# Introduction

**CineDream is a color grading plugin.**

You can use it to color grade video, as it works with Adobe Premiere Pro, Final Cut and DaVinci Resolve.  Or use it to color grade photos, as it works with Lightroom Classic and Photoshop.  Plus, you can use it in standalone mode, as an independent app, to color grade photos.

CineDream will let you:

-Perform a base correction, fixing any exposure and balance issues.

-Organize your footage or photos into groups to quickly copy corrections between images and match them.

-And apply a final grade or look grade to each group for that final cinematic feel.

To accomplish this you’ll be able to use traditional tools like sliders, wheels and curves as well as direct on screen grading, which let’s you control all those tools, just by clicking and dragging over the image.

This page is a technical manual where you’ll find all the information needed to install, navigate and use CineDream.


# Buy CineDream

You can buy CineDream from the official website.

In the pricing section, just select the version of CineDream you want to buy.

<figure><img src="https://1449894025-files.gitbook.io/~/files/v0/b/gitbook-x-prod.appspot.com/o/spaces%2FXV6dIa2ZTHDKnFjYTLCU%2Fuploads%2FAST60P5Em55ta78DLjdT%2FScreenshot%202025-09-14%20at%208.57.42%E2%80%AFAM.png?alt=media&amp;token=3d3e6fe4-6f31-42d8-8884-d927523a4fac" alt="" width="563"><figcaption></figcaption></figure>

You can choose an Annual Subscription, which will give you ongoing access to new features, maintenance updates and technical support.

Or choose a Perpetual License, which will give you access to new features, maintenance updates and technical support for 30 months with the option to extend that support yearly.

Both options will give you access to CineDream for all host softwares (Premiere, Final Cut, Resolve, Lightroom Classic and Photoshop) as well as the standalone version, for both Mac and Windows.

Each license supports up to two devices, and you can easily deactivate a license and assign it to another device.

If you have any questions or need additional support you can email us at: <support@cinedream.io>


# License Manager & Downloads

After completing purchase, you’ll be taken to a page with 3 sections for activation, downloading CineDream and watching the Getting Started tutorials.

<figure><img src="https://1449894025-files.gitbook.io/~/files/v0/b/gitbook-x-prod.appspot.com/o/spaces%2FXV6dIa2ZTHDKnFjYTLCU%2Fuploads%2FfCOIQYwT74yLxSiYfzBU%2Fpurchase.00_01_04_18.Still003.png?alt=media&amp;token=3c18ddc5-242f-4ccf-a1e7-aa5192d0fe32" alt=""><figcaption></figcaption></figure>

Check your email for a message from support that contains your License Key.

<figure><img src="https://1449894025-files.gitbook.io/~/files/v0/b/gitbook-x-prod.appspot.com/o/spaces%2FXV6dIa2ZTHDKnFjYTLCU%2Fuploads%2FoMewAgG5aUV19UQ5JM35%2Fpurchase.00_04_35_19.Still015.png?alt=media&amp;token=10c7c948-6844-411a-bb59-d33193f5fe97" alt=""><figcaption></figcaption></figure>

In case you can’t find the email, use the License Manager link in this section.

<figure><img src="https://1449894025-files.gitbook.io/~/files/v0/b/gitbook-x-prod.appspot.com/o/spaces%2FXV6dIa2ZTHDKnFjYTLCU%2Fuploads%2F3g00aDMGNdqIlW1CJVY2%2Fpurchase.00_01_03_26.Still016.png?alt=media&amp;token=6c3cb23f-22d7-4320-aec9-fc0812237156" alt=""><figcaption></figcaption></figure>

The link will take you to <https://lm.cinedream.io> . Enter the email address you used during purchase.

<figure><img src="https://1449894025-files.gitbook.io/~/files/v0/b/gitbook-x-prod.appspot.com/o/spaces%2FXV6dIa2ZTHDKnFjYTLCU%2Fuploads%2FpALzHH30vwp8dlfYppC8%2Fpurchase.00_01_30_27.Still018.png?alt=media&amp;token=91342469-7060-41b0-b9ea-ede76a5a7c7d" alt=""><figcaption></figcaption></figure>

You'll get an email with direct access to your License Manager.

<figure><img src="https://1449894025-files.gitbook.io/~/files/v0/b/gitbook-x-prod.appspot.com/o/spaces%2FXV6dIa2ZTHDKnFjYTLCU%2Fuploads%2FVBdr2RU7kHrggDh5gvFj%2Fpurchase.00_01_46_11.Still019.png?alt=media&amp;token=fe606325-696c-47c5-be10-48331e75dae1" alt=""><figcaption></figcaption></figure>

<figure><img src="https://1449894025-files.gitbook.io/~/files/v0/b/gitbook-x-prod.appspot.com/o/spaces%2FXV6dIa2ZTHDKnFjYTLCU%2Fuploads%2FLFAZKrr1pQN2IczhHSZj%2Fpurchase.00_01_57_20.Still006.png?alt=media&amp;token=34d57496-c8bc-43c7-950a-0517921c8992" alt=""><figcaption></figcaption></figure>

Inside the License Manager you'll find 3 sections.&#x20;

**Download Area:** For downloading the latest or previous versions of CineDream.

**Getting Started:** With links to instructions on how to install and use CineDream.

**Your License(s):** Where you'll find your license key, activations and the option to extend support or manage your subscription.

<figure><img src="https://1449894025-files.gitbook.io/~/files/v0/b/gitbook-x-prod.appspot.com/o/spaces%2FXV6dIa2ZTHDKnFjYTLCU%2Fuploads%2F4AduBe1cIOBsJjNY88oc%2Fpurchase.00_02_07_00.Still020.png?alt=media&amp;token=5a2e81d1-3266-46dc-ae84-a83d6b9929a1" alt=""><figcaption></figcaption></figure>

If you are already using CineDream, you can access the License Manager from the Help Menu. Click on Registration and then Manage License.

<figure><img src="https://1449894025-files.gitbook.io/~/files/v0/b/gitbook-x-prod.appspot.com/o/spaces%2FXV6dIa2ZTHDKnFjYTLCU%2Fuploads%2FovT9Y42iK9R2OyR8wjx9%2FScreenshot%202025-10-01%20at%2010.00.23%E2%80%AFAM.png?alt=media&amp;token=bc1d4572-100a-4587-afa7-88f97db7169d" alt=""><figcaption></figcaption></figure>

<figure><img src="https://1449894025-files.gitbook.io/~/files/v0/b/gitbook-x-prod.appspot.com/o/spaces%2FXV6dIa2ZTHDKnFjYTLCU%2Fuploads%2F5sl5mLBNlzAgZZ0eVgGd%2FScreenshot%202025-10-01%20at%2010.02.02%E2%80%AFAM.png?alt=media&amp;token=f5811555-9717-436a-b1e8-fa5a70159e2b" alt="" width="375"><figcaption></figcaption></figure>

This will take you to <https://lm.cinedream.io> . Follow the same steps as before from there.

<figure><img src="https://1449894025-files.gitbook.io/~/files/v0/b/gitbook-x-prod.appspot.com/o/spaces%2FXV6dIa2ZTHDKnFjYTLCU%2Fuploads%2FpALzHH30vwp8dlfYppC8%2Fpurchase.00_01_30_27.Still018.png?alt=media&amp;token=91342469-7060-41b0-b9ea-ede76a5a7c7d" alt=""><figcaption></figcaption></figure>


# System Requirements

## Mac OS Silicon

**Minimum System Requirements:**

***

* **Operating System:** macOS 13.4 or later
* **Memory:** 16 GB RAM
* **GPU:** Integrated Apple GPU supported
* **Software Compatibility:**
  * Adobe Premiere Pro 2025 or later
  * DaVinci Resolve 20 or later
  * Final Cut Pro X 11.1 or later
  * Adobe Photoshop 2022 or later
  * Adobe Lightroom Classic 202 or later

## Mac OS Intel

**Minimum System Requirements:**

***

* **Operating System:** macOS 13.4 or later
* **Memory:** 16 GB RAM
* **GPU:**
  * Discrete AMD GPU with 4 GB VRAM
  * Integrated Intel GPUs not supported
* **Software Compatibility:**
  * Adobe Premiere Pro 2025 or later
  * DaVinci Resolve 20 or later
  * Final Cut Pro X 11.1 or later
  * Adobe Photoshop 2022 or later
  * Adobe Lightroom Classic 2022 or later

## Windows

**Minimum System Requirements**

***

* **Operating System:** Windows 10 or 11
* **Memory**: 16 GB RAM
* **Graphics**:
  * NVIDIA RTX 1060 or better (CUDA compute 6.1+)
  * AMD Radeon RX6600 or better
  * AMD Radeon Pro W5500 or better
* **Software Compatibility**:
  * Adobe Premiere Pro 2025 or later
  * DaVinci Resolve 20 or later
  * Adobe Photoshop 2022 or later
  * Adobe Lightroom Classic 2022 or later

***


# Installation & Activation

In this section you'll find guides to install CineDream on your Mac or Windows computer as well as how to activate your license.

{% content-ref url="/pages/6vmdu7886oEGu8cScxsj" %}
[Installation & Activation on Mac](/installation-and-activation/installation-and-activation-on-mac)
{% endcontent-ref %}

{% content-ref url="/pages/lXTxTEG7NRICFAIJNNng" %}
[Installation & Activation on Windows](/installation-and-activation/installation-and-activation-on-windows)
{% endcontent-ref %}

Alternatively if you don't own a CineDream license and just want to test drive the software, in the activation window you can choose Demo Mode.  In Demo Mode you will have access to all the tools and options inside CineDream but images will be displayed with a watermark.

<figure><img src="https://1449894025-files.gitbook.io/~/files/v0/b/gitbook-x-prod.appspot.com/o/spaces%2FXV6dIa2ZTHDKnFjYTLCU%2Fuploads%2FkmyrUefkCRgyJDhtAoso%2FScreenshot%202025-10-24%20at%2011.36.34%E2%80%AFAM.png?alt=media&amp;token=f4c378e2-d2af-4950-8e5d-63157335726e" alt="" width="375"><figcaption></figcaption></figure>


# Installation & Activation on Mac

{% embed url="<https://colorgradingcentral.wistia.com/medias/64ucq7tq74>" %}

On Mac, open the .dmg file downloaded from the license manager.  Double click the Install Icon and follow the prompts.

After installation you’ll be able to use CineDream on all host software and as a standalone app. To activate your license, copy your license from the license manager, then open CineDream and click on Activate, paste the license and follow the prompts.

<figure><img src="https://1449894025-files.gitbook.io/~/files/v0/b/gitbook-x-prod.appspot.com/o/spaces%2FXV6dIa2ZTHDKnFjYTLCU%2Fuploads%2FyvjMEuHJlcHJr1MxKgy1%2FScreenshot%202025-09-14%20at%209.00.50%E2%80%AFAM.png?alt=media&amp;token=923eb99a-39b0-4dc6-88c3-5f6030db275b" alt=""><figcaption><p>License Manager</p></figcaption></figure>

<figure><img src="https://1449894025-files.gitbook.io/~/files/v0/b/gitbook-x-prod.appspot.com/o/spaces%2FXV6dIa2ZTHDKnFjYTLCU%2Fuploads%2FJUPRbn3zeqnX4n4Ktcpy%2FScreenshot%202025-03-13%20at%206.53.08%E2%80%AFPM.png?alt=media&amp;token=8c19b5c2-2de4-477a-96e4-a87edb808440" alt="" width="375"><figcaption><p>Registration Panel</p></figcaption></figure>

<figure><img src="https://1449894025-files.gitbook.io/~/files/v0/b/gitbook-x-prod.appspot.com/o/spaces%2FXV6dIa2ZTHDKnFjYTLCU%2Fuploads%2FTpR6GECTOCjeAhXAqpYl%2FScreenshot%202025-03-13%20at%206.54.37%E2%80%AFPM.png?alt=media&amp;token=2868a31b-6b5d-4087-bb31-d3722b47fb5a" alt="" width="375"><figcaption><p>Copy your License</p></figcaption></figure>


# Installation & Activation on Windows

{% embed url="<https://colorgradingcentral.wistia.com/medias/3rvb0smcqf>" %}

On Windows, open the .msi file downloaded from the license manager and follow the prompts.

After installation you’ll be able to use CineDream on all host software and as a standalone app. To activate your license, copy your license from the license manager, then open CineDream and click on Activate, paste the license and follow the prompts.

<figure><img src="https://1449894025-files.gitbook.io/~/files/v0/b/gitbook-x-prod.appspot.com/o/spaces%2FXV6dIa2ZTHDKnFjYTLCU%2Fuploads%2FyvjMEuHJlcHJr1MxKgy1%2FScreenshot%202025-09-14%20at%209.00.50%E2%80%AFAM.png?alt=media&amp;token=923eb99a-39b0-4dc6-88c3-5f6030db275b" alt=""><figcaption><p>License Manager</p></figcaption></figure>

<figure><img src="https://1449894025-files.gitbook.io/~/files/v0/b/gitbook-x-prod.appspot.com/o/spaces%2FXV6dIa2ZTHDKnFjYTLCU%2Fuploads%2FJUPRbn3zeqnX4n4Ktcpy%2FScreenshot%202025-03-13%20at%206.53.08%E2%80%AFPM.png?alt=media&amp;token=8c19b5c2-2de4-477a-96e4-a87edb808440" alt="" width="375"><figcaption><p>Registration Panel</p></figcaption></figure>

<figure><img src="https://1449894025-files.gitbook.io/~/files/v0/b/gitbook-x-prod.appspot.com/o/spaces%2FXV6dIa2ZTHDKnFjYTLCU%2Fuploads%2FTpR6GECTOCjeAhXAqpYl%2FScreenshot%202025-03-13%20at%206.54.37%E2%80%AFPM.png?alt=media&amp;token=2868a31b-6b5d-4087-bb31-d3722b47fb5a" alt="" width="375"><figcaption><p>Copy your License</p></figcaption></figure>


# How to Apply CineDream


# Adobe Premiere Pro

{% embed url="<https://colorgradingcentral.wistia.com/medias/fravze0g1v>" %}

In **Adobe Premiere Pro** look for CineDream in the Effects panel and drag it to a clip.  For multiple clips, select the clips first, then drag the CineDream effect to them.

<figure><img src="https://1449894025-files.gitbook.io/~/files/v0/b/gitbook-x-prod.appspot.com/o/spaces%2FXV6dIa2ZTHDKnFjYTLCU%2Fuploads%2FTlReQ6hG21vaGqoxqCFB%2FScreenshot%202025-09-13%20at%2012.53.41%E2%80%AFPM.png?alt=media&amp;token=e2259d3f-23a8-426c-a151-c2c95b7d6e90" alt="" width="277"><figcaption><p>Look for CineDream in the Effects Panel</p></figcaption></figure>

Then go to the Effects Control panel, look for CineDream and click on Open Controls to launch CineDream.

<figure><img src="https://1449894025-files.gitbook.io/~/files/v0/b/gitbook-x-prod.appspot.com/o/spaces%2FXV6dIa2ZTHDKnFjYTLCU%2Fuploads%2FhHDODHGvZndafkAj7KeD%2FScreenshot%202025-09-13%20at%2012.54.39%E2%80%AFPM.png?alt=media&amp;token=5bf71688-14a6-424f-9a6a-1dd3848a362b" alt="" width="375"><figcaption><p>Effects Control Panel</p></figcaption></figure>

After applying CineDream to the clips, another way to open it besides the Open Controls button is to open CineDream as a standalone app and choose Open a grading session within host.  This will open a session containing the clips in your timeline to which you applied CineDream to.

<figure><img src="https://1449894025-files.gitbook.io/~/files/v0/b/gitbook-x-prod.appspot.com/o/spaces%2FXV6dIa2ZTHDKnFjYTLCU%2Fuploads%2FfX2ZCrUxl9Il9IQfpAzw%2FScreenshot%202025-03-13%20at%207.49.05%E2%80%AFPM.png?alt=media&amp;token=f03db28a-4fda-4325-9d39-330c4b44edc8" alt="" width="172"><figcaption><p>Open a grading session within host</p></figcaption></figure>

Once you are happy with your corrections and grades it is time to send them back to Premiere.  Select Apply from the top right corner, then you can minimize or close CineDream. Back to Premiere, all your clips will have the grade applied.

<figure><img src="https://1449894025-files.gitbook.io/~/files/v0/b/gitbook-x-prod.appspot.com/o/spaces%2FXV6dIa2ZTHDKnFjYTLCU%2Fuploads%2FZ8okGxOLqs7jdFajvBc7%2FScreenshot%202025-03-13%20at%209.10.01%E2%80%AFPM.png?alt=media&amp;token=d377e201-c183-4ba6-a3a8-a8e1e13e9401" alt=""><figcaption></figcaption></figure>

Additionally you can export stills from the video clips using the Share Button at the top right corner.

<figure><img src="https://1449894025-files.gitbook.io/~/files/v0/b/gitbook-x-prod.appspot.com/o/spaces%2FXV6dIa2ZTHDKnFjYTLCU%2Fuploads%2FBufHXbyJymVZaKnkMOnq%2FScreenshot%202025-09-14%20at%207.52.42%E2%80%AFAM.png?alt=media&amp;token=3ecde1b8-a215-47bc-bc93-fb51a0b18d78" alt="" width="273"><figcaption><p>Share</p></figcaption></figure>

When selecting Export or Batch Export you’ll be taken to the **Export Image Panel**.  There you can choose the File Name, Location, Aspect Ratio, Format and Resolution.  The Aspect section let’s you crop the image either manually or with one of 4 presets of commonly used aspect ratios.  On the preview window on the right you can customize the crop.

<figure><img src="https://1449894025-files.gitbook.io/~/files/v0/b/gitbook-x-prod.appspot.com/o/spaces%2FXV6dIa2ZTHDKnFjYTLCU%2Fuploads%2FLoZJs7tO5eqiLClTirJs%2FScreenshot%202025-03-13%20at%208.10.57%E2%80%AFPM.png?alt=media&amp;token=77bc5fb0-4348-4d0e-b99b-5cf30a9c7eb6" alt=""><figcaption><p>Export Image Panel</p></figcaption></figure>


# Final Cut Pro

{% embed url="<https://colorgradingcentral.wistia.com/medias/sreu3o6dce>" %}

In **Final Cut Pro** look for CineDream in the Effects panel and drag it to a clip.  For multiple clips, select the clips first, then double click on the CineDream effect.

<figure><img src="https://1449894025-files.gitbook.io/~/files/v0/b/gitbook-x-prod.appspot.com/o/spaces%2FXV6dIa2ZTHDKnFjYTLCU%2Fuploads%2FcZMtsiCGiGn1Jqg0bFFw%2FScreenshot%202025-09-14%20at%207.56.49%E2%80%AFAM.png?alt=media&amp;token=30212ae4-2bab-43c6-8133-31a1aa0f6dc6" alt="" width="375"><figcaption><p>Look for CineDream in the Effects Panel</p></figcaption></figure>

Then go to the Inspector panel, look for CineDream and click on Open Controls to launch CineDream.

<figure><img src="https://1449894025-files.gitbook.io/~/files/v0/b/gitbook-x-prod.appspot.com/o/spaces%2FXV6dIa2ZTHDKnFjYTLCU%2Fuploads%2FPlraoGWEZ5WhKeOx9Y2X%2FScreenshot%202025-09-14%20at%207.57.26%E2%80%AFAM.png?alt=media&amp;token=23aee1c8-17be-4401-80b4-0a21da71ab06" alt="" width="375"><figcaption><p>Inspector</p></figcaption></figure>

After applying CineDream to the clips, another way to open it besides the Open Controls button is to open CineDream as a standalone app and choose Open a grading session within host.  This will open a session containing the clips in your timeline to which you applied CineDream to.

<figure><img src="https://1449894025-files.gitbook.io/~/files/v0/b/gitbook-x-prod.appspot.com/o/spaces%2FXV6dIa2ZTHDKnFjYTLCU%2Fuploads%2FfX2ZCrUxl9Il9IQfpAzw%2FScreenshot%202025-03-13%20at%207.49.05%E2%80%AFPM.png?alt=media&amp;token=f03db28a-4fda-4325-9d39-330c4b44edc8" alt="" width="172"><figcaption><p>Open a grading session within host</p></figcaption></figure>

Once you are happy with your corrections and grades it is time to send them back to Final Cut.  Select Apply from the top right corner, then you can minimize or close CineDream. Back to Final Cut, all your clips will have the grade applied.

<figure><img src="https://1449894025-files.gitbook.io/~/files/v0/b/gitbook-x-prod.appspot.com/o/spaces%2FXV6dIa2ZTHDKnFjYTLCU%2Fuploads%2FZ8okGxOLqs7jdFajvBc7%2FScreenshot%202025-03-13%20at%209.10.01%E2%80%AFPM.png?alt=media&amp;token=d377e201-c183-4ba6-a3a8-a8e1e13e9401" alt=""><figcaption></figcaption></figure>

Additionally you can export stills from the video clips using the Share Button at the top right corner.

<figure><img src="https://1449894025-files.gitbook.io/~/files/v0/b/gitbook-x-prod.appspot.com/o/spaces%2FXV6dIa2ZTHDKnFjYTLCU%2Fuploads%2FBufHXbyJymVZaKnkMOnq%2FScreenshot%202025-09-14%20at%207.52.42%E2%80%AFAM.png?alt=media&amp;token=3ecde1b8-a215-47bc-bc93-fb51a0b18d78" alt="" width="273"><figcaption><p>Share</p></figcaption></figure>

When selecting Export or Batch Export you’ll be taken to the **Export Image Panel**.  There you can choose the File Name, Location, Aspect Ratio, Format and Resolution.  The Aspect section let’s you crop the image either manually or with one of 4 presets of commonly used aspect ratios.  On the preview window on the right you can customize the crop.

<figure><img src="https://1449894025-files.gitbook.io/~/files/v0/b/gitbook-x-prod.appspot.com/o/spaces%2FXV6dIa2ZTHDKnFjYTLCU%2Fuploads%2FLoZJs7tO5eqiLClTirJs%2FScreenshot%202025-03-13%20at%208.10.57%E2%80%AFPM.png?alt=media&amp;token=77bc5fb0-4348-4d0e-b99b-5cf30a9c7eb6" alt=""><figcaption><p>Export Image Panel</p></figcaption></figure>


# DaVinci Resolve

{% embed url="<https://colorgradingcentral.wistia.com/medias/vchmh4ypbf>" %}

In **DaVinci Resolve** you can apply CineDream in the Edit and Color pages.

In the Edit Page look for CineDream in the Effects panel and drag it to a clip.  For multiple clips, select the clips first, then drag the CineDream effect to them.

<figure><img src="https://1449894025-files.gitbook.io/~/files/v0/b/gitbook-x-prod.appspot.com/o/spaces%2FXV6dIa2ZTHDKnFjYTLCU%2Fuploads%2FxvoNuxNlrQJ1Vc3NM04v%2FScreenshot%202025-09-14%20at%208.10.50%E2%80%AFAM.png?alt=media&amp;token=3873187d-c78c-4239-bd7e-8ad794b57af8" alt="" width="375"><figcaption><p>Looks for CineDream in the Effects Panel</p></figcaption></figure>

Then go to the Inspector panel, look for CineDream and click on Open Controls to launch CineDream.

<figure><img src="https://1449894025-files.gitbook.io/~/files/v0/b/gitbook-x-prod.appspot.com/o/spaces%2FXV6dIa2ZTHDKnFjYTLCU%2Fuploads%2FGMgLZZvzxUqLaAWbE8M8%2FScreenshot%202025-09-14%20at%208.11.18%E2%80%AFAM.png?alt=media&amp;token=6a30244f-9921-4c7e-bbaf-7325f36e9a34" alt="" width="375"><figcaption><p>Inspector</p></figcaption></figure>

In the Color Page you can apply CineDream to a node, then clicking Open Controls to launch CineDream.

<figure><img src="https://1449894025-files.gitbook.io/~/files/v0/b/gitbook-x-prod.appspot.com/o/spaces%2FXV6dIa2ZTHDKnFjYTLCU%2Fuploads%2FvKXzfR6PQ0oYAZNgaeLb%2FScreenshot%202025-09-14%20at%208.11.32%E2%80%AFAM.png?alt=media&amp;token=dd426f52-76e2-481e-b946-20df756cfae9" alt="" width="375"><figcaption><p>OFX panel in Resolve's Color Page</p></figcaption></figure>

<figure><img src="https://1449894025-files.gitbook.io/~/files/v0/b/gitbook-x-prod.appspot.com/o/spaces%2FXV6dIa2ZTHDKnFjYTLCU%2Fuploads%2FzgERwknKeM9D0DSZUyoq%2FScreenshot%202025-09-14%20at%208.11.54%E2%80%AFAM.png?alt=media&amp;token=f3c72aa6-df95-4033-b77e-76a8832bc82f" alt="" width="375"><figcaption><p>CineDream in the Effects Panel</p></figcaption></figure>

After applying CineDream to the clips, another way to open it besides the Open Controls button is to open CineDream as a standalone app and choose Open a grading session within host.  This will open a session containing the clips in your timeline to which you applied CineDream to.

<figure><img src="https://1449894025-files.gitbook.io/~/files/v0/b/gitbook-x-prod.appspot.com/o/spaces%2FXV6dIa2ZTHDKnFjYTLCU%2Fuploads%2FfX2ZCrUxl9Il9IQfpAzw%2FScreenshot%202025-03-13%20at%207.49.05%E2%80%AFPM.png?alt=media&amp;token=f03db28a-4fda-4325-9d39-330c4b44edc8" alt="" width="172"><figcaption><p>Open a grading session within host</p></figcaption></figure>

Once you are happy with your corrections and grade it is time to send them back to Resolve.  Select Apply from the top right corner, then you can minimize or close CineDream. Back to Resolve, go to the Inspector panel and hit the Apply button in the CineDream effect. The grade will be applied to the clip.

<figure><img src="https://1449894025-files.gitbook.io/~/files/v0/b/gitbook-x-prod.appspot.com/o/spaces%2FXV6dIa2ZTHDKnFjYTLCU%2Fuploads%2FZ8okGxOLqs7jdFajvBc7%2FScreenshot%202025-03-13%20at%209.10.01%E2%80%AFPM.png?alt=media&amp;token=d377e201-c183-4ba6-a3a8-a8e1e13e9401" alt=""><figcaption></figcaption></figure>

In Resolve, CineDream has two pages instead of three, Base Correction and Final Grading. This is because Resolve can’t send multiple clips at a time to CineDream. To quickly move on to the next clip, just select the clip in Resolve, switch back to CineDream (use cmd/ctrl + tab to quickly toggle between apps) and click Refresh for the new clip to load.

\
Alternatively you can use CineDream at a group or timeline level as a color management/film emulation/grading tool. You can start by adding CineDream to a group, setting the input color profile, film emulation and final grade, then go back at a clip level to use Resolve’s native tool for base correction and matching.

Additionally you can export stills from video clips using the Share Button at the top right corner.&#x20;

<figure><img src="https://1449894025-files.gitbook.io/~/files/v0/b/gitbook-x-prod.appspot.com/o/spaces%2FXV6dIa2ZTHDKnFjYTLCU%2Fuploads%2FBufHXbyJymVZaKnkMOnq%2FScreenshot%202025-09-14%20at%207.52.42%E2%80%AFAM.png?alt=media&amp;token=3ecde1b8-a215-47bc-bc93-fb51a0b18d78" alt="" width="273"><figcaption><p>Share</p></figcaption></figure>

When selecting Export or Batch Export you’ll be taken to the **Export Image Panel**.  There you can choose the File Name, Location, Aspect Ratio, Format and Resolution.  The Aspect section let’s you crop the image either manually or with one of 4 presets of commonly used aspect ratios.  On the preview window on the right you can customize the crop.

<figure><img src="https://1449894025-files.gitbook.io/~/files/v0/b/gitbook-x-prod.appspot.com/o/spaces%2FXV6dIa2ZTHDKnFjYTLCU%2Fuploads%2FLoZJs7tO5eqiLClTirJs%2FScreenshot%202025-03-13%20at%208.10.57%E2%80%AFPM.png?alt=media&amp;token=77bc5fb0-4348-4d0e-b99b-5cf30a9c7eb6" alt=""><figcaption><p>Export Image Panel</p></figcaption></figure>


# Adobe Photoshop

{% embed url="<https://colorgradingcentral.wistia.com/medias/10mpoe2k61>" %}

In **Adobe** **Photoshop**, open CineDream as a standalone app, then go back to Photoshop, go to Plugins and select CineDream, then choose between sending the image or a layer to CineDream and they will load inside CineDream.  The first time you use CineDream in Photoshop you will have to choose a location for temporary files.

<figure><img src="https://1449894025-files.gitbook.io/~/files/v0/b/gitbook-x-prod.appspot.com/o/spaces%2FXV6dIa2ZTHDKnFjYTLCU%2Fuploads%2F3D2LzBuYxIhGZNTJZ68M%2FScreenshot%202025-09-14%20at%208.20.30%E2%80%AFAM.png?alt=media&amp;token=af7b3d54-4542-4327-a854-7d81ae95ad01" alt="" width="301"><figcaption><p>CineDream in the Plugins Panel</p></figcaption></figure>

<figure><img src="https://1449894025-files.gitbook.io/~/files/v0/b/gitbook-x-prod.appspot.com/o/spaces%2FXV6dIa2ZTHDKnFjYTLCU%2Fuploads%2FWkXwEHKAFrW3TKoLcJMw%2FScreenshot%202025-09-14%20at%208.19.39%E2%80%AFAM.png?alt=media&amp;token=7dfc0a17-e698-4867-b4e6-4f58e71d585c" alt="" width="340"><figcaption><p>CineDream Panel</p></figcaption></figure>

Once you are done with the grade hit the Share button on the top right corner.  Then select Send to Photoshop from the dropdown menu.  Back to Photoshop, you'll find the graded images. Alternatively you can go back to Photoshop and select Retrieve as New Image or as New Layer.

<figure><img src="https://1449894025-files.gitbook.io/~/files/v0/b/gitbook-x-prod.appspot.com/o/spaces%2FXV6dIa2ZTHDKnFjYTLCU%2Fuploads%2FtaY8cHWpjkHgiuvontrM%2FScreenshot%202025-09-14%20at%208.24.19%E2%80%AFAM.png?alt=media&amp;token=d469c0fb-c03e-4933-bb29-fdb14eedc7e6" alt="" width="274"><figcaption><p>Share</p></figcaption></figure>


# Adobe Lightroom Classic

{% embed url="<https://colorgradingcentral.wistia.com/medias/cy06udq883>" %}

In **Adobe** **Lightroom Classic**, select one or more photos, right click, go to Edit In from the dropdown contextual menu, and select CineDream.  CineDream will open up and load those photos.

<figure><img src="https://1449894025-files.gitbook.io/~/files/v0/b/gitbook-x-prod.appspot.com/o/spaces%2FXV6dIa2ZTHDKnFjYTLCU%2Fuploads%2FS4xrdbA0xZaQgoyGRsqu%2FScreenshot%202025-09-14%20at%208.26.39%E2%80%AFAM.png?alt=media&amp;token=41a7c8b7-94fd-4f69-bb5e-4184ca9d7504" alt="" width="563"><figcaption><p>Sending photos from Lightroom Classic to CineDream</p></figcaption></figure>

Once you are done with the grade hit the Share button on the top right corner.  Then select Save image(s) to Lightroom from the dropdown menu.  Back to Lightroom, you'll find the graded images.&#x20;

<figure><img src="https://1449894025-files.gitbook.io/~/files/v0/b/gitbook-x-prod.appspot.com/o/spaces%2FXV6dIa2ZTHDKnFjYTLCU%2Fuploads%2FtaY8cHWpjkHgiuvontrM%2FScreenshot%202025-09-14%20at%208.24.19%E2%80%AFAM.png?alt=media&amp;token=d469c0fb-c03e-4933-bb29-fdb14eedc7e6" alt="" width="274"><figcaption><p>Share</p></figcaption></figure>


# Standalone Mode

{% embed url="<https://colorgradingcentral.wistia.com/medias/p3z82tpyk3>" %}

In Standalone Mode, CineDream works as any independent app.  Open the app and choose Add New Photos to import photos through Finder/Browser or drag the photos directly into CineDream.&#x20;

If this is not the first time using CineDream and you already saved projects you can choose Open an existing photo project or choose a project from the Recent Photo projects section at the bottom.

<figure><img src="https://1449894025-files.gitbook.io/~/files/v0/b/gitbook-x-prod.appspot.com/o/spaces%2FXV6dIa2ZTHDKnFjYTLCU%2Fuploads%2FlVekwJT64fLBEefqRFoc%2FScreenshot%202025-03-13%20at%207.56.06%E2%80%AFPM.png?alt=media&amp;token=c73813fe-ccdd-4255-9895-29861a821ee8" alt="" width="375"><figcaption><p>Open a Standalone project</p></figcaption></figure>

Once you are done with the grade hit the Share button on the top right corner.  A contextual menu will be displayed with these options:

<figure><img src="https://1449894025-files.gitbook.io/~/files/v0/b/gitbook-x-prod.appspot.com/o/spaces%2FXV6dIa2ZTHDKnFjYTLCU%2Fuploads%2FtaY8cHWpjkHgiuvontrM%2FScreenshot%202025-09-14%20at%208.24.19%E2%80%AFAM.png?alt=media&amp;token=d469c0fb-c03e-4933-bb29-fdb14eedc7e6" alt="" width="274"><figcaption><p>Share menu</p></figcaption></figure>

**Quick Save (Duplicate):** To save a duplicate of the current image. &#x20;

**Export Image(s):** To export 1 or more images.  You can export the image you are currently parked at or select multiple images in the FilmStrip (more on that in the FilmStrip section).

**Batch Export all Grade Images:** To export only the graded images in the project.

**Batch export all images:** To export all the images in the project.

When selecting Export or Batch Export you’ll be taken to the **Export Image Panel**.  There you can choose the File Name, Location, Aspect Ratio, Format and Resolution.  The Aspect section let’s you crop the image either manually or with one of 4 presets of commonly used aspect ratios.  On the preview window on the right you can customize the crop.

<figure><img src="https://1449894025-files.gitbook.io/~/files/v0/b/gitbook-x-prod.appspot.com/o/spaces%2FXV6dIa2ZTHDKnFjYTLCU%2Fuploads%2FLoZJs7tO5eqiLClTirJs%2FScreenshot%202025-03-13%20at%208.10.57%E2%80%AFPM.png?alt=media&amp;token=77bc5fb0-4348-4d0e-b99b-5cf30a9c7eb6" alt=""><figcaption><p>Export Image Panel</p></figcaption></figure>

**Share Project:** This option is exclusive to projects created for photos.  It will let you create a .cdp file containing your project so you can back it up or move it to a different computer.  In the case of video host applications, the project is contained within your video editing software project. Additionally you’ll find options to send the image you are currently working at to Photoshop or Lightroom Classic.


# Color Management

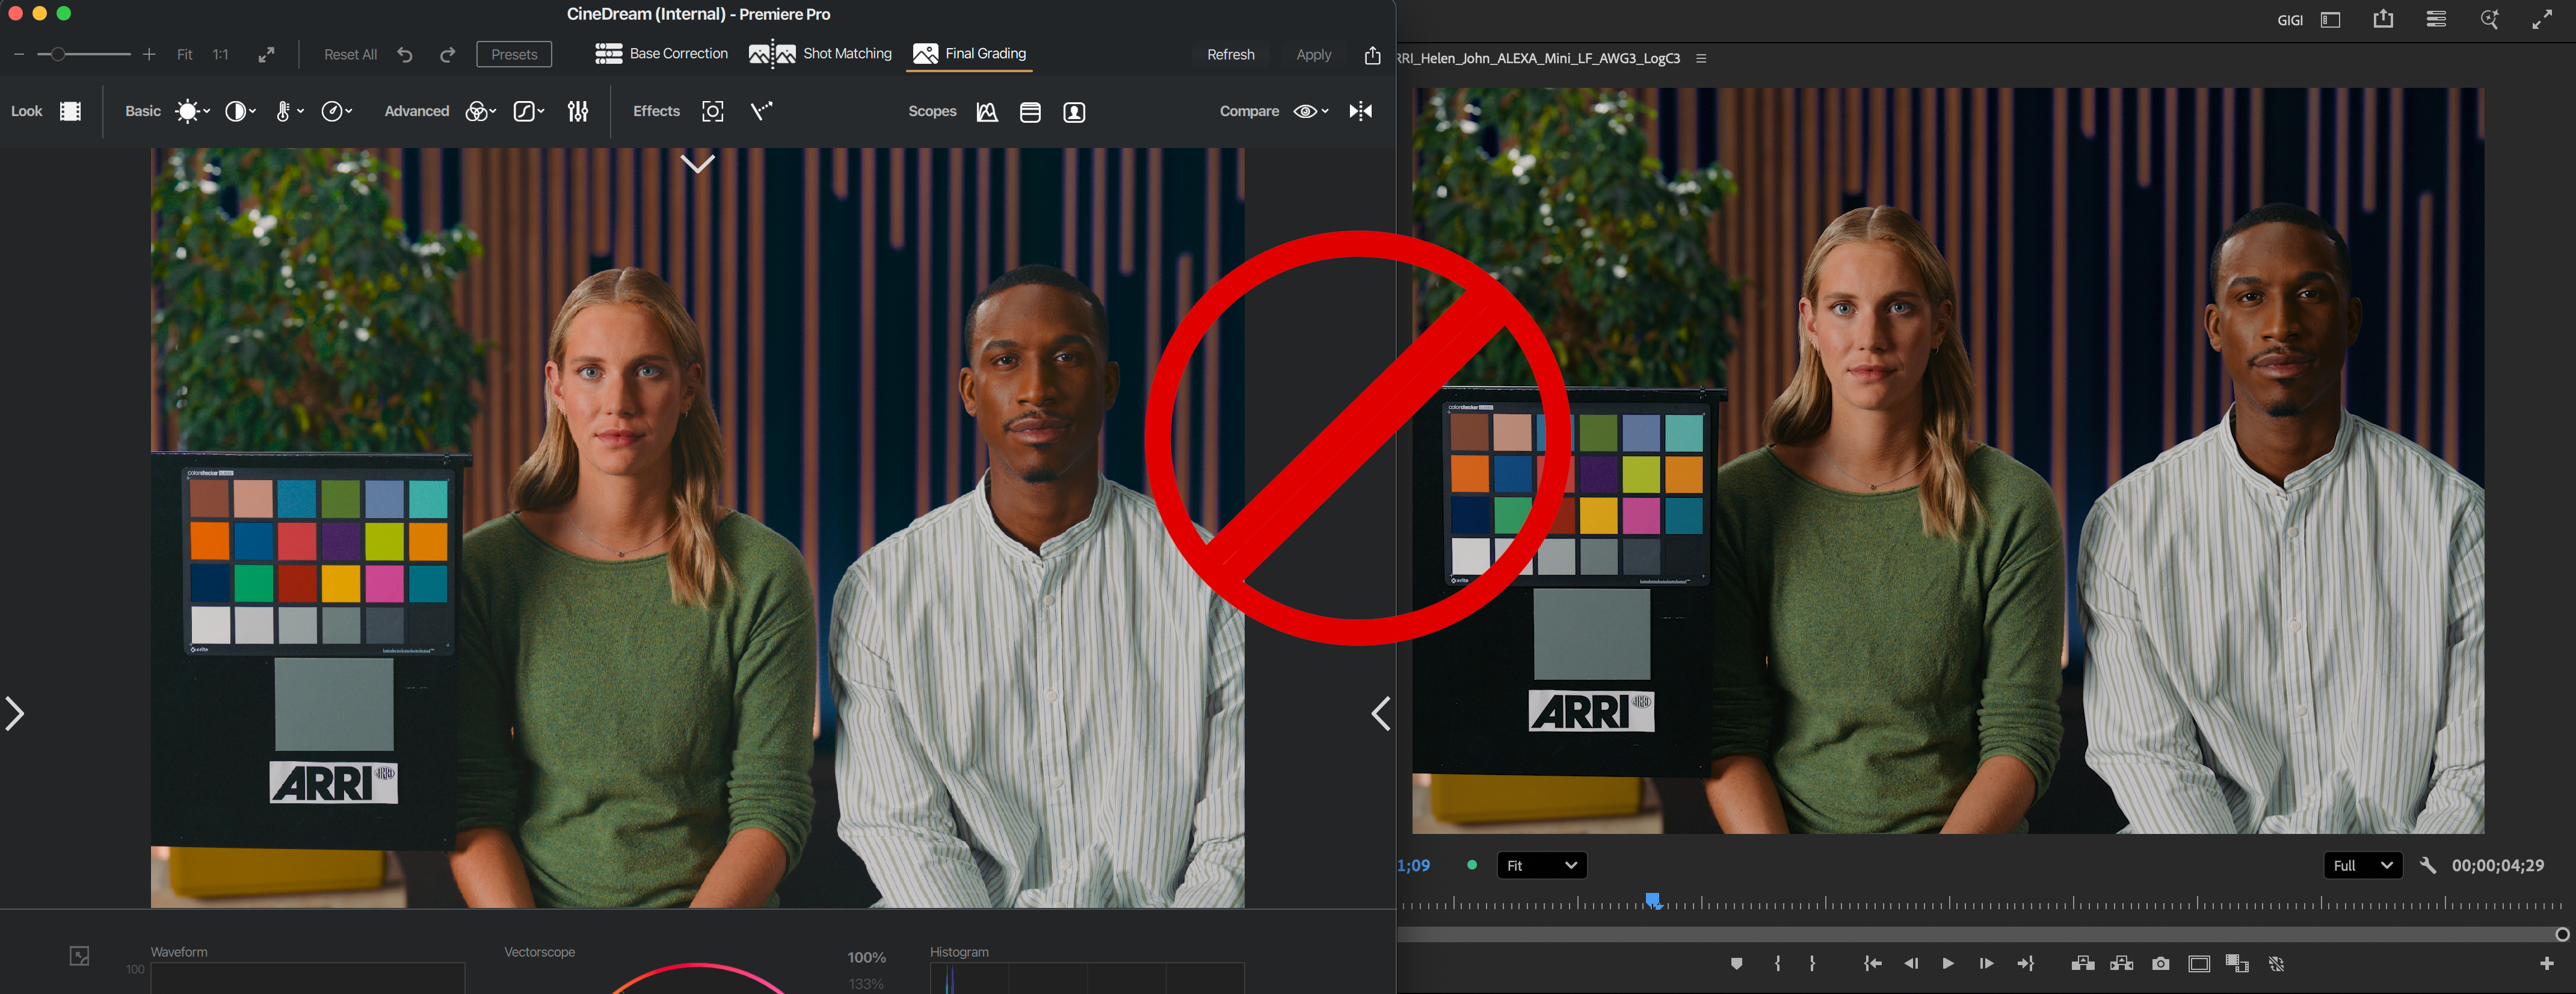
<figure><img src="https://1449894025-files.gitbook.io/~/files/v0/b/gitbook-x-prod.appspot.com/o/spaces%2FXV6dIa2ZTHDKnFjYTLCU%2Fuploads%2FothHCXhIGrVOOrx0osvu%2Fmismatch.png?alt=media&amp;token=a29bde7e-7db5-4d24-bc77-b61497320d7a" alt=""><figcaption><p>CineDream viewer vs Adobe Premiere Pro Viewer mismatch</p></figcaption></figure>

If you are experiencing mismatch issues between what you see in CineDream’s viewer and in the host application, it is most likely a color management issue.&#x20;

We want to make sure both the host application and CineDream are working in the same color space and gamma.  CineDream delivers in the Rec709 color space and can be set to use gamma 2.4 for broadcast, 2.2 for web and 1.96 for quicktime.

The other setting to consider is you monitor’s ICC profile. The ICC profile does the corresponding transformations so your images are displayed correctly in your specific monitor. &#x20;

The ICC profile settings should match between the host application and CineDream.

In the next sections we’ll show you how to change these settings on both the host application and CineDream in order to achieve a 1:1 match.

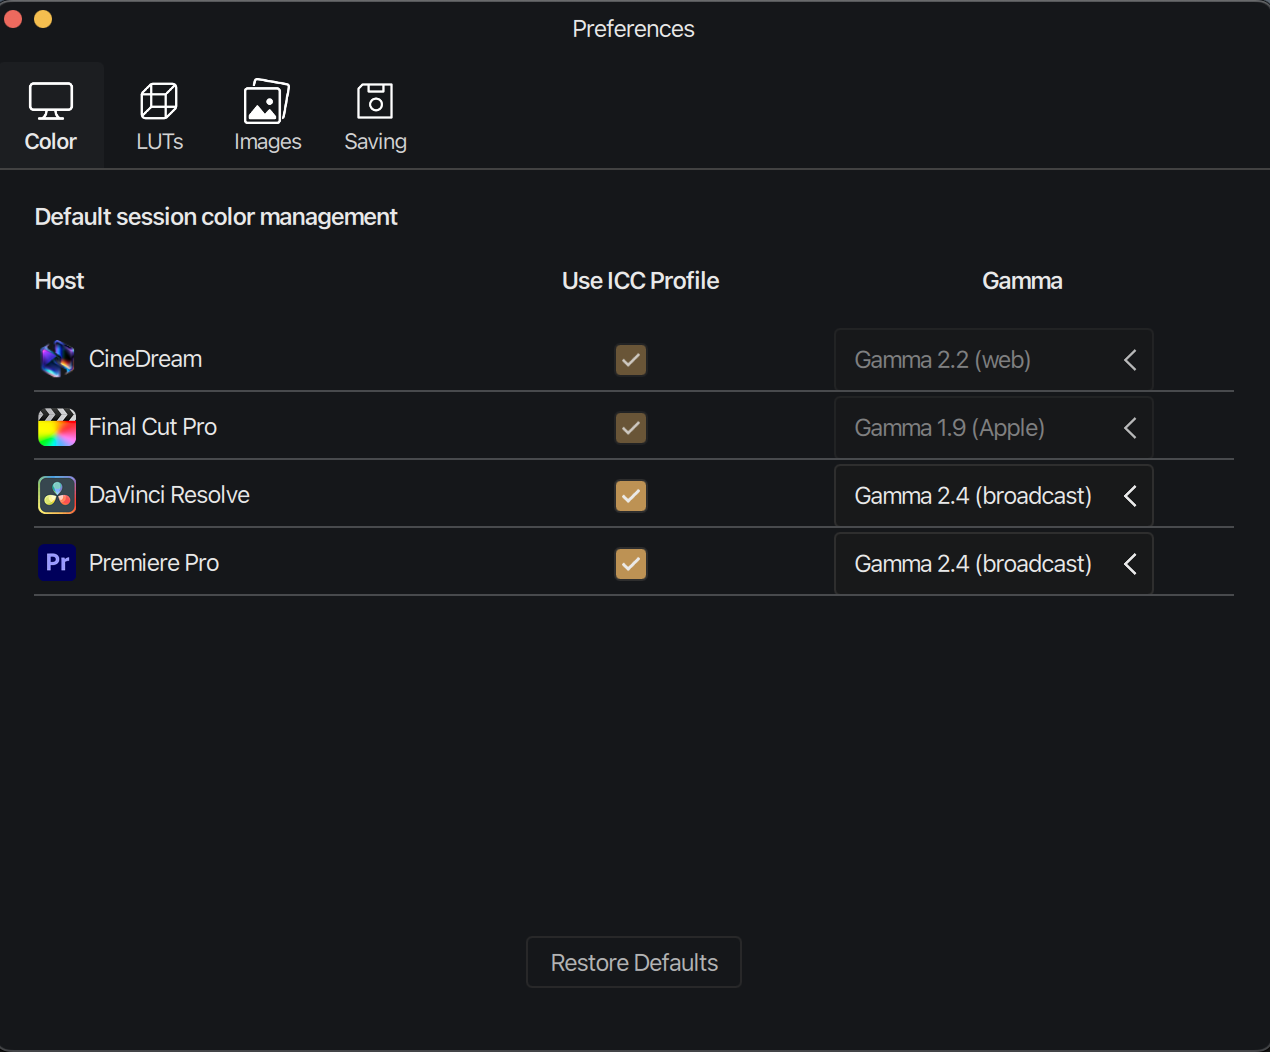
You’ll find CineDream color management settings under Preferences/Color.\
\
Mac: CineDream menu → Preferences\
\
Windows: Edit menu → Preferences

<figure><img src="https://1449894025-files.gitbook.io/~/files/v0/b/gitbook-x-prod.appspot.com/o/spaces%2FXV6dIa2ZTHDKnFjYTLCU%2Fuploads%2Fli0KMCrCSFdrACCbc8XK%2Fpreferences%20color%20menu.png?alt=media&amp;token=f76df011-0088-4321-b75a-d3a757a46a2d" alt=""><figcaption></figcaption></figure>


# Color Management Adobe Premiere Pro

{% embed url="<https://colorgradingcentral.wistia.com/medias/ritxeg3f6b?embedType=async&seo=false&videoFoam=true&videoWidth=1920>" %}

In Adobe Premiere Pro there are 3 color management menus to pay attention to.

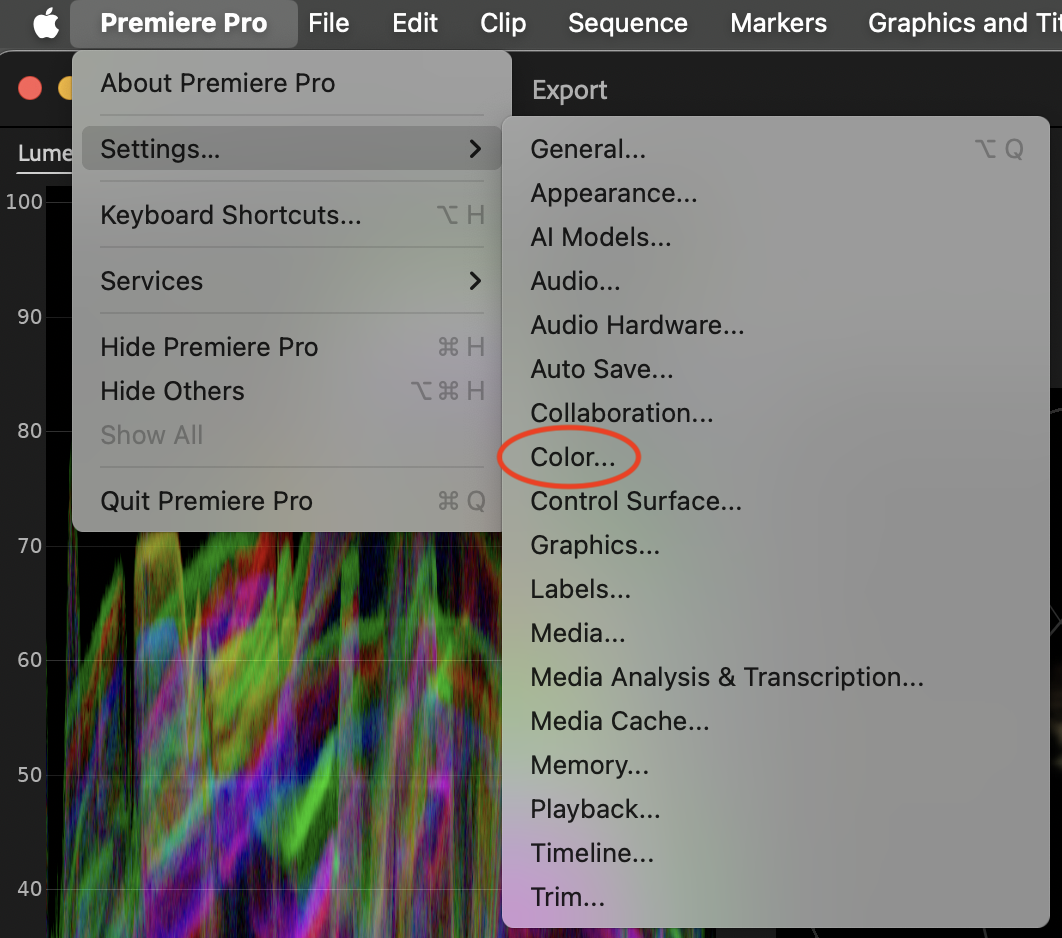
Settings→Color

<figure><img src="https://1449894025-files.gitbook.io/~/files/v0/b/gitbook-x-prod.appspot.com/o/spaces%2FXV6dIa2ZTHDKnFjYTLCU%2Fuploads%2FI8jo4LiaQZ4FdVjijsZn%2FScreenshot%202025-09-19%20at%208.14.41%E2%80%AFAM.png?alt=media&amp;token=8a0da747-f077-4811-93a4-25085e88e200" alt="" width="375"><figcaption></figcaption></figure>

In this menu you’ll find the option to enable/disable Display Color Management. Enabling Display Color Management means Premiere will do the necessary conversions to ensure the image displayed in Premiere’s viewer adapts to the characteristics and color space of your monitor. This is equivalent to switching the ICC Profile on.

<figure><img src="https://1449894025-files.gitbook.io/~/files/v0/b/gitbook-x-prod.appspot.com/o/spaces%2FXV6dIa2ZTHDKnFjYTLCU%2Fuploads%2FhrshycIZeGxAj9F0Ccrx%2FScreenshot%202025-09-19%20at%208.11.53%E2%80%AFAM.png?alt=media&amp;token=cd5dd40e-86d0-45fe-a9a8-aef1e1dc5dc0" alt="" width="375"><figcaption></figcaption></figure>

This option not always yields the expected results and the conversion might not be accurate. We encourage you to run some tests and see if the images displayed in Premiere look closer or not to what you see on other devices like smartphones, tablets and TVs with this option enabled.  Based on that you can opt to keep it on or off.

Then make sure to match these same setting inside CineDream.

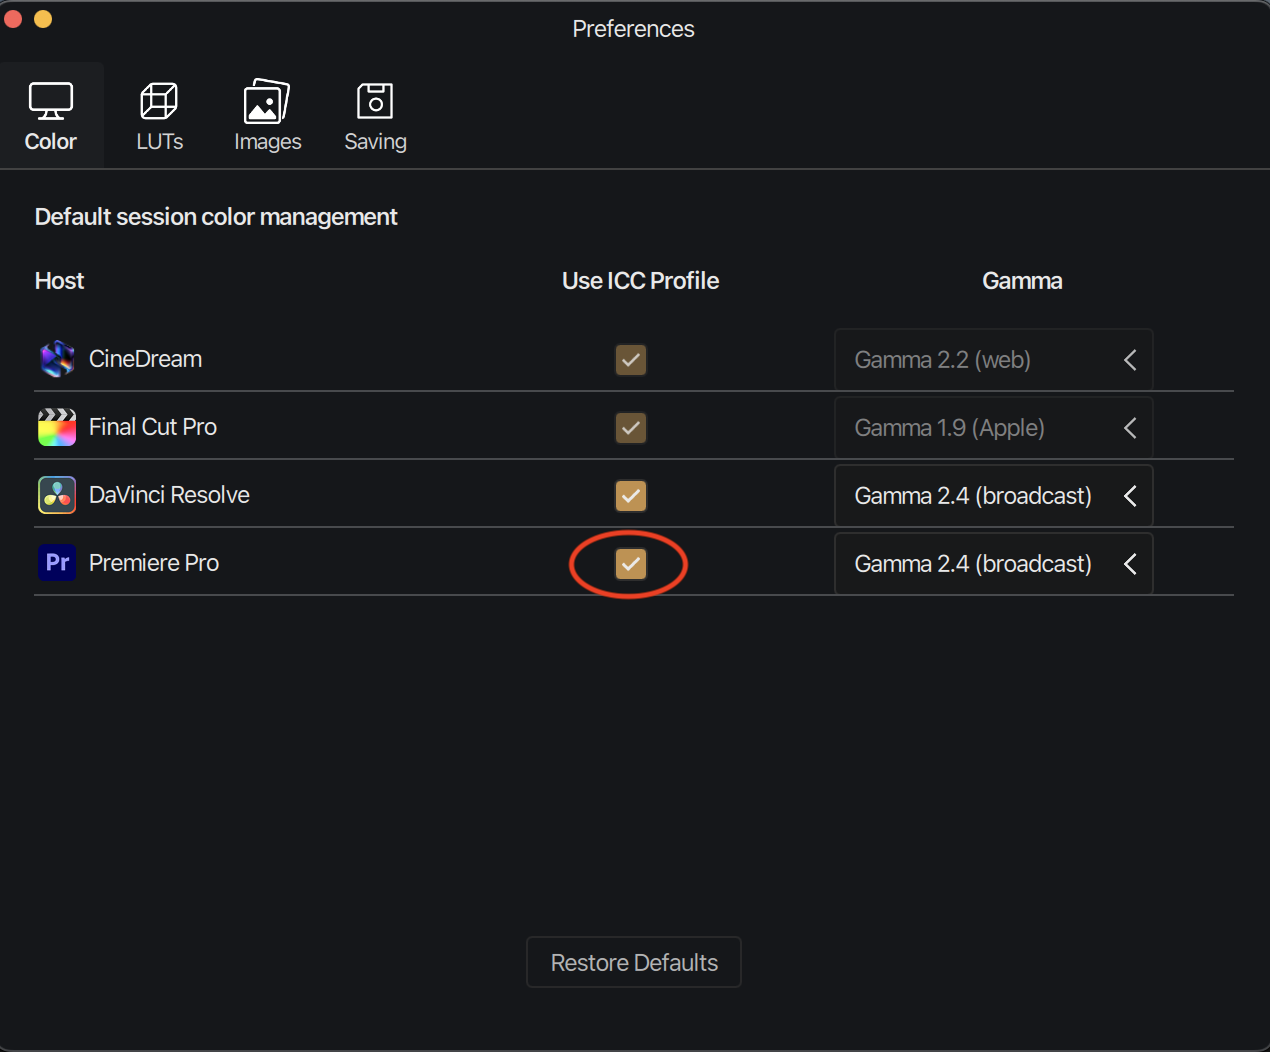
In Preferences/Color, make sure ICC Profile is checked if you chose to keep Display Color Management enabled in Premiere, and unchecked if you chose to keep Display Color Management disabled.

<figure><img src="https://1449894025-files.gitbook.io/~/files/v0/b/gitbook-x-prod.appspot.com/o/spaces%2FXV6dIa2ZTHDKnFjYTLCU%2Fuploads%2FlAjWO7U552997m04Kpjl%2Fpreferences%20color%20menu%20prmiere.png?alt=media&amp;token=b7331675-4f58-4a2d-9f19-cdf450f83f34" alt="" width="375"><figcaption></figcaption></figure>

It is important to remember these settings are not changing your images, just how those images are displayed in the viewer.  Changing these settings won’t change the grade or the look of the exported file.

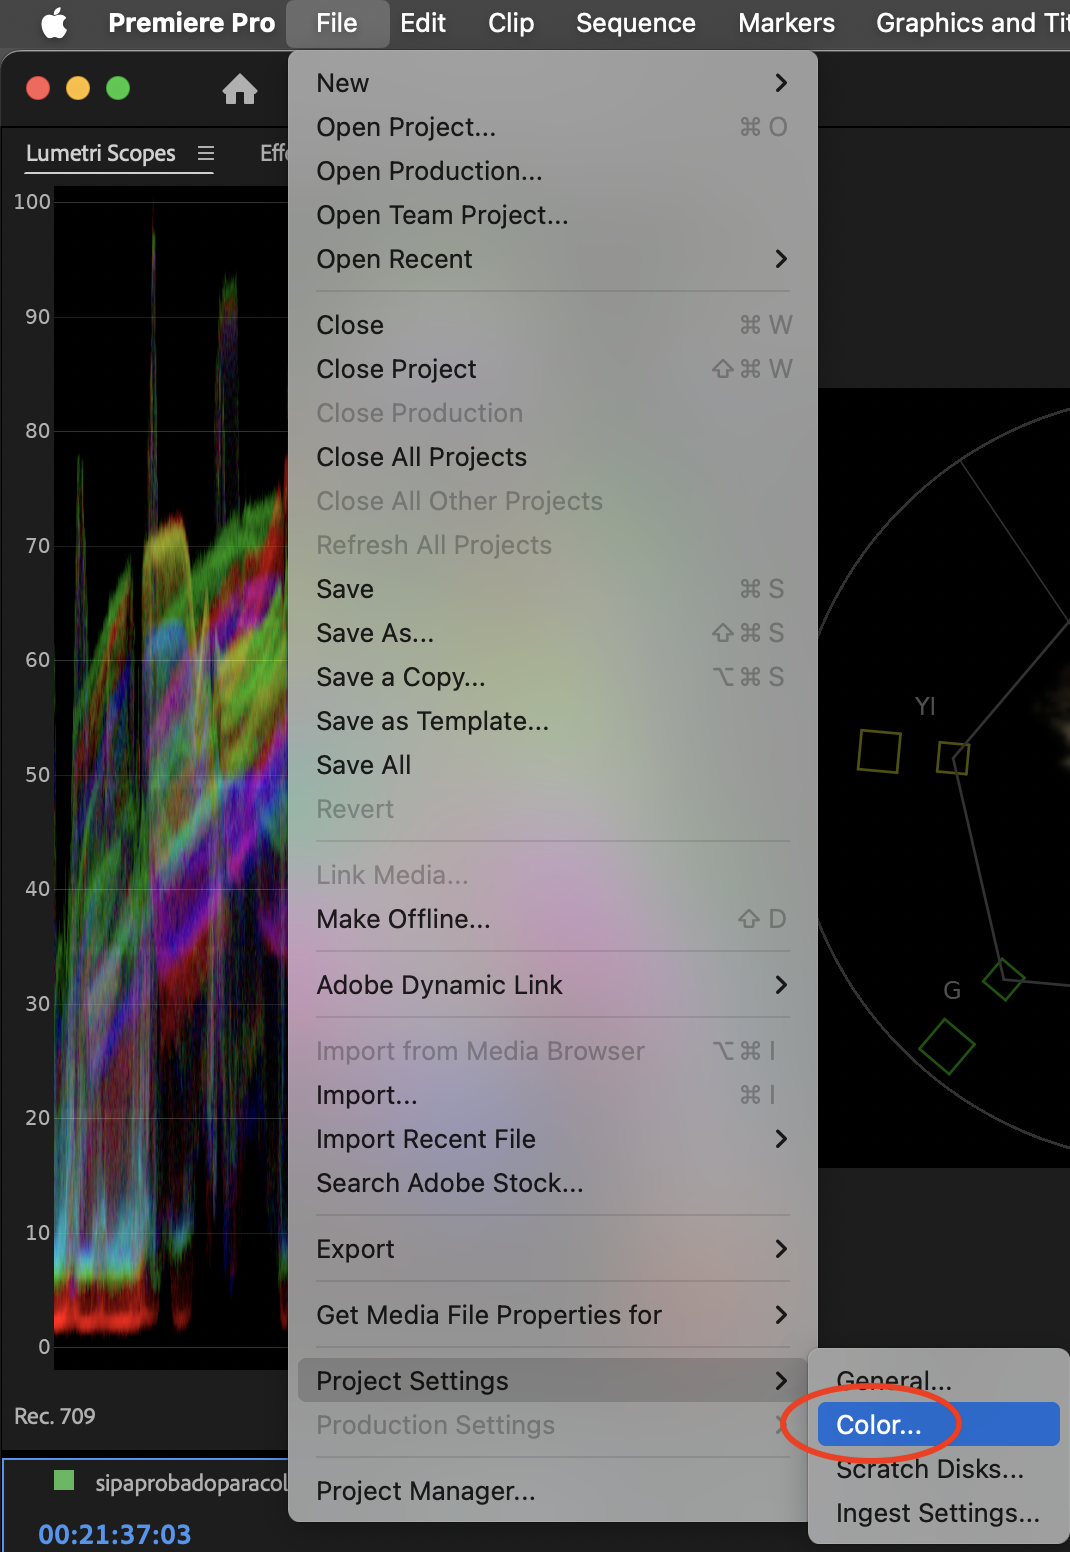
The next menu to look at in Premiere is Project Settings→Color

<figure><img src="https://1449894025-files.gitbook.io/~/files/v0/b/gitbook-x-prod.appspot.com/o/spaces%2FXV6dIa2ZTHDKnFjYTLCU%2Fuploads%2FJ7BFQ0lqa3oQQmw06HcO%2FScreenshot%202025-09-19%20at%208.12.14%E2%80%AFAM.png?alt=media&amp;token=7a97897a-20dd-48ce-b876-71dad8b6ea19" alt="" width="375"><figcaption></figcaption></figure>

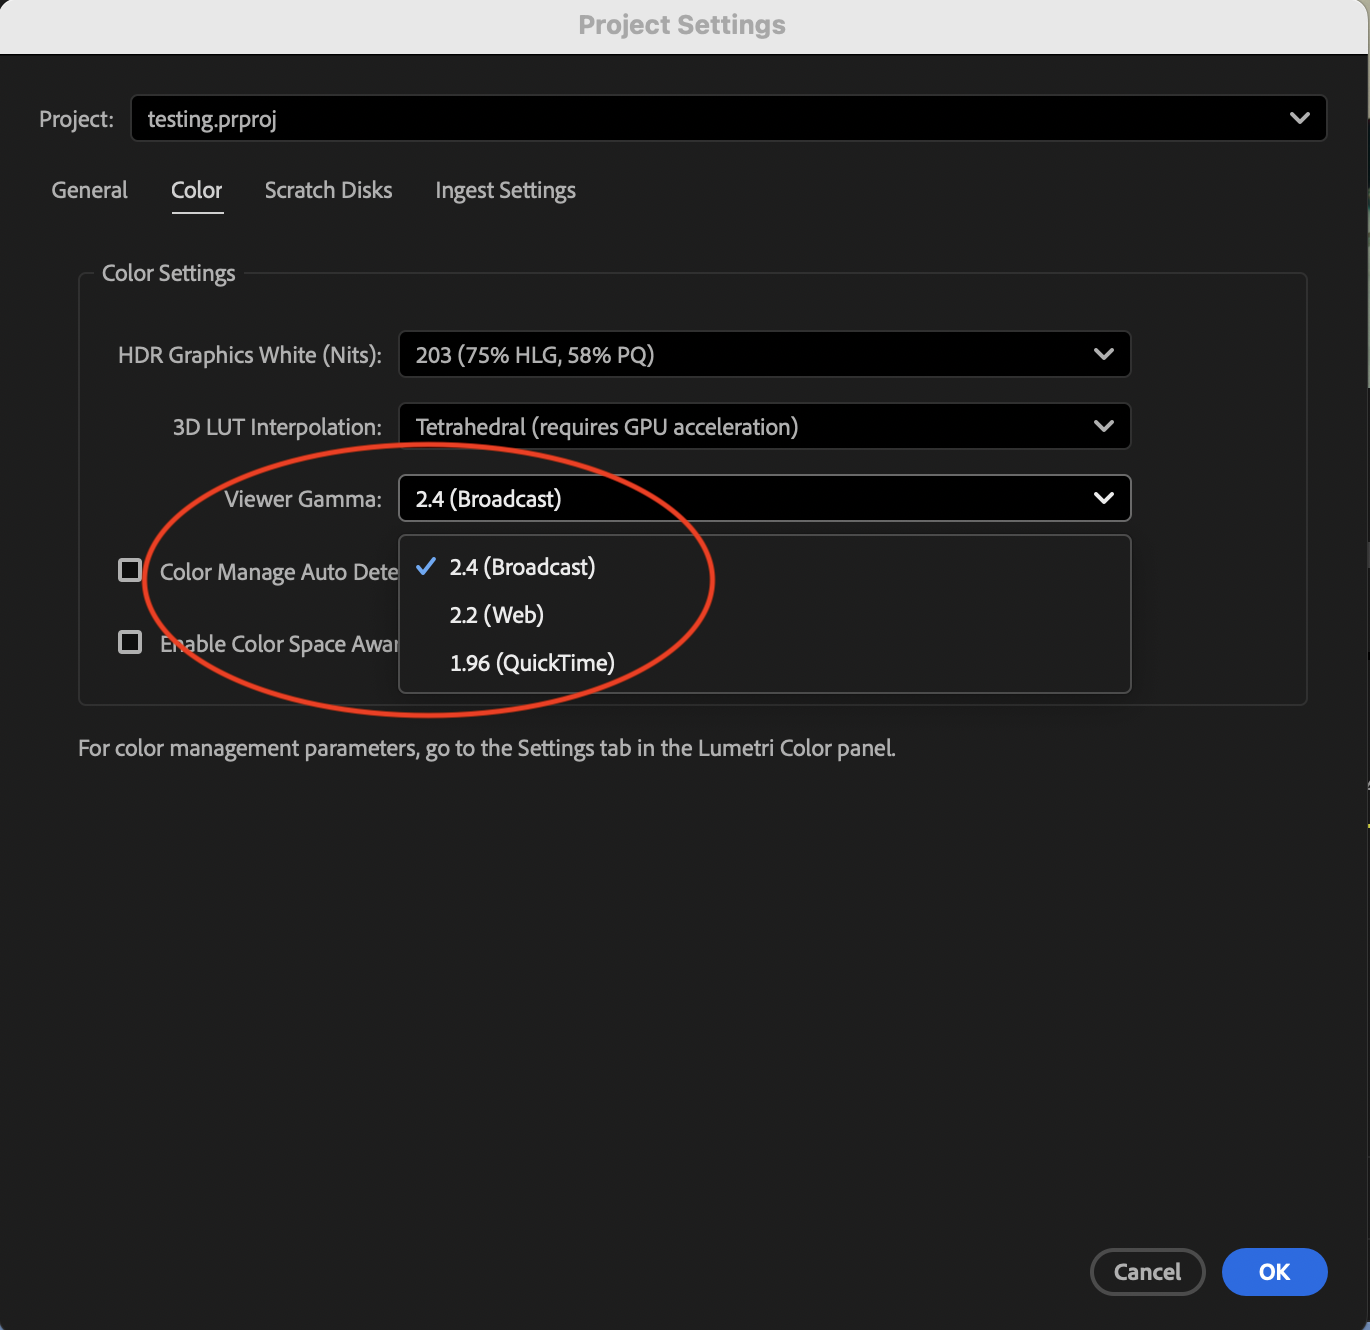
Here we can change the Gamma of the project depending on your intended delivery. 2.4 for broadcast, 2.2 for web, 1.96 for quicktime.

<figure><img src="https://1449894025-files.gitbook.io/~/files/v0/b/gitbook-x-prod.appspot.com/o/spaces%2FXV6dIa2ZTHDKnFjYTLCU%2Fuploads%2FZETUryk7Hgwa9LKgjyBP%2FScreenshot%202025-09-19%20at%208.12.25%E2%80%AFAM.png?alt=media&amp;token=188bde9b-99b9-40ba-8023-215714704268" alt="" width="375"><figcaption></figcaption></figure>

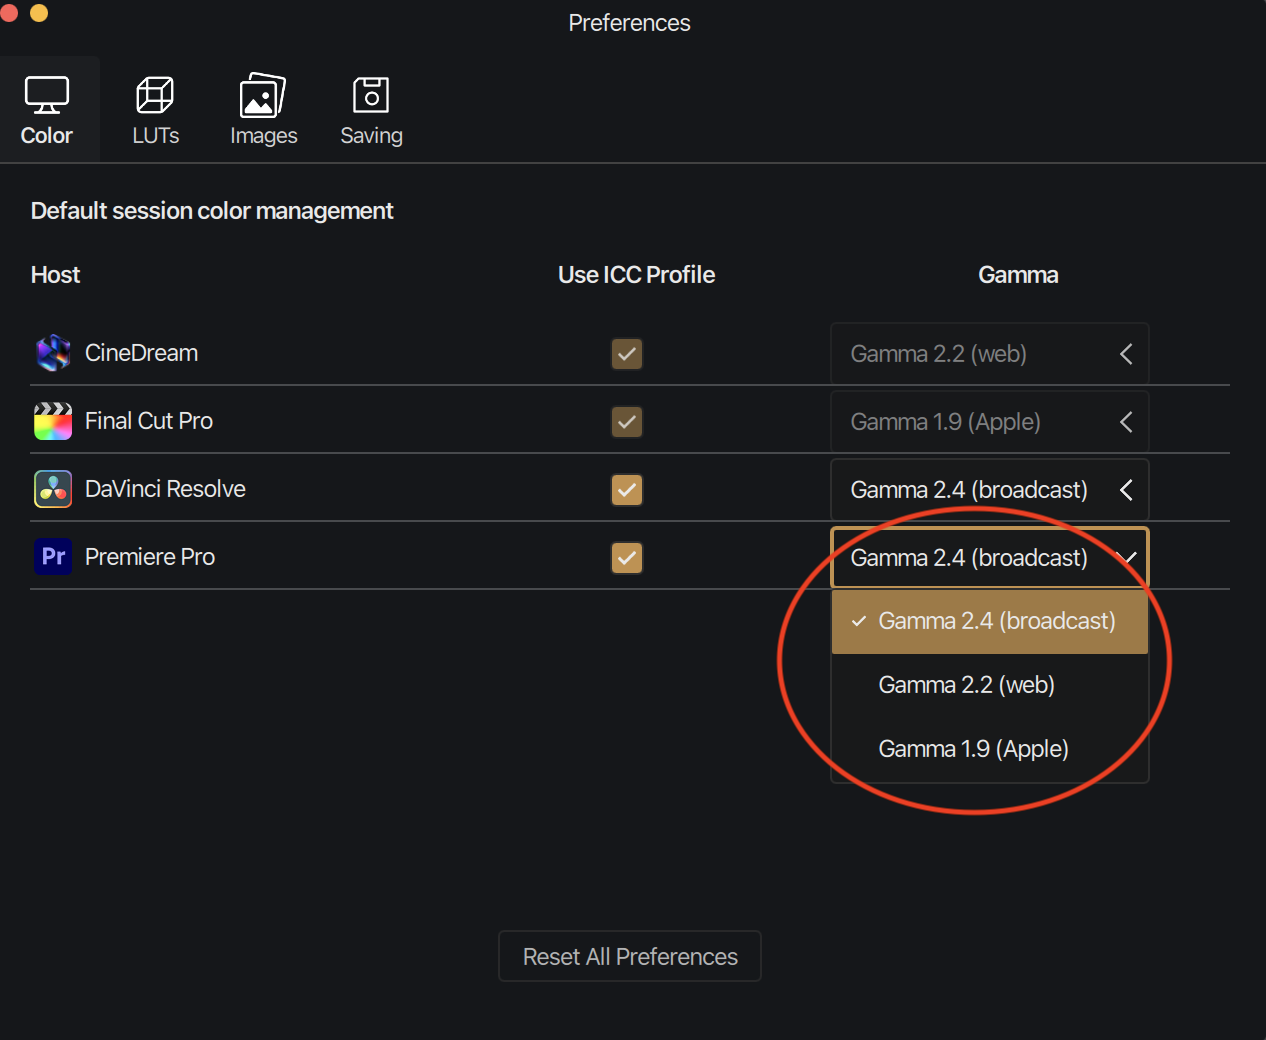
Back to CineDream, in the Preferences/Color menu, change the gamma accordingly.

<figure><img src="https://1449894025-files.gitbook.io/~/files/v0/b/gitbook-x-prod.appspot.com/o/spaces%2FXV6dIa2ZTHDKnFjYTLCU%2Fuploads%2Fghbheh3NukkMs4dAtJgW%2FScreenshot%202025-09-19%20at%208.31.39%E2%80%AFAM.png?alt=media&amp;token=100f0908-9670-4fd4-9650-f574186c86d7" alt="" width="375"><figcaption></figcaption></figure>

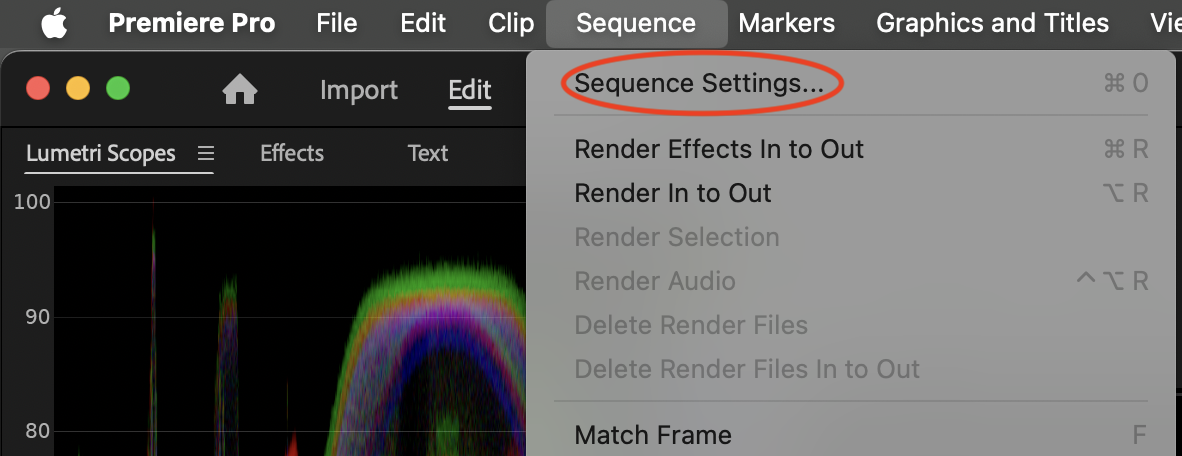
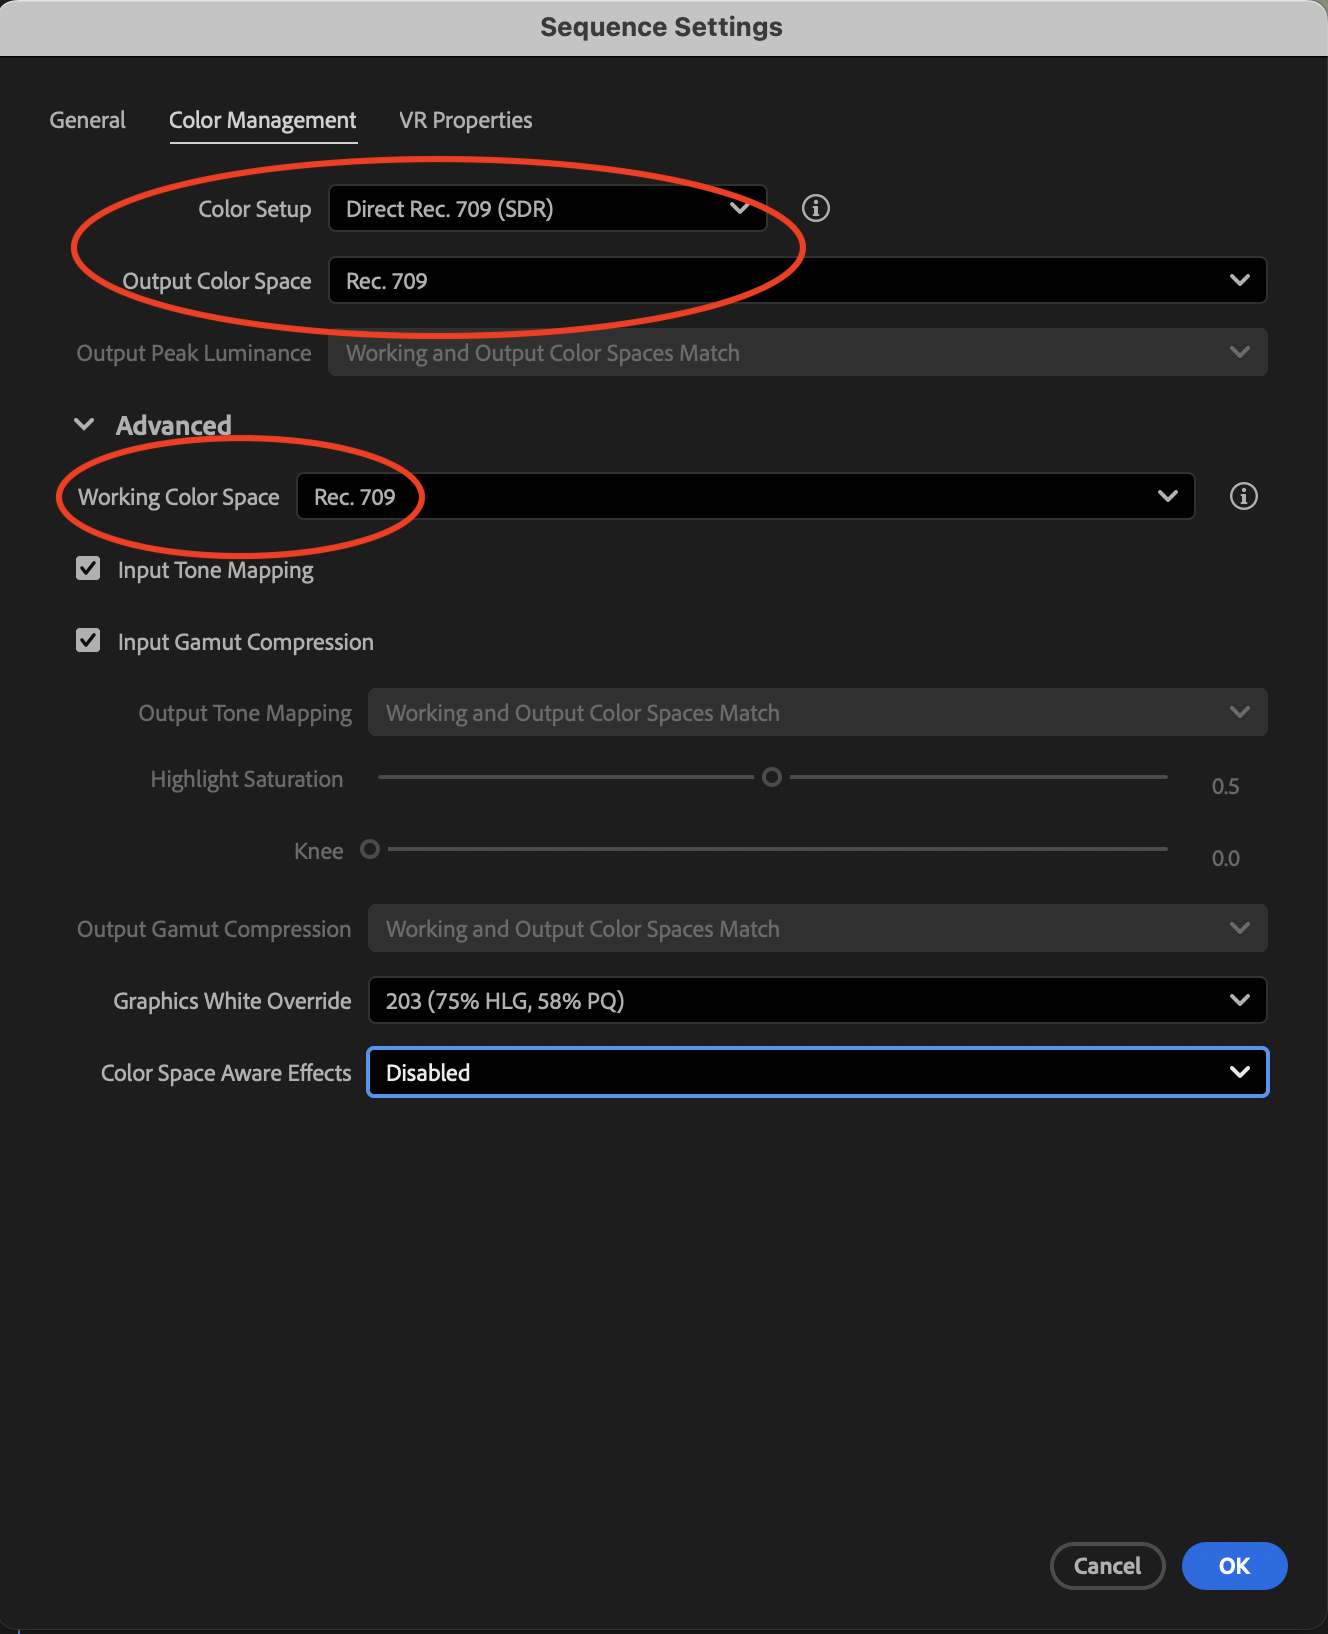
And finally, go to the Sequence Settings Menu

<figure><img src="https://1449894025-files.gitbook.io/~/files/v0/b/gitbook-x-prod.appspot.com/o/spaces%2FXV6dIa2ZTHDKnFjYTLCU%2Fuploads%2FjnrPLwiz02hyt7NOy68y%2FScreenshot%202025-09-19%20at%208.32.40%E2%80%AFAM.png?alt=media&amp;token=d82554e2-a231-44c3-8c6d-0f179c6dc16a" alt="" width="375"><figcaption></figcaption></figure>

Make sure the sequence is set to Rec709 as CineDream works in Rec709 by default.

<figure><img src="https://1449894025-files.gitbook.io/~/files/v0/b/gitbook-x-prod.appspot.com/o/spaces%2FXV6dIa2ZTHDKnFjYTLCU%2Fuploads%2FZpSHsAO6dAuDCe15LZom%2FScreenshot%202025-09-19%20at%208.13.03%E2%80%AFAM.png?alt=media&amp;token=86b094d3-76e7-48a4-a1d0-887714310138" alt="" width="375"><figcaption></figcaption></figure>

After reviewing these 3 Premiere menus and setting CineDream accordingly, both the CineDream viewer and Premiere Viewer/Monitor should match perfectly.

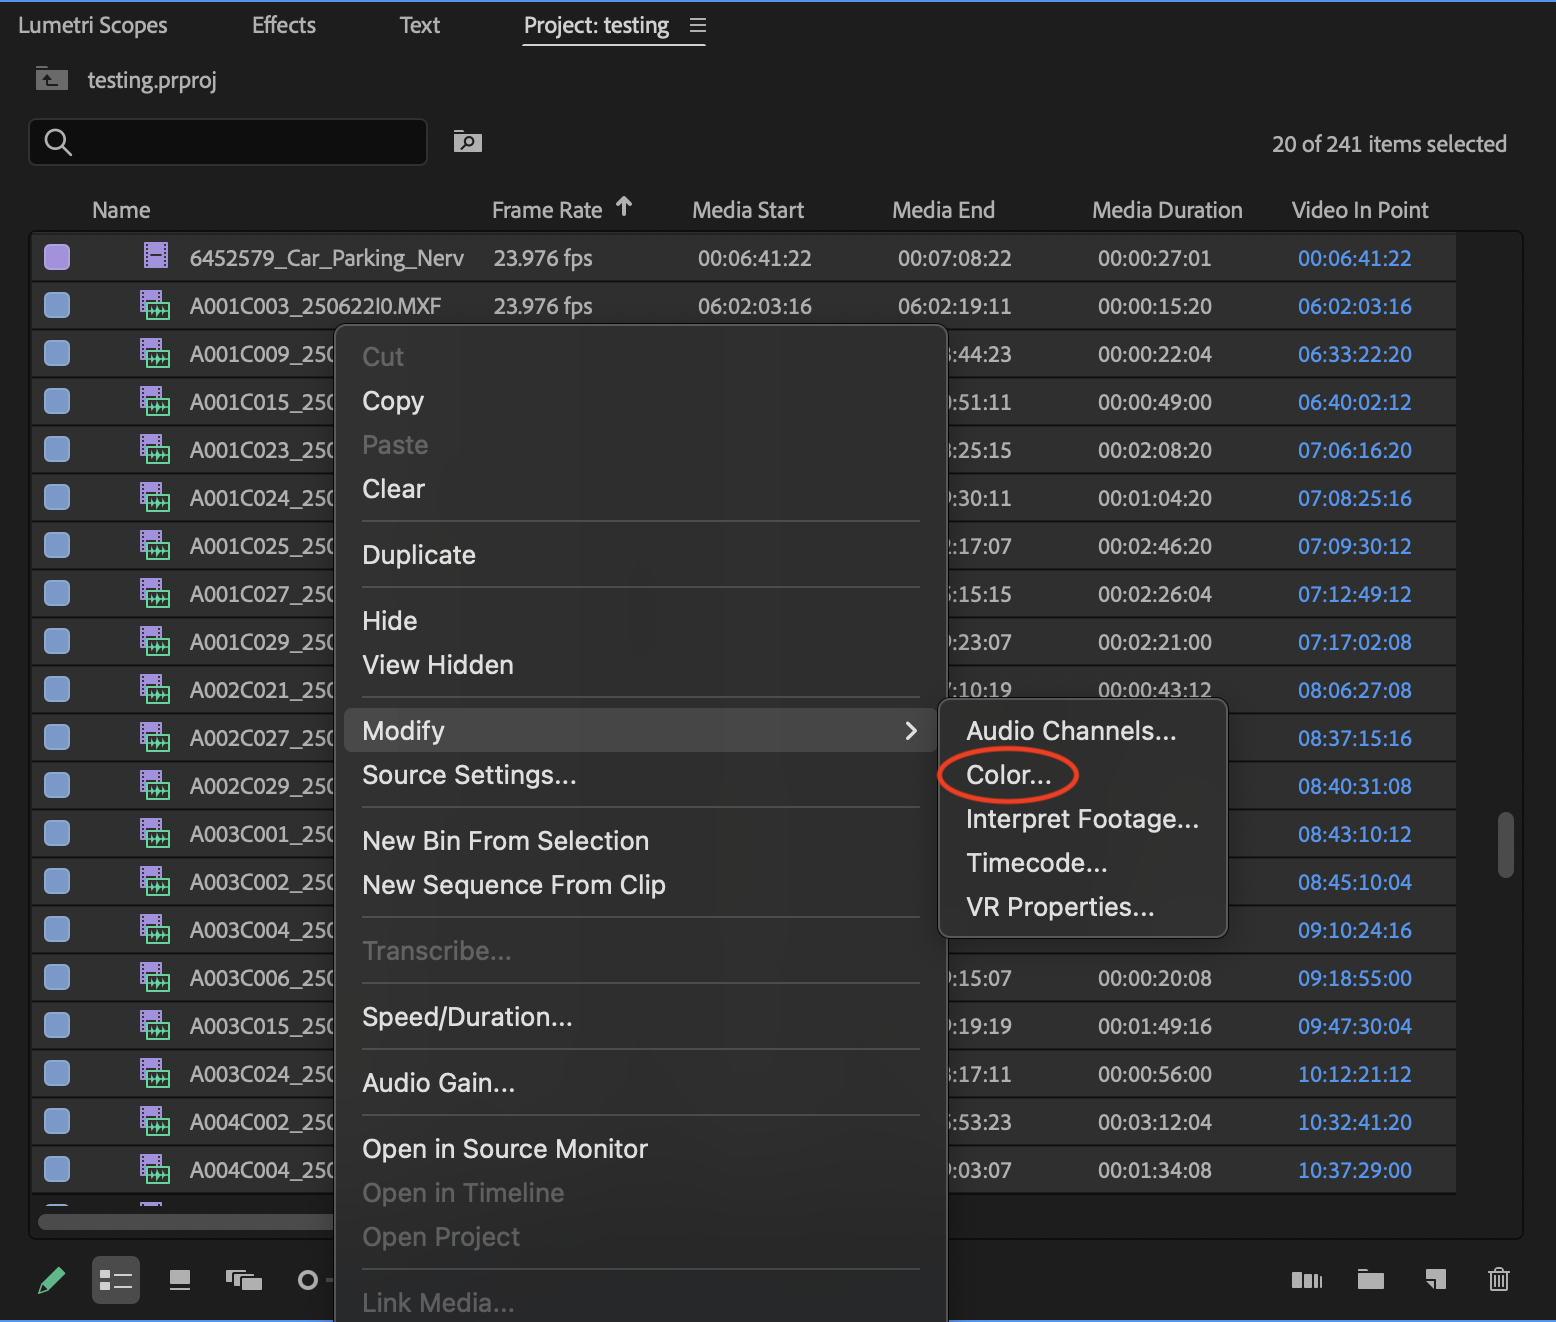
If you notice that your log footage shows transformed to Rec709 inside Premiere without ever doing any color correction, it means Premiere is applying a LUT or color space override onto your footage based on its metadata.&#x20;

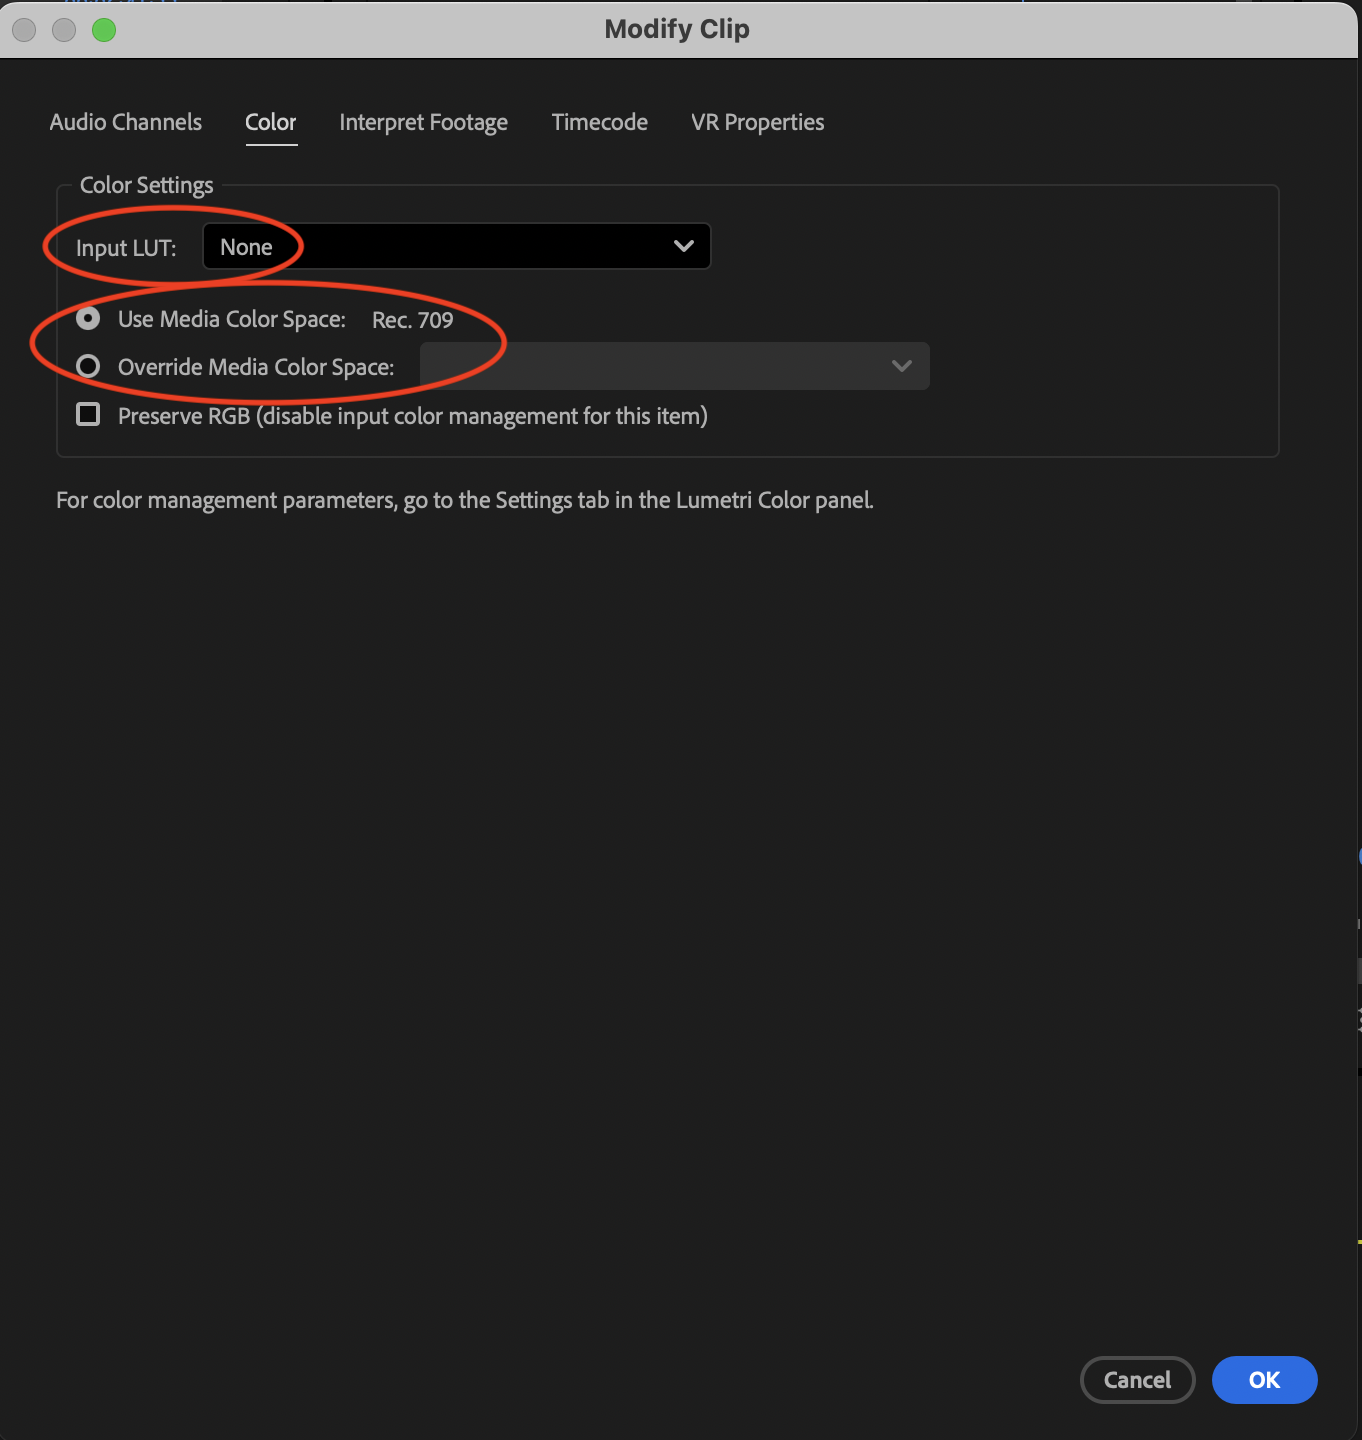
We don’t want this as CineDream is designed to handle all your color space management and it is expecting to get the native image untouched.  To disable any Premiere conversion, select all your clips in the Project panel, right click and go to Modify/Color.

<figure><img src="https://1449894025-files.gitbook.io/~/files/v0/b/gitbook-x-prod.appspot.com/o/spaces%2FXV6dIa2ZTHDKnFjYTLCU%2Fuploads%2FTJslUiSFJqYKe4iGcAdg%2FScreenshot%202025-09-19%20at%208.55.05%E2%80%AFAM.png?alt=media&amp;token=9675ff32-2634-480b-badb-a3d38b4a9c54" alt="" width="375"><figcaption></figcaption></figure>

Make sure no input LUT is applied and the used color space is Rec709, with Override Media Color Space disabled.

<figure><img src="https://1449894025-files.gitbook.io/~/files/v0/b/gitbook-x-prod.appspot.com/o/spaces%2FXV6dIa2ZTHDKnFjYTLCU%2Fuploads%2FDMabrnivTKJl8UCjgZtX%2FScreenshot%202025-09-19%20at%208.55.14%E2%80%AFAM.png?alt=media&amp;token=e19a9670-96d4-47f0-9d64-f58643761f25" alt="" width="375"><figcaption></figcaption></figure>

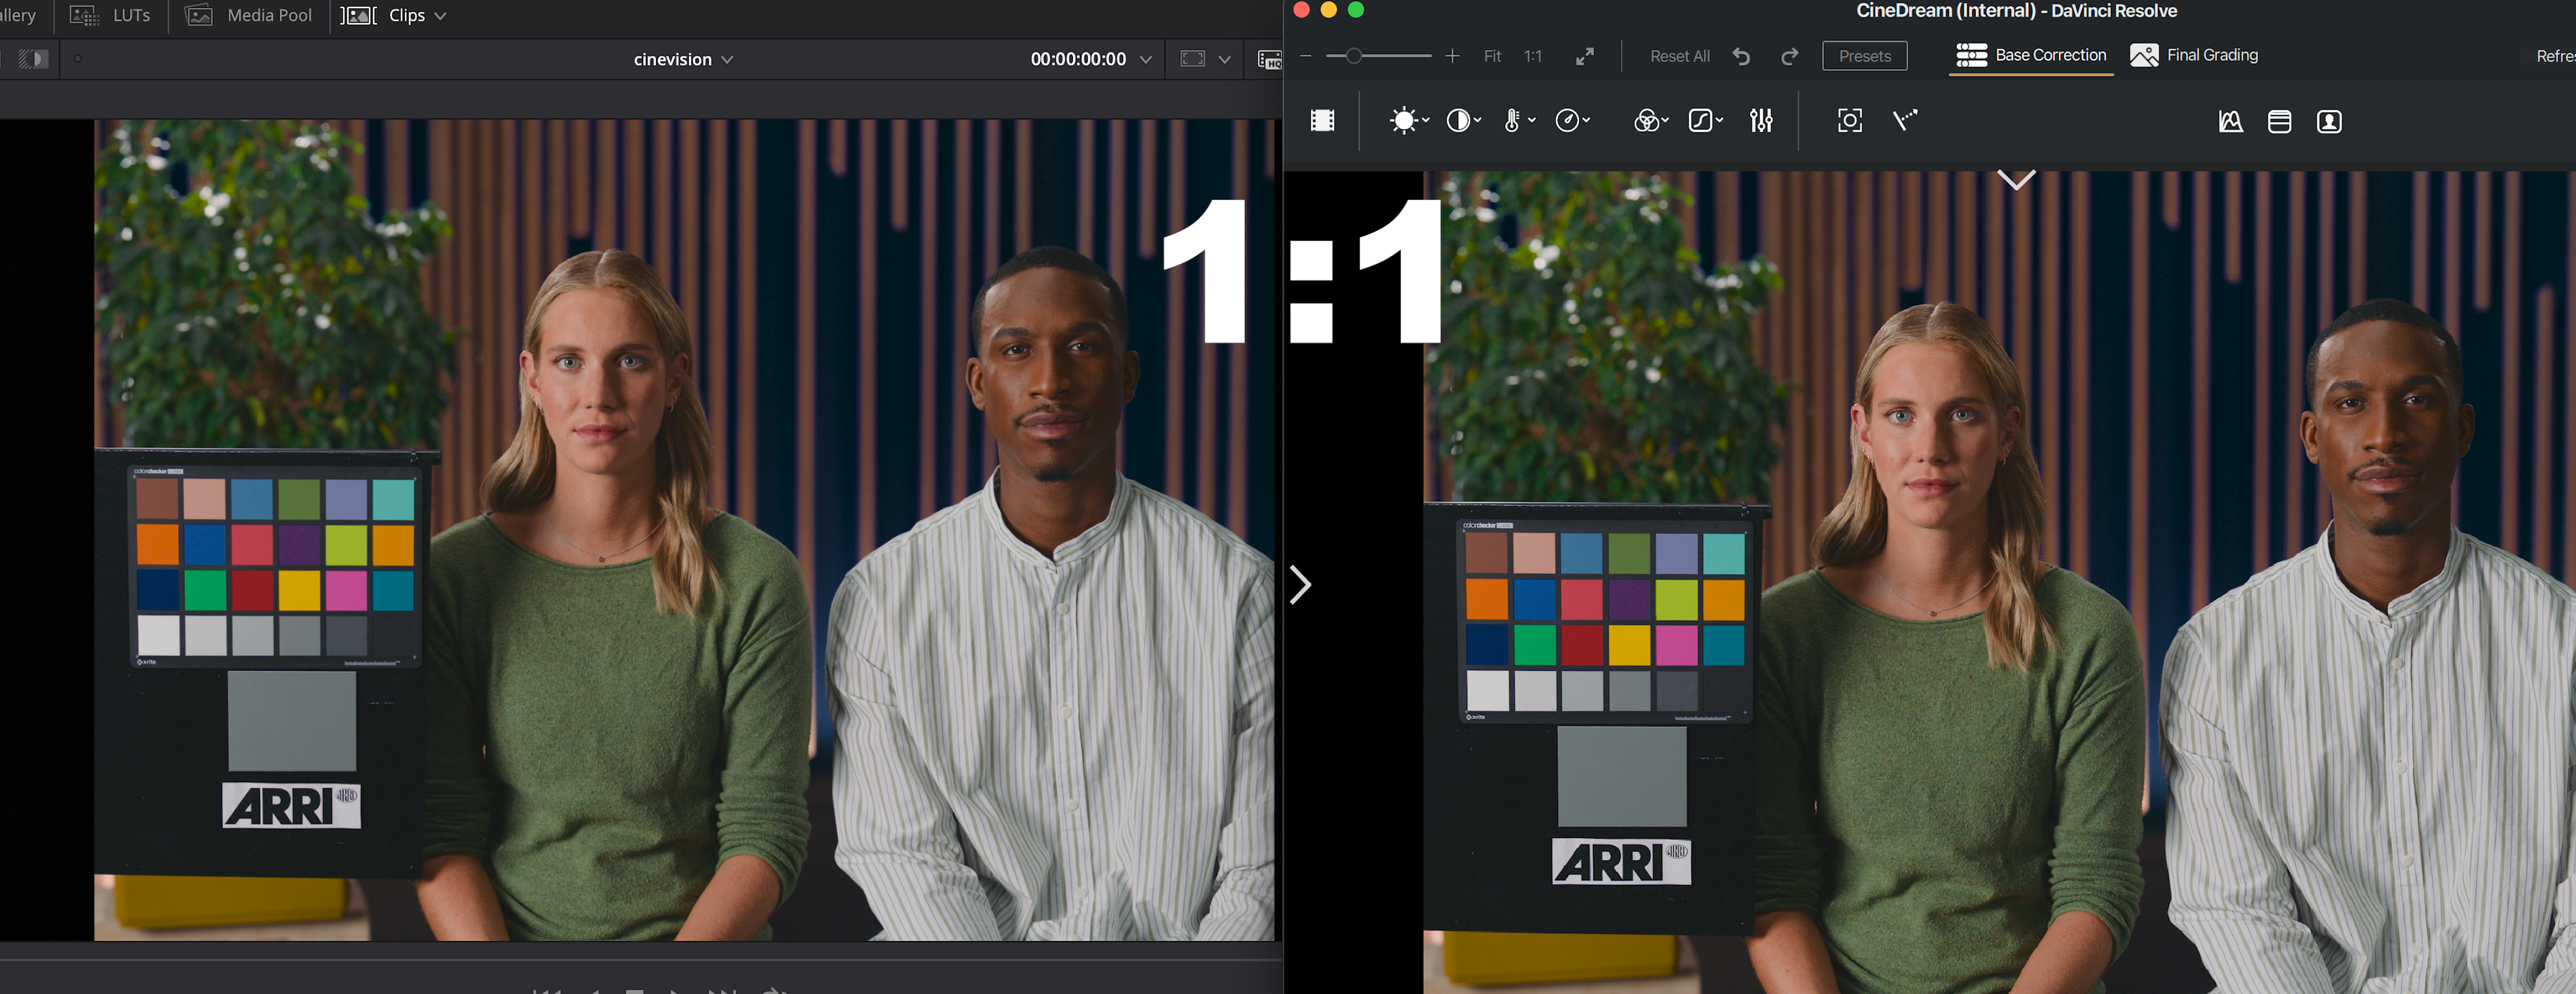
With the color management settings matched between CineDream and Adobe Premiere Pro you can expect a 1:1 match.

<figure><img src="https://1449894025-files.gitbook.io/~/files/v0/b/gitbook-x-prod.appspot.com/o/spaces%2FXV6dIa2ZTHDKnFjYTLCU%2Fuploads%2F7X7iziikGDOJ0jRdDlx9%2Fpremiere%20match.png?alt=media&amp;token=9312bcd9-c83b-4d45-b3e1-fafec7d5dbfc" alt=""><figcaption></figcaption></figure>


# Color Management Final Cut Pro

{% embed url="<https://colorgradingcentral.wistia.com/medias/g80sbejhjz?embedType=web_component&seo=true&videoWidth=960>" %}

Inside Final Cut Pro there are 4 settings to pay attention to.

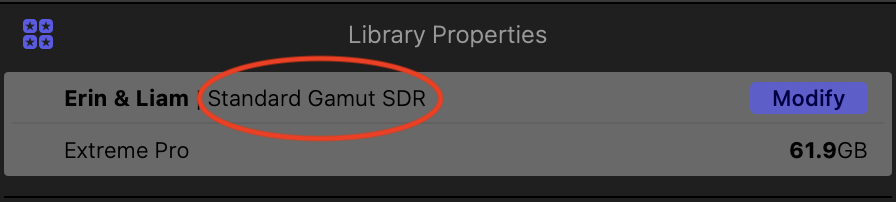
First the Library’s color space.  Select the library and go to Library Properties. Make sure it is set to Standard Gamut SDR.  If that’s not the case, click Modify and change it.

<figure><img src="https://1449894025-files.gitbook.io/~/files/v0/b/gitbook-x-prod.appspot.com/o/spaces%2FXV6dIa2ZTHDKnFjYTLCU%2Fuploads%2FkjUOdmIIVvIbr2N3uiNC%2FScreenshot%202025-09-19%20at%208.43.12%E2%80%AFAM.png?alt=media&amp;token=26d56279-e44e-4c33-bd34-09682e615924" alt="" width="375"><figcaption></figcaption></figure>

<figure><img src="https://1449894025-files.gitbook.io/~/files/v0/b/gitbook-x-prod.appspot.com/o/spaces%2FXV6dIa2ZTHDKnFjYTLCU%2Fuploads%2FCSQK54ALFEl2ChXow5rK%2FScreenshot%202025-09-19%20at%208.43.28%E2%80%AFAM.png?alt=media&amp;token=623a89c4-e569-42f3-aeab-0e20871cce62" alt="" width="375"><figcaption></figcaption></figure>

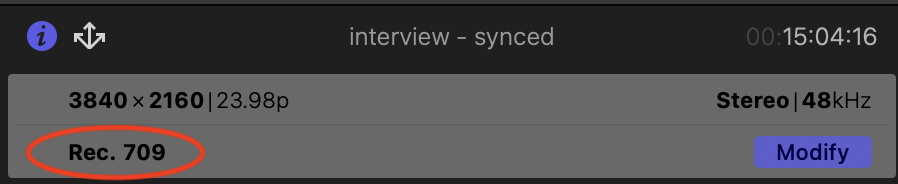
By default the project inside a Standard Gamut SDR Library should be set to Rec709. If you want to make sure, select a project and it should be tagged as Rec709 in the inspector.

<figure><img src="https://1449894025-files.gitbook.io/~/files/v0/b/gitbook-x-prod.appspot.com/o/spaces%2FXV6dIa2ZTHDKnFjYTLCU%2Fuploads%2FH795JdmRNp1ZK6tbRbuT%2FScreenshot%202025-09-19%20at%208.47.58%E2%80%AFAM.png?alt=media&amp;token=2bebc170-9230-4b39-8406-1e696b2ac4b4" alt="" width="375"><figcaption></figcaption></figure>

If that’s not the case, click modify and change it.

<figure><img src="https://1449894025-files.gitbook.io/~/files/v0/b/gitbook-x-prod.appspot.com/o/spaces%2FXV6dIa2ZTHDKnFjYTLCU%2Fuploads%2Fzbfx6SzDfswSbzHz13JD%2FScreenshot%202025-09-19%20at%208.48.08%E2%80%AFAM.png?alt=media&amp;token=d7fae753-3cca-4e43-a49a-2f6c8fab36ea" alt="" width="375"><figcaption></figcaption></figure>

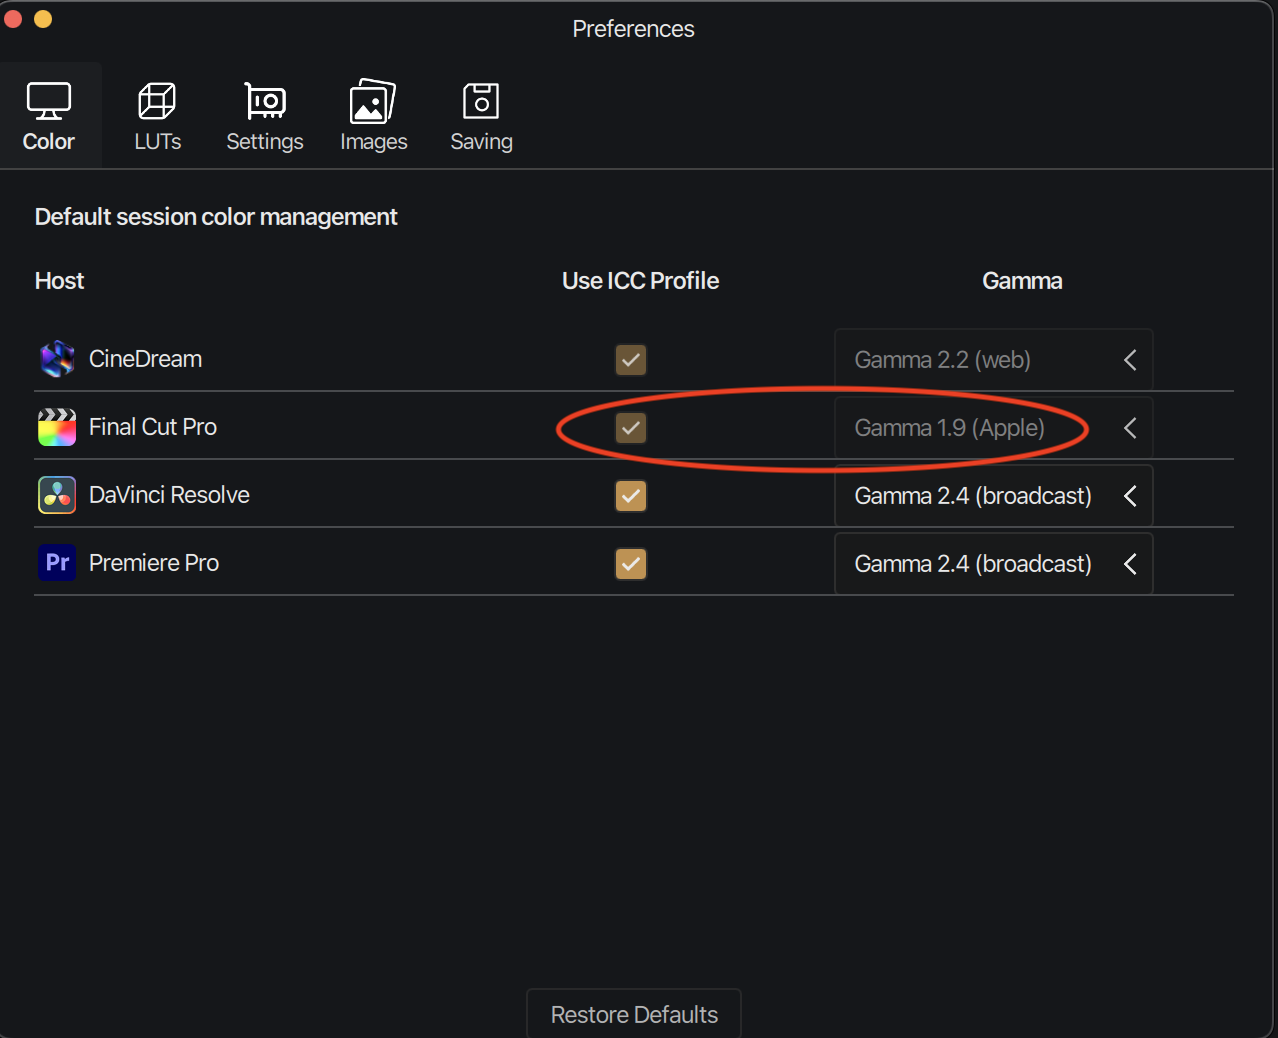
By default Final Cut Pro works with ICC Profile on and Gamma 1.96. This means that the software is always doing the necessary transformations for the image to display correctly inside Final Cut. Back to CineDream, you’ll see this settings are displayed but greyed out as there is no need to change them.

<figure><img src="https://1449894025-files.gitbook.io/~/files/v0/b/gitbook-x-prod.appspot.com/o/spaces%2FXV6dIa2ZTHDKnFjYTLCU%2Fuploads%2FrwL7rnJ7Yy0oVY8viOpJ%2FScreenshot%202025-09-19%20at%201.42.21%E2%80%AFPM%20copy.png?alt=media&amp;token=d295e973-8a76-4eff-921f-7a48c80ff2b1" alt="" width="375"><figcaption></figcaption></figure>

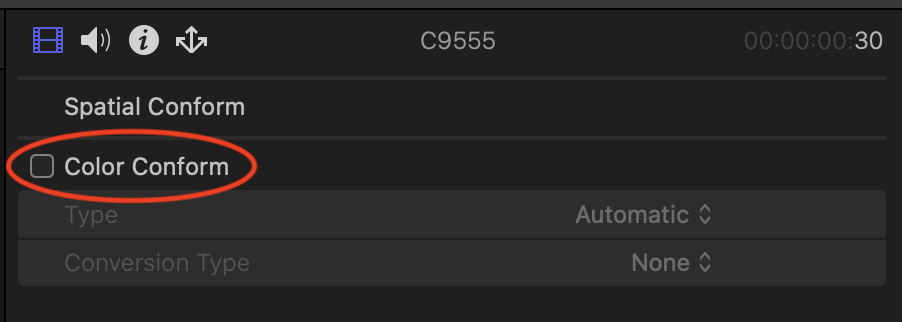
If you notice that your log footage shows transformed to Rec709 inside Final Cut without ever doing any color correction, it means Final Cut is applying a LUT or color space override onto your footage based on its metadata.  We don’t want this as CineDream is designed to handle all your color space management and it is expecting to get the native image untouched. &#x20;

To disable any Final Cut conversion, select all your clips in the Library, go to the Video Inspector and disable Color Conform.

<figure><img src="https://1449894025-files.gitbook.io/~/files/v0/b/gitbook-x-prod.appspot.com/o/spaces%2FXV6dIa2ZTHDKnFjYTLCU%2Fuploads%2FxvseEztxjYo9rXkTW7gx%2FScreenshot%202025-09-19%20at%209.05.13%E2%80%AFAM.png?alt=media&amp;token=fc204fcd-161d-4be8-8ab4-c5139920decb" alt="" width="375"><figcaption></figcaption></figure>

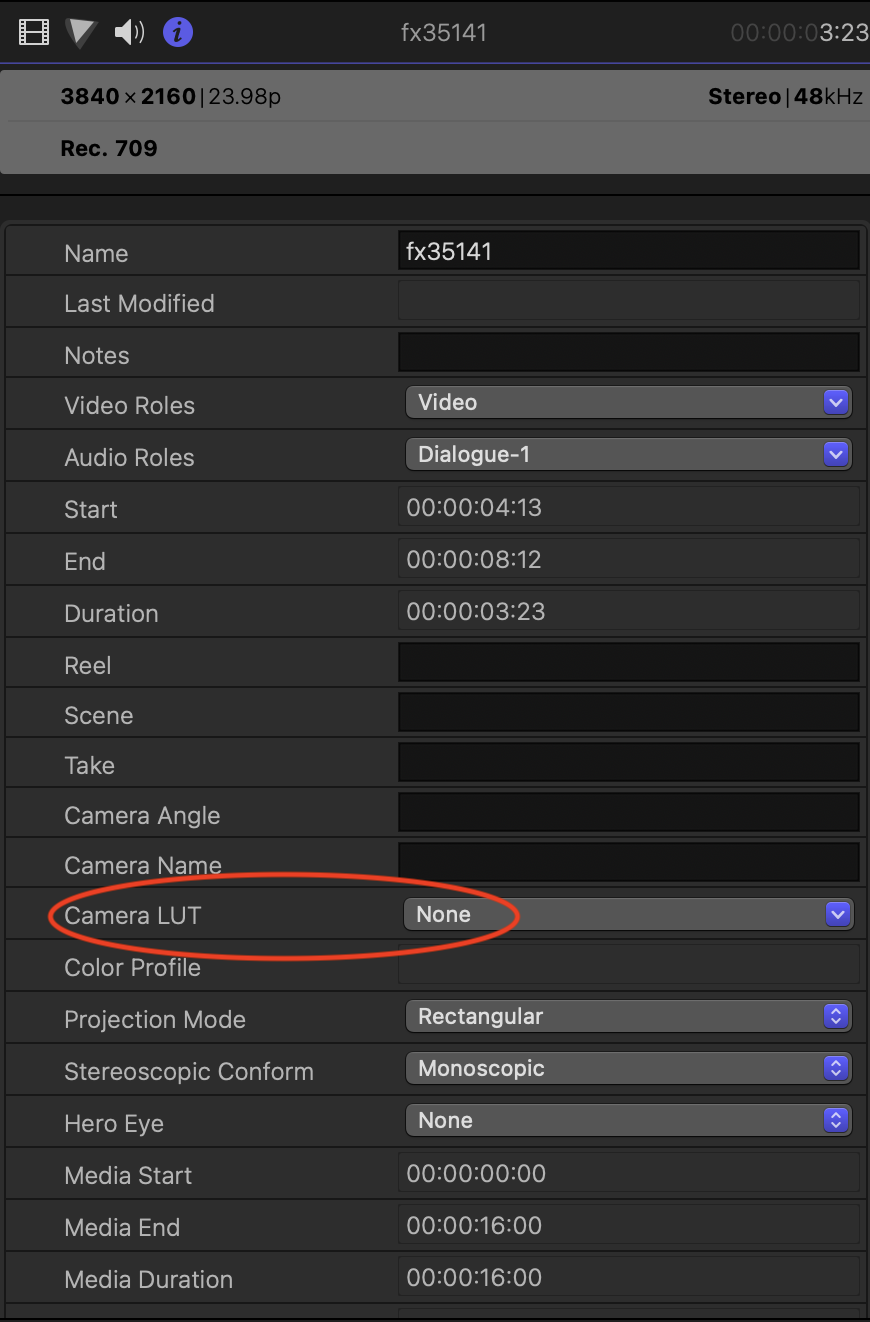
Then go to the Info Inspector and make sure no LUT is applied under Camera LUT.

<figure><img src="https://1449894025-files.gitbook.io/~/files/v0/b/gitbook-x-prod.appspot.com/o/spaces%2FXV6dIa2ZTHDKnFjYTLCU%2Fuploads%2FnaVgEDnbT1CJYSQk8877%2FScreenshot%202025-09-19%20at%209.04.22%E2%80%AFAM.png?alt=media&amp;token=8dfe102e-5f81-4987-aab9-5179e27e045a" alt="" width="375"><figcaption></figcaption></figure>

With the color management settings matched between CineDream and Final Cut Pro you can expect a 1:1 match.

<figure><img src="https://1449894025-files.gitbook.io/~/files/v0/b/gitbook-x-prod.appspot.com/o/spaces%2FXV6dIa2ZTHDKnFjYTLCU%2Fuploads%2FK9NkWMDUMIbu4AR3Nt5u%2Ffinal%20cut%20match.png?alt=media&amp;token=4076f7e7-d0e2-4df5-a5cb-5fe2923e77a1" alt=""><figcaption></figcaption></figure>


# Color Management DaVinci Resolve

{% embed url="<https://colorgradingcentral.wistia.com/medias/fo07t49ntm?embedType=web_component&seo=true&videoWidth=960>" %}

In DaVinci Resolve there are 2 color management menus to pay attention to.

Preferences→General

<figure><img src="https://1449894025-files.gitbook.io/~/files/v0/b/gitbook-x-prod.appspot.com/o/spaces%2FXV6dIa2ZTHDKnFjYTLCU%2Fuploads%2F5AyTKukZbpJyukFTeuZY%2FScreenshot%202025-10-24%20at%2010.57.24%E2%80%AFAM.png?alt=media&amp;token=5e859dc2-b5c6-4cef-8b07-7765923dac20" alt="" width="375"><figcaption></figcaption></figure>

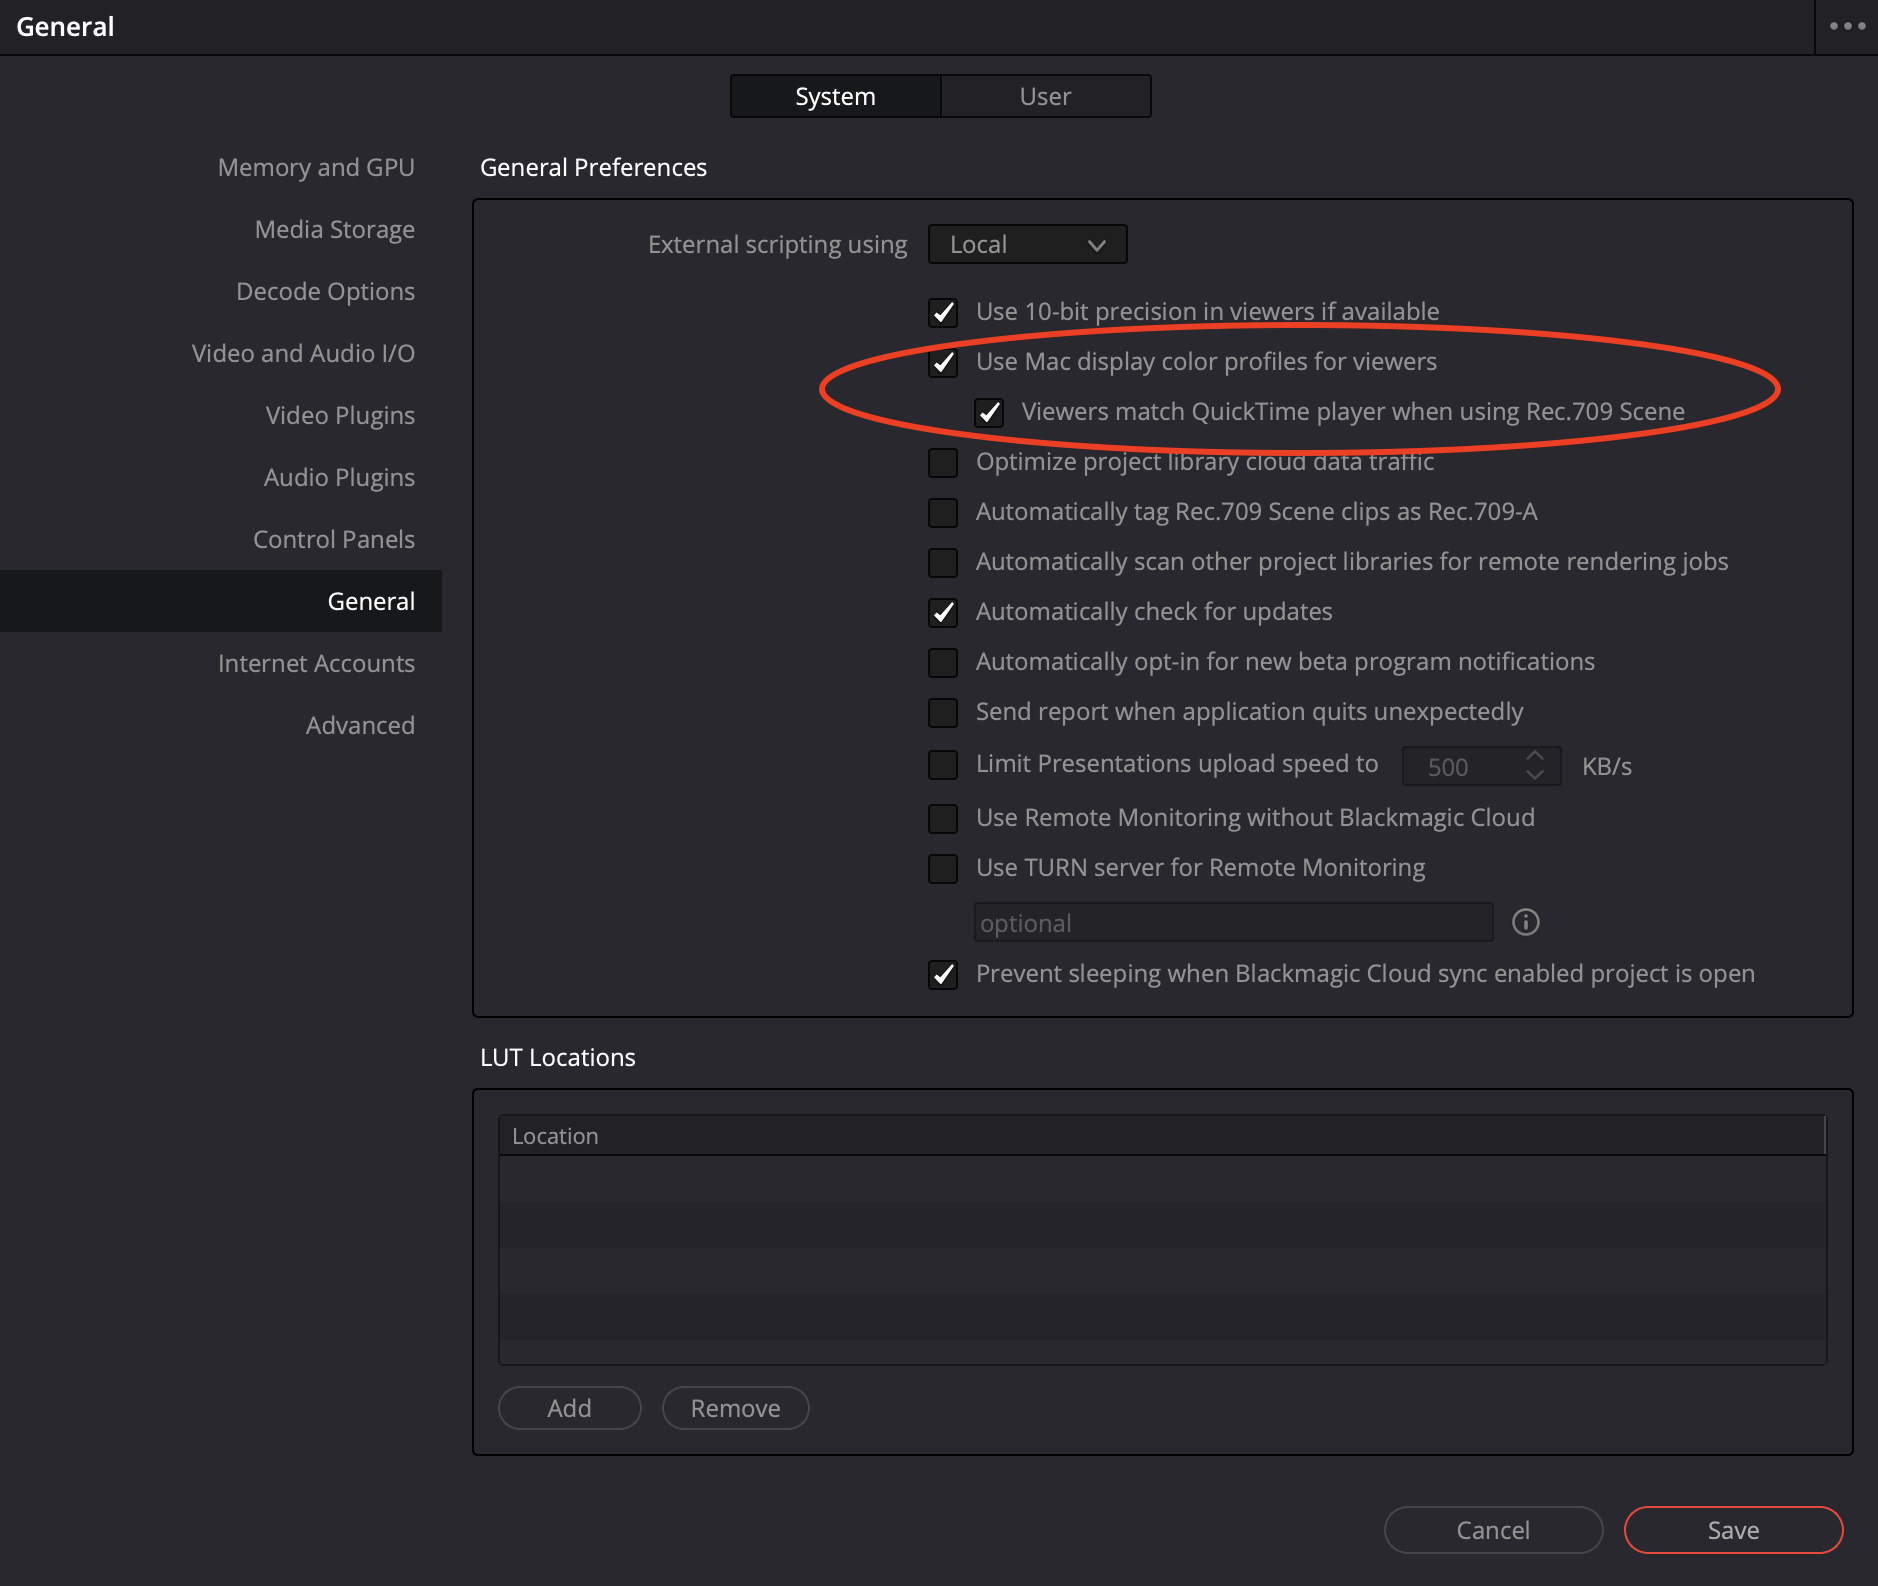
Here you can choose to enable/disable "Use Mac display color profiles for viewers" (on Mac) and "Use Windows display color management and HDR for viewers" (on Windows) which is equivalent to switching your monitor's ICC Profile on or off.

Enabling it means Resolve will do the necessary conversions to ensure the image displayed in Resolve’s viewer adapts to the characteristics and color space of your monitor.&#x20;

This option not always yields the expected results and the conversion might not be accurate. We encourage you to run some tests and see if the images displayed in Resolve looks closer or not to what you see on other devices like smartphones, tablets and TVs with this option enabled.  Based on that you can opt to keep it on or off.

For Mac users, below the "Use Mac display color profiles for viewers" option you'll find "Viewers match Quicktime player when using Rec.709 (Scene)". This option is aimed at making Resolve's viewer match Quicktime Player's viewer, as a way to address the famous gamma shift issue on Mac.  This setting will only affect Resolve's viewer when Rec.709 (Scene) is selected in the Color Management menu. If you want to make your images match between Resolve and Quicktime Player, enable this option and we will show you how to set Color Management and CineDream Preferences acordingly in the paragraphs below.

After settings Preferences we need to match this same settings inside CineDream.

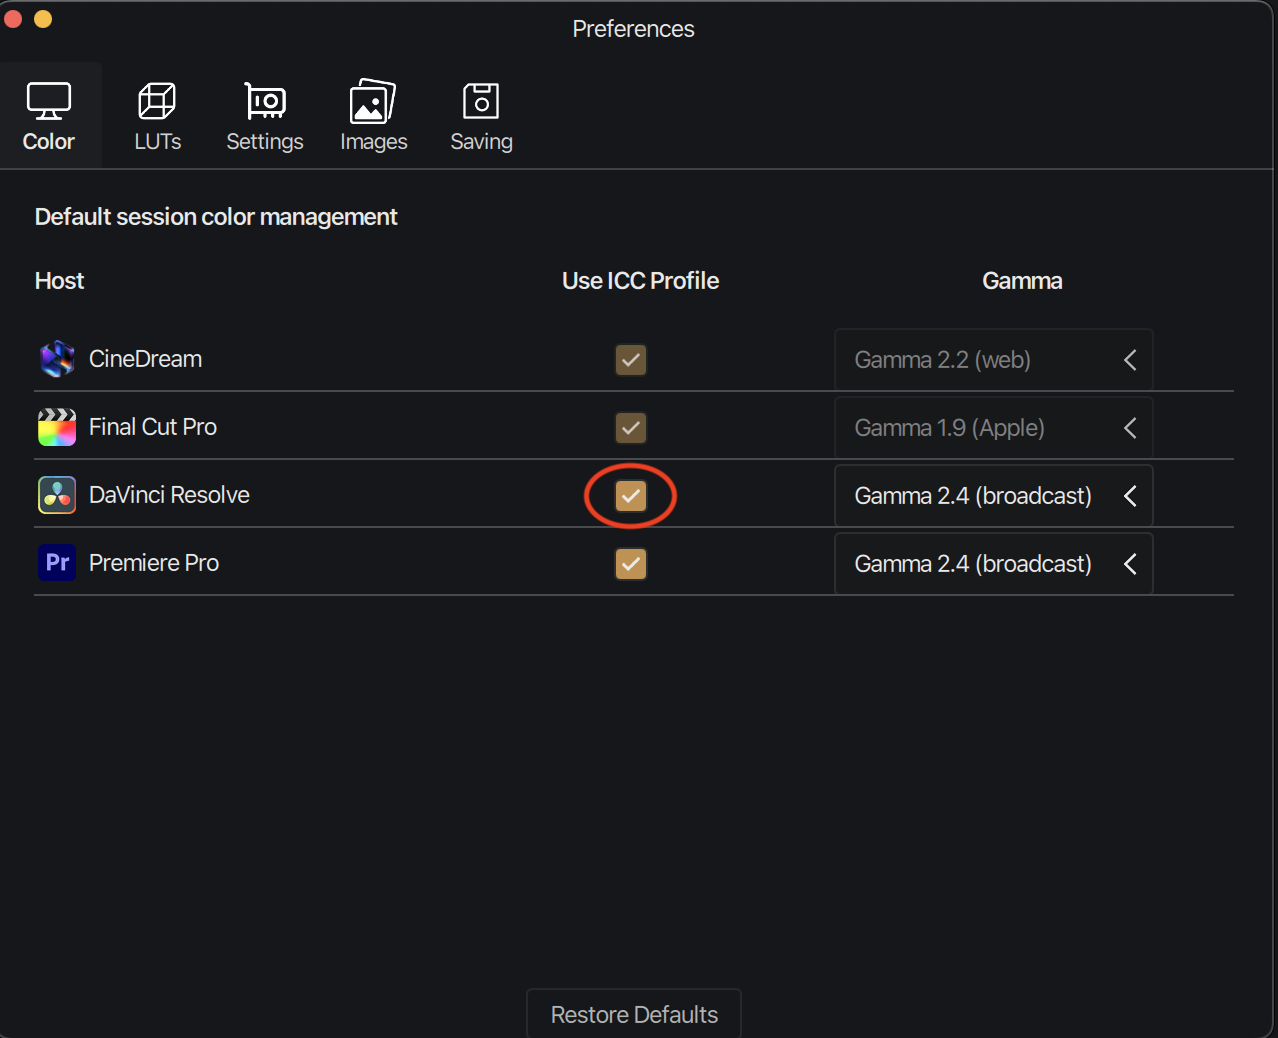
In Preferences/Color, make sure ICC Profile is checked if you chose to keep Display Color Management enabled in Resolve, and unchecked if you chose to keep Display Color Management disabled.&#x20;

<figure><img src="https://1449894025-files.gitbook.io/~/files/v0/b/gitbook-x-prod.appspot.com/o/spaces%2FXV6dIa2ZTHDKnFjYTLCU%2Fuploads%2FCEPoFxEieR07KGkhdBWm%2FScreenshot%202025-09-19%20at%201.42.21%E2%80%AFPM%20copy%202.png?alt=media&amp;token=06f3623e-7bf4-42f5-9bbe-76b7f94e3804" alt="" width="375"><figcaption></figcaption></figure>

The second menu to look at is Project Settings/Color Management

<figure><img src="https://1449894025-files.gitbook.io/~/files/v0/b/gitbook-x-prod.appspot.com/o/spaces%2FXV6dIa2ZTHDKnFjYTLCU%2Fuploads%2FAtG9cajhT6K1Tqjdk0Cu%2FScreenshot%202025-09-19%20at%209.23.01%E2%80%AFAM.png?alt=media&amp;token=9208996a-ddde-4132-b31d-5024794bb804" alt="" width="375"><figcaption></figcaption></figure>

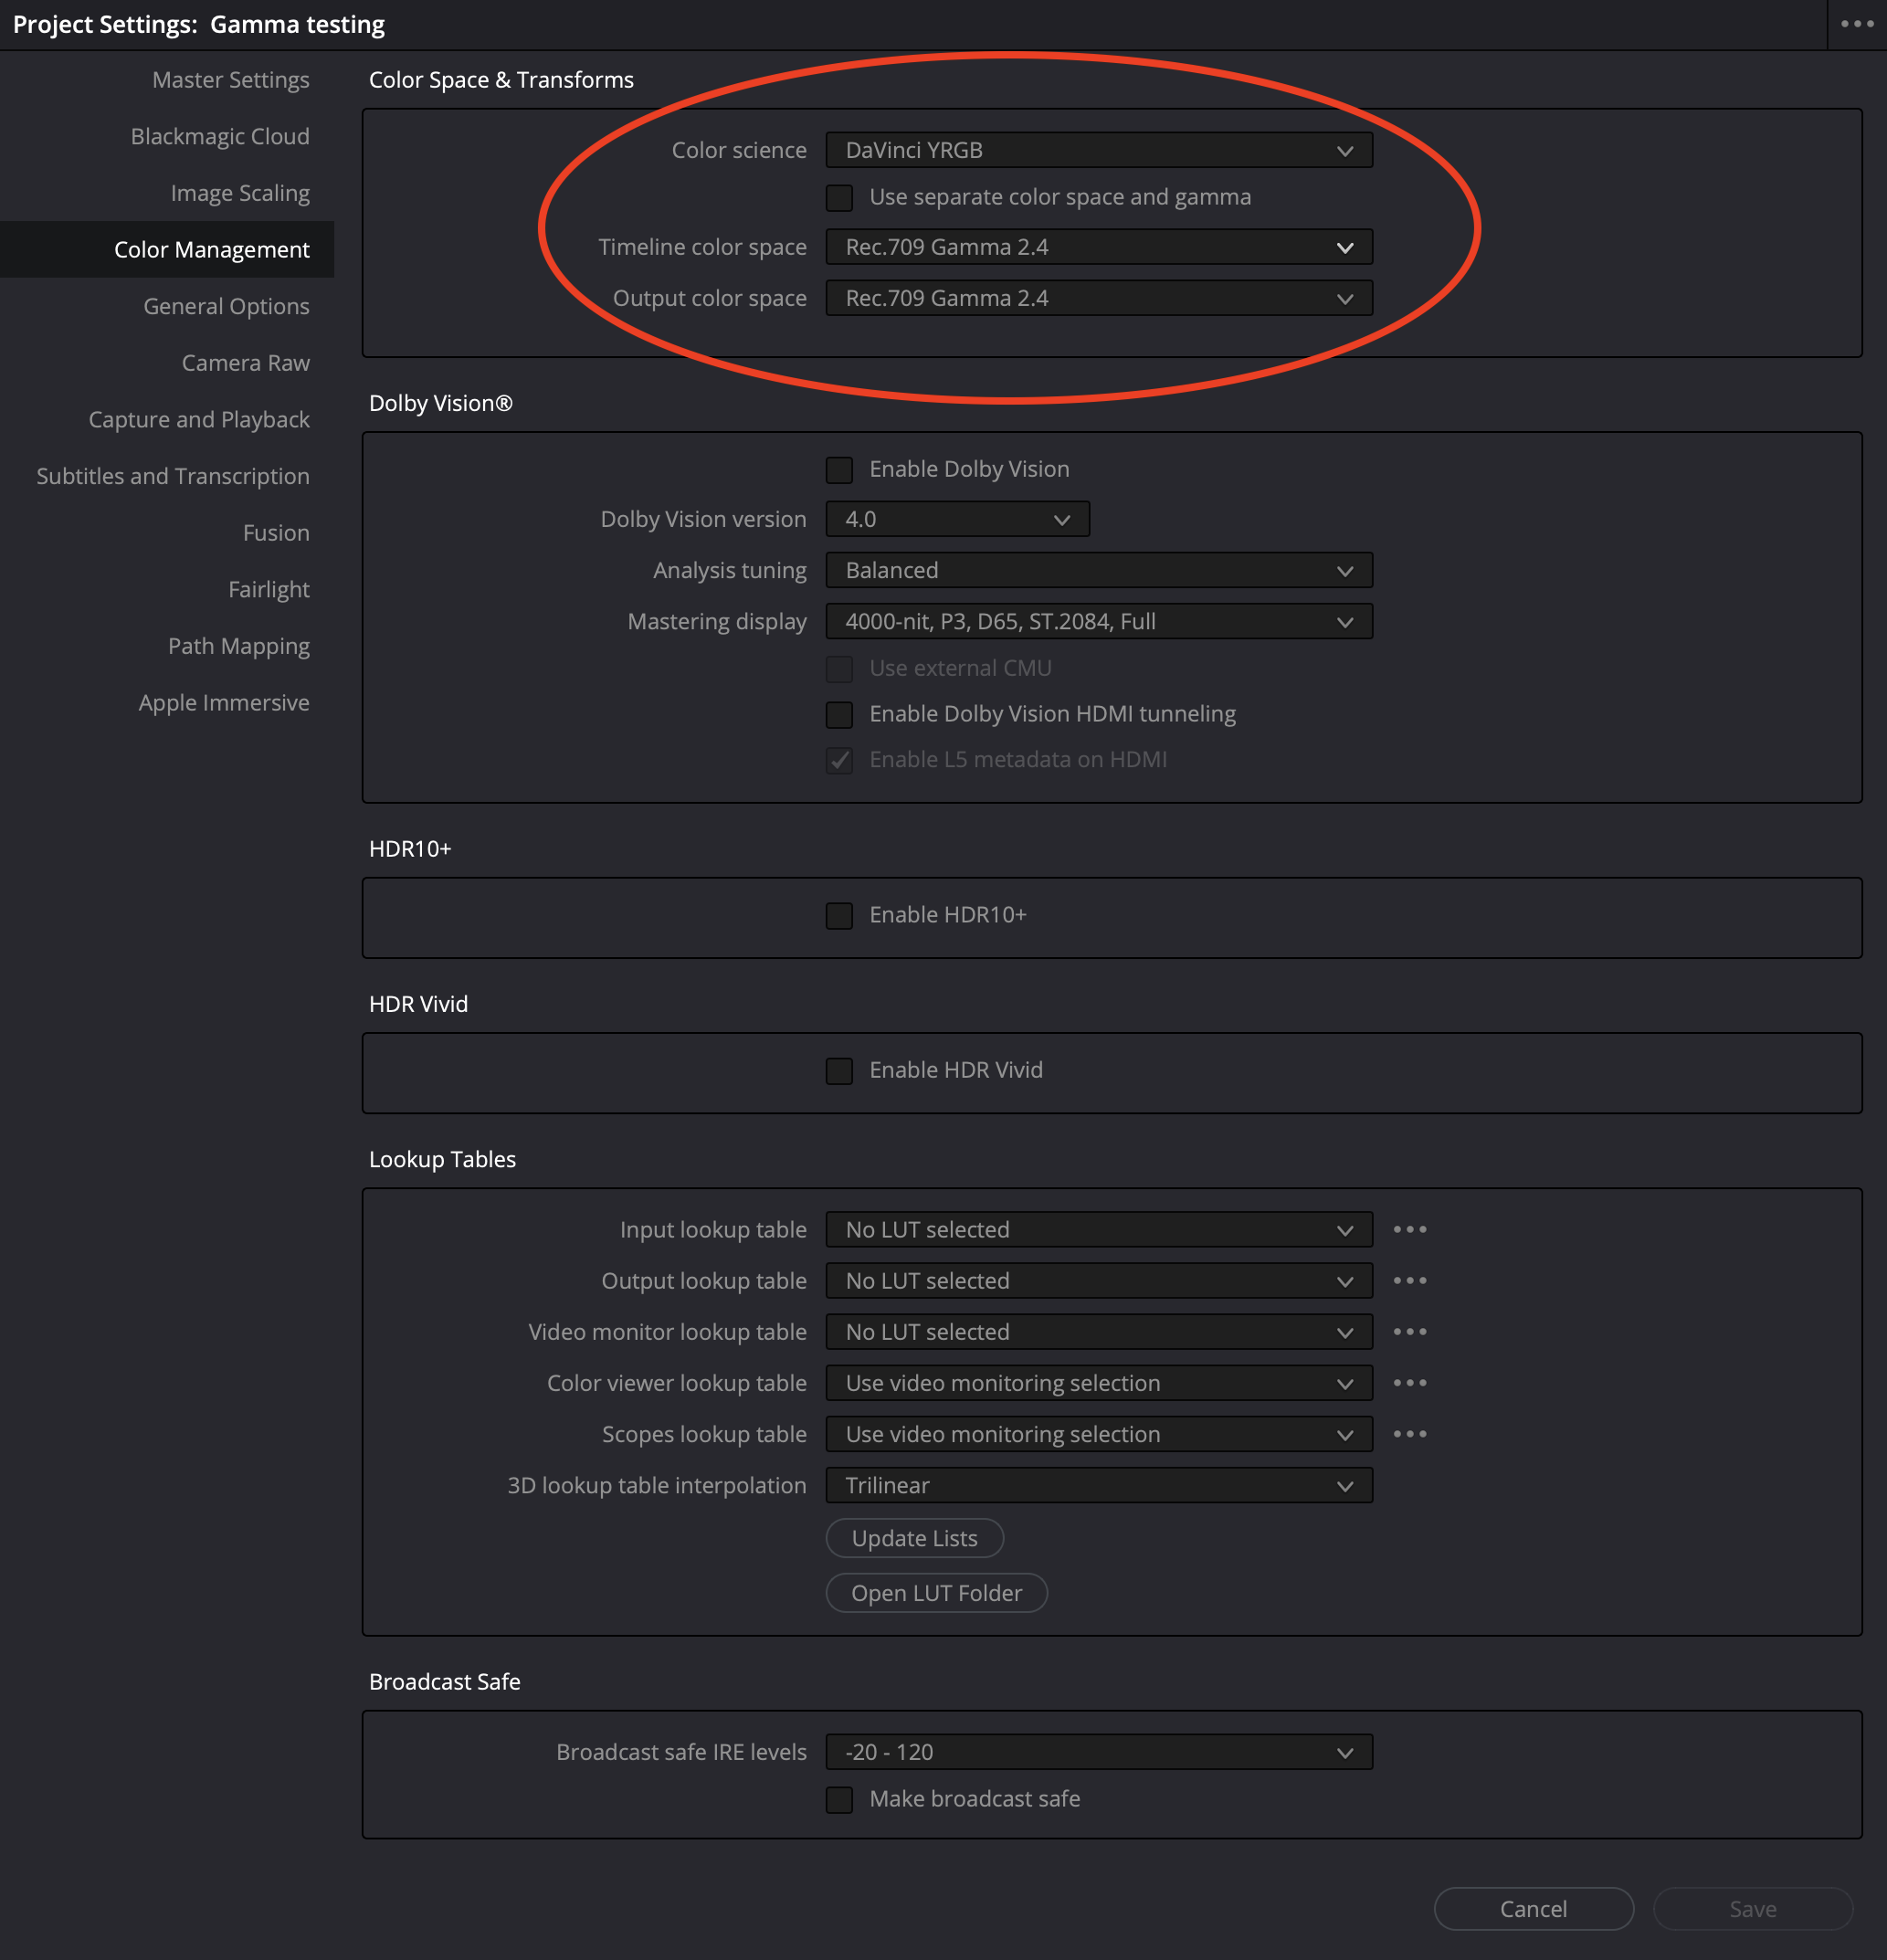
Here make sure Color Science is set to DaVinci YRGB, this means you’ll be using a non-color managed workflow.  This is important because all your color management will happen inside CineDream and we don’t want two different color managements, Resolve and CineDream, to collide.

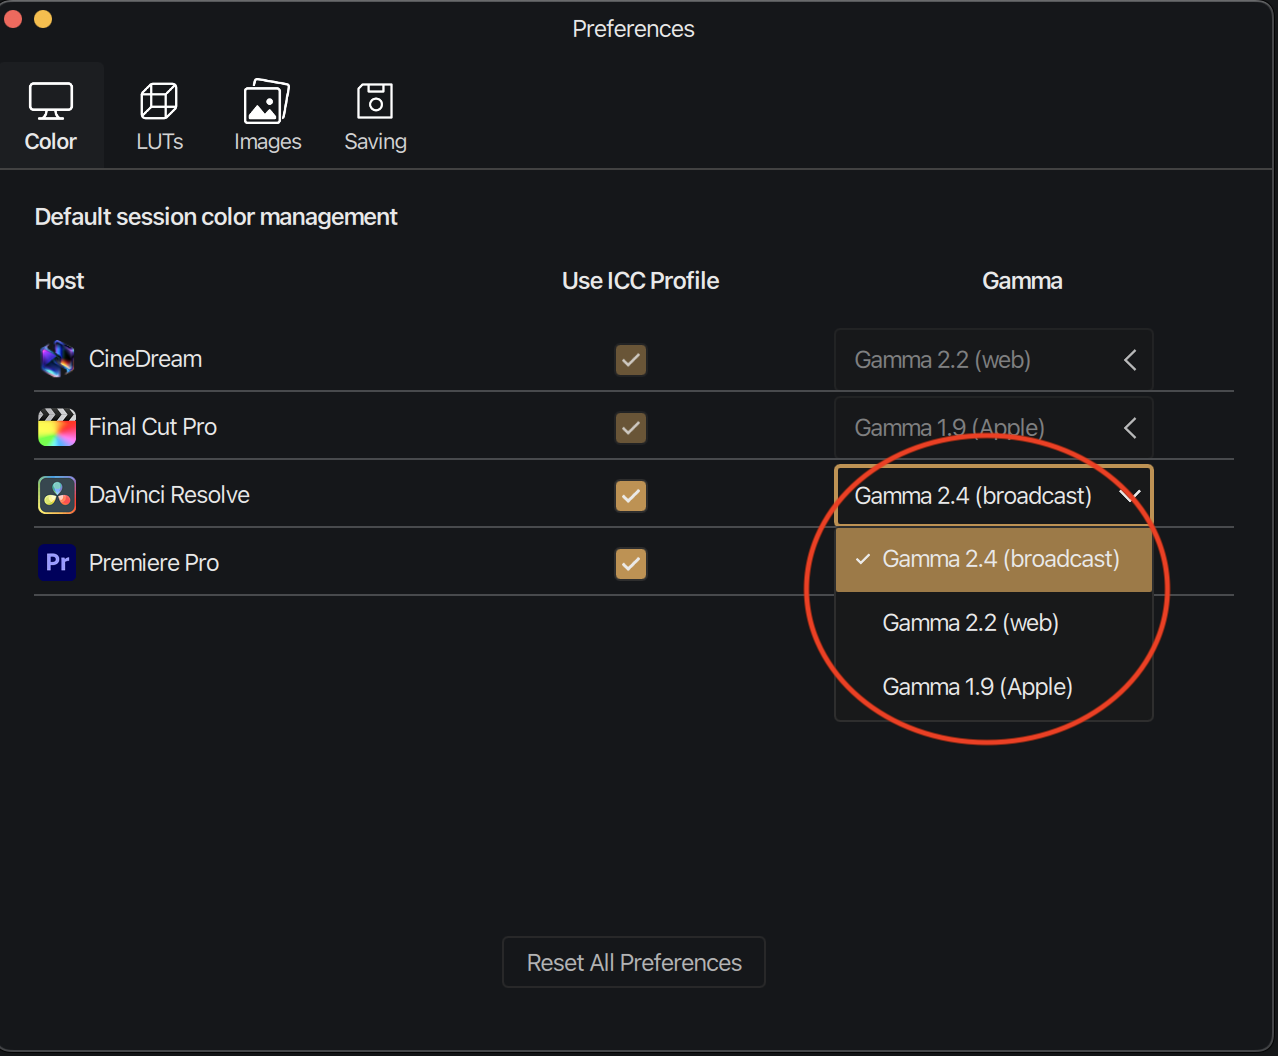
Then for Timeline and Output color space choose Rec709, gamma 2.4 for broadcast or 2.2 for web, depending on your intended delivery. If you checked "Viewers match Quicktime player when using Rec.709 (Scene)" in the Preferences menu to ensure Resolve and Quicktime Player match, change the Timeline color space and Output color space to Rec709 (Scene).

Back to CineDream, Preferences/Color menu, set the gamma accordingly.  If you chose Rec709 (Scene), change Gamma to 1.9 (Apple), as that is the Gamma used in Quicktime Player.

<figure><img src="https://1449894025-files.gitbook.io/~/files/v0/b/gitbook-x-prod.appspot.com/o/spaces%2FXV6dIa2ZTHDKnFjYTLCU%2Fuploads%2FoAQtDDFwGSOidAmD05Km%2FScreenshot%202025-09-19%20at%209.34.39%E2%80%AFAM.png?alt=media&amp;token=877549f1-7f78-4fbc-a24f-44c113450a33" alt="" width="375"><figcaption></figcaption></figure>

With the color management settings matched between CineDream and Adobe Premiere Pro you can expect a 1:1 match.

<figure><img src="https://1449894025-files.gitbook.io/~/files/v0/b/gitbook-x-prod.appspot.com/o/spaces%2FXV6dIa2ZTHDKnFjYTLCU%2Fuploads%2FGQrNrN1epDQOIT5yj6GV%2Fresolve%20match.png?alt=media&amp;token=0254af3c-1a18-4ad9-9c2b-fe2ca346ec2e" alt=""><figcaption></figcaption></figure>


# Color Management for Photos (Photoshop, Lightroom Classic and Standalone mode)

When working with photos the operating system and the host applications will work with ICC Profile on by default. Meaning the software is doing the necessary transforms to display the images correctly in your monitor.  In this cases, by default, the gamma used is 2.2, optimized for web delivery.

Back in CineDream, Preferences/Color, you’ll see those are the settings displayed, ICC Profile enabled and Gamma 2.2 (web). They are greyed out as there is no reason to change them.

CineDream viewer and the host application viewers (Photoshop and Lightroom Classic) should match.

<figure><img src="https://1449894025-files.gitbook.io/~/files/v0/b/gitbook-x-prod.appspot.com/o/spaces%2FXV6dIa2ZTHDKnFjYTLCU%2Fuploads%2FYorbbj52DF7GtqQsqM2d%2FScreenshot%202025-09-19%20at%201.42.21%E2%80%AFPM.png?alt=media&amp;token=727fb1bc-e7f1-4c15-94ff-1b9f1422cc61" alt="" width="375"><figcaption></figcaption></figure>


# Final Cut Users: Watch this!

***

{% embed url="<https://www.youtube.com/watch?v=BExsyhoVYTs>" %}


# DaVinci Resolve Users: Watch this!

CineDream for DaVinci Resolve can be used in two different ways:

1. Full Editor, which is the closest experience to what you get with CineDream for Adobe Premiere and Final Cut, but with 2 pages (Base Correction & Final Grading) instead of three (Base Correciton, Shot Matching & Final Grading), so the grouping and matching workflow is a little different.
2. OFX Plugins (Base Corretion & Final Grading), which are two plugins you can use inside DaVinci Resolve without having to launch a separate application.  These plugins work like regular effects, with controls inside Resolve's UI and provide you the same tools as the Full Editor but with direct on screen grading over Resolve's viewer.

Please watch this video to learn how to use CineDream Full Editor inside DaVinci Resolve.

{% embed url="<https://colorgradingcentral.wistia.com/medias/yi9x0ii22g>" %}

And watch this video to learn how to use CineDream's Base Correction and Final Grading OFXs.

{% embed url="<https://colorgradingcentral.wistia.com/medias/re2pvvie33?embedType=iframe_web_component&seo=true&videoWidth=960>" %}


# Adobe Premiere Pro Users: Watch this!

{% embed url="<https://youtu.be/rvgEscCVWwQ?si=9uh7wXrgpzk7O6ZT>" %}


# Menus, Preferences & LUTs


# Top Menus

**CineDream:** Includes standard options like About, Hide and Quit, plus the Preferences Menu which we will explained in the next section.

<figure><img src="https://1449894025-files.gitbook.io/~/files/v0/b/gitbook-x-prod.appspot.com/o/spaces%2FXV6dIa2ZTHDKnFjYTLCU%2Fuploads%2FqpmpRxxaXY6VaQEhWXkN%2FScreenshot%202025-03-13%20at%207.57.44%E2%80%AFPM.png?alt=media&amp;token=66601f00-bedd-4160-8424-0474a0c2253e" alt="" width="198"><figcaption><p>CineDream Dropdown Menu</p></figcaption></figure>

**File:** Includes options to create New projects, open projects, close projects, import images, and share and export which we’ll explain in more detail in another section.

<figure><img src="https://1449894025-files.gitbook.io/~/files/v0/b/gitbook-x-prod.appspot.com/o/spaces%2FXV6dIa2ZTHDKnFjYTLCU%2Fuploads%2FgJSpDTlUp1G72FYkNkiU%2FScreenshot%202025-03-13%20at%207.57.53%E2%80%AFPM.png?alt=media&amp;token=61637d0b-0ea5-45f3-bbd5-23eb71d9d301" alt="" width="234"><figcaption><p>File Dropdown Menu</p></figcaption></figure>

**Edit:** Which let’s you copy and paste corrections and grades as well as apply Presets.

<figure><img src="https://1449894025-files.gitbook.io/~/files/v0/b/gitbook-x-prod.appspot.com/o/spaces%2FXV6dIa2ZTHDKnFjYTLCU%2Fuploads%2FBdxnh5dCnsdDS5M2KaEO%2FScreenshot%202025-03-13%20at%207.59.22%E2%80%AFPM.png?alt=media&amp;token=baaa4588-3142-44e9-be34-0fb166844dc4" alt="" width="273"><figcaption><p>Edit Dropdown Menu</p></figcaption></figure>

**Tools:** Which let’s you select any of the tools in CineDream.

<figure><img src="https://1449894025-files.gitbook.io/~/files/v0/b/gitbook-x-prod.appspot.com/o/spaces%2FXV6dIa2ZTHDKnFjYTLCU%2Fuploads%2FJRp0p1ytC2KQwAfXWWBa%2FScreenshot%202025-03-13%20at%207.59.54%E2%80%AFPM.png?alt=media&amp;token=766ce126-4389-4b45-ae04-156315a8e7ac" alt="" width="237"><figcaption><p>Tools Dropdown Menu</p></figcaption></figure>

**View:** Which let’s you navigate between the three pages, zoom in and out on the viewer, enable/disable scopes, false color, skin false color, by pass corrections, show or hide the various other tool panels and enable Full Screen View, which hides most tools and panels to maximize the screen real state for the viewer.

<figure><img src="https://1449894025-files.gitbook.io/~/files/v0/b/gitbook-x-prod.appspot.com/o/spaces%2FXV6dIa2ZTHDKnFjYTLCU%2Fuploads%2F3eMDdzSDFYxUWUb7mkuJ%2FScreenshot%202025-03-13%20at%208.00.03%E2%80%AFPM.png?alt=media&amp;token=2e7be123-9a7e-412e-95bd-ad968784e7b4" alt="" width="294"><figcaption><p>View Dropdown Menu</p></figcaption></figure>

**Go:** To navigate between previous and next images.

<figure><img src="https://1449894025-files.gitbook.io/~/files/v0/b/gitbook-x-prod.appspot.com/o/spaces%2FXV6dIa2ZTHDKnFjYTLCU%2Fuploads%2FCUfse9Ap6QogH86cAmcc%2FScreenshot%202025-03-13%20at%208.00.08%E2%80%AFPM.png?alt=media&amp;token=f8657295-e258-4819-8a0d-65fb5f96267e" alt="" width="245"><figcaption><p>Go Dropdown Menu</p></figcaption></figure>

**Windows:** To navigate between various projects you might have opened at the same time.

<figure><img src="https://1449894025-files.gitbook.io/~/files/v0/b/gitbook-x-prod.appspot.com/o/spaces%2FXV6dIa2ZTHDKnFjYTLCU%2Fuploads%2F20FcMnQ0KV8B7RbPQDc1%2FScreenshot%202025-03-13%20at%208.00.15%E2%80%AFPM.png?alt=media&amp;token=98c6e32d-b2c4-407c-9e27-040629a754b2" alt="" width="305"><figcaption><p>Windows Dropdown Menu</p></figcaption></figure>

**Help:** For Registration, link to tutorials, frequently asked questions and support.

<figure><img src="https://1449894025-files.gitbook.io/~/files/v0/b/gitbook-x-prod.appspot.com/o/spaces%2FXV6dIa2ZTHDKnFjYTLCU%2Fuploads%2FWwihxtjFtfCaY1a94QtH%2FScreenshot%202025-03-13%20at%208.00.22%E2%80%AFPM.png?alt=media&amp;token=dcbe57b5-9125-492c-b833-672a53e33568" alt="" width="369"><figcaption><p>Help Dropdown Menu</p></figcaption></figure>


# Preferences & LUTs

Under the CineDream menu at the top on Mac or the File menu on Windows you’ll find Preferences.

**The Preferences panel has 4 sections**:

**Color:** Here you can set the viewer's color management to match that of your NLE's viewer.  You can enable/disable the ICC Profile and change the Gamma for DaVinci Resolve and Premiere Pro as they are the only ones that let you change those settingsin their corresponding preferences settings.  Final Cut Pro has ICC always on and Gamma 1.9 by default.  And CineDream in standalone mode uses ICC and Gamma 2.2 to match your computer monitor.

<figure><img src="https://1449894025-files.gitbook.io/~/files/v0/b/gitbook-x-prod.appspot.com/o/spaces%2FXV6dIa2ZTHDKnFjYTLCU%2Fuploads%2FetJvzO1cLL9vOlvNhIll%2FScreenshot%202025-09-14%20at%209.02.46%E2%80%AFAM.png?alt=media&amp;token=dc0b291b-8298-4d8e-b101-48d86b3dd159" alt="" width="375"><figcaption><p>Color Management menu</p></figcaption></figure>

**LUTs:** You can use this menu to import LUTs into CineDream.  Use the + icon to add folders containing LUTs and the - icon to remove them.  Remember, the folders should remain in their location as CineDream references to them directly.  For both folders and LUT names you should avoid symbols like ( ) “ # and spaces.  Once imported the LUTs will show up in the LUT Previewer as part of the Look Panel in the Final Grading Page.

<figure><img src="https://1449894025-files.gitbook.io/~/files/v0/b/gitbook-x-prod.appspot.com/o/spaces%2FXV6dIa2ZTHDKnFjYTLCU%2Fuploads%2FkQCcnKueepF7jlHWJq7U%2FScreenshot%202025-09-14%20at%209.02.55%E2%80%AFAM.png?alt=media&amp;token=762d138c-991f-4d8e-a44d-541f8203f642" alt="" width="375"><figcaption><p>LUTs menu</p></figcaption></figure>

**Images:** This menu is exclusive for working with photos.  CineDream lets you export photos in JPG, TIFF and PNG.  You can choose the quality/bit depth for those formats and the default exporting format.

<figure><img src="https://1449894025-files.gitbook.io/~/files/v0/b/gitbook-x-prod.appspot.com/o/spaces%2FXV6dIa2ZTHDKnFjYTLCU%2Fuploads%2FkgI3Itw8ldQS7FQMbny0%2FScreenshot%202025-09-14%20at%209.03.04%E2%80%AFAM.png?alt=media&amp;token=cf6ceb52-2d7c-4acf-a801-f02788b69e76" alt="" width="375"><figcaption><p>Images menu</p></figcaption></figure>

**Saving:** This menu is exclusive for working with photos.  It establishes the suffix for quick saving photos and for saving photos to Lightroom.

<figure><img src="https://1449894025-files.gitbook.io/~/files/v0/b/gitbook-x-prod.appspot.com/o/spaces%2FXV6dIa2ZTHDKnFjYTLCU%2Fuploads%2FZeqCng4PUqrGeix3IAtn%2FScreenshot%202025-09-14%20at%209.03.14%E2%80%AFAM.png?alt=media&amp;token=028d9d29-26e5-4c98-b944-ab2fa7c457c3" alt="" width="375"><figcaption><p>Saving menu</p></figcaption></figure>


# CineDream 3 Pages Interface

CineDream interface is organized into 3 pages.  You can switch between these 3 pages clicking on the button at the top center of the interface or through the View dropdown menu.

<figure><img src="https://1449894025-files.gitbook.io/~/files/v0/b/gitbook-x-prod.appspot.com/o/spaces%2FXV6dIa2ZTHDKnFjYTLCU%2Fuploads%2FrRvFaqpN60iJro7SHkLS%2FScreenshot%202025-03-13%20at%208.12.26%E2%80%AFPM.png?alt=media&amp;token=0e05f99c-57b0-4821-af5a-5e01d6e55090" alt=""><figcaption><p>3 Pages Interface</p></figcaption></figure>

The only exception to this layout is in Resolve where CineDream does not have a Shot Matching page.  Due to limitations on how CineDream communicates with DaVinci Resolve, multiple clips can’t be viewed in CineDream at the same time, which makes impossible to use grouping and shot matching. You can use CineDream to create a Base Correction or a Final Grade on a per clip basis.  To apply that correction or final grade to multiple clips, you can copy and paste CineDream to other clips inside Resolve’s UI as you would with any other effect or property.


# Base Correction Page

In this page you can use the Develop Panel on the left to perform color management, transforming any log footage and adding a CineDream preset for a film look, and use the tools in the Color Correction Tools Panel to correct exposure, color balance and other issues.

<figure><img src="https://1449894025-files.gitbook.io/~/files/v0/b/gitbook-x-prod.appspot.com/o/spaces%2FXV6dIa2ZTHDKnFjYTLCU%2Fuploads%2FJV1BCk9GJw65odAzrJwx%2FScreenshot%202025-03-13%20at%208.15.19%E2%80%AFPM.png?alt=media&amp;token=fe40dd83-6552-4eb1-a09a-480814f2ccf4" alt=""><figcaption><p>Base Correction Page</p></figcaption></figure>

**Tools Top Layout**

**First row**, starting from the left:

<figure><img src="https://1449894025-files.gitbook.io/~/files/v0/b/gitbook-x-prod.appspot.com/o/spaces%2FXV6dIa2ZTHDKnFjYTLCU%2Fuploads%2FryY40n6QRJ2W09hWNbQ4%2FScreenshot%202025-03-13%20at%208.21.58%E2%80%AFPM.png?alt=media&amp;token=06aaa041-e444-402f-947e-a7483f767742" alt="" width="563"><figcaption></figcaption></figure>

**Zoom Slider:** to control the size of the image in the viewer.

**Fit:** To fit the size of the image to the available space for the viewer.

**1:1:** To show the image at 100% of its size regardless of the size of the viewer.

**Full screen icon:** to go to Full Screen mode

**Reset all:** To reset all corrections done to the image.

**Undo:** to undo corrections

**Redo:** To redo corrections

**Presets:** To save or apply correction presets.

**Second row**, starting from the left:

<figure><img src="https://1449894025-files.gitbook.io/~/files/v0/b/gitbook-x-prod.appspot.com/o/spaces%2FXV6dIa2ZTHDKnFjYTLCU%2Fuploads%2FxFo4lOSui9mb48Ma3Drk%2FScreenshot%202025-03-13%20at%208.24.12%E2%80%AFPM.png?alt=media&amp;token=bf3e05a8-bde7-436a-8b10-51d6adf96ce0" alt=""><figcaption></figcaption></figure>

**Crop tool:** enables the cropping tool.

**Develop:** to open and close the Develop panel on the left hand side of the UI. More on that in the Develop section.

**Basic Tools:** Four icons representing the 4 basic correction bundles of tools.  Each icon has an arrow pointing downwards. By clicking on each arrow, a dropdown menu displays showing the tools that are part of that section.  If you click on the icon itself you’ll be selecting the first tool in the dropdown list.

**Advanced Tools:** Three icons representing 3 bundle of tools.

**Effects:** With two tools, vignette and gradient.

**Scopes:** Icons to disable and enable the scopes, false color and skin false color.

<figure><img src="https://1449894025-files.gitbook.io/~/files/v0/b/gitbook-x-prod.appspot.com/o/spaces%2FXV6dIa2ZTHDKnFjYTLCU%2Fuploads%2FCg3NhTRoLeGj7kOeivmf%2FScreenshot%202025-03-13%20at%208.24.16%E2%80%AFPM.png?alt=media&amp;token=251764c7-437a-4042-95a7-37f9340efd35" alt="" width="180"><figcaption></figcaption></figure>

**Compare:** Eye icon to bypass all corrections and wipe icon to enable a before/after wipe view.

<figure><img src="https://1449894025-files.gitbook.io/~/files/v0/b/gitbook-x-prod.appspot.com/o/spaces%2FXV6dIa2ZTHDKnFjYTLCU%2Fuploads%2F17ofk1W7jkX4CvU7H3Mz%2FScreenshot%202025-03-13%20at%208.24.21%E2%80%AFPM.png?alt=media&amp;token=c4f7a147-b6d7-4b89-bb62-096483bc146f" alt="" width="159"><figcaption></figcaption></figure>

\
**Panels**

There are 4 panels that are hidden by default.  Each one has an arrow you can hover the mouse over to open up.

**Presets panel:** Hover the cursor over the arrow situated at the top of the viewer.

**Develop panel:** Hover the cursor over the arrow situated at the left edge of the interface.

**Color Correction tools panel:** Hover the cursor over the arrow situated at the right edge of the interface.

**FilmStrip:** Hover the cursor over the arrow situated at the bottom edge of the interface.


# Shot Matching Page

This page is composed of two sections. First **Group Shots**, where you can organize your footage in groups based on any criteria you consider fit, scene, camera, etc.  Then you can move on to the **Match Shots** section, where you can view the Hero shot of each group on the left viewer and the other images on the right viewer.  Here you can easily copy corrections between images and use the side by side view to match the images.


# Group Shots

<figure><img src="https://1449894025-files.gitbook.io/~/files/v0/b/gitbook-x-prod.appspot.com/o/spaces%2FXV6dIa2ZTHDKnFjYTLCU%2Fuploads%2Fsm4Zm20zpPHEPFAIbZWE%2FScreenshot%202025-03-13%20at%208.15.39%E2%80%AFPM.png?alt=media&amp;token=8e3b05da-e876-40e5-abfa-2cd177efc9a7" alt=""><figcaption><p>Group Shots</p></figcaption></figure>

At the center of this section there is a grid showing all the images in the project. All color correction tool at the top are greyed out in this section as it is intended for organization purposes and not performing corrections.

Above the grid, on the left side you have the group navigation tools. You can search a shot by name, by group, filter by group, change the size of the thumbnails with the Image size slider and Collapse group so that instead of displaying all the clips in each group, they will be collapsed to a single Thumbnail representing the whole group.

<figure><img src="https://1449894025-files.gitbook.io/~/files/v0/b/gitbook-x-prod.appspot.com/o/spaces%2FXV6dIa2ZTHDKnFjYTLCU%2Fuploads%2FchlrMIXSXlxhLM1gwkBg%2FScreenshot%202025-03-13%20at%208.28.45%E2%80%AFPM.png?alt=media&amp;token=136f24eb-4f12-4df9-ae14-f19bd8b05344" alt="" width="375"><figcaption></figcaption></figure>

On the right side you have Merge Groups to merge two or more groups, clear group and clear all.  Next to this options you’ll find the Match Shots button to switch to the second section of this page.

<figure><img src="https://1449894025-files.gitbook.io/~/files/v0/b/gitbook-x-prod.appspot.com/o/spaces%2FXV6dIa2ZTHDKnFjYTLCU%2Fuploads%2FYW9e6h63pTdLP6LcCWqV%2FScreenshot%202025-03-13%20at%208.28.51%E2%80%AFPM.png?alt=media&amp;token=5896ee58-6183-4248-a6dd-d3c4d191ffd7" alt="" width="375"><figcaption></figcaption></figure>

On the left edge you can select groups. Each group is represented by a color, you can add more colors with the + icon.  You can drag at the right side of the color swatches to reveal the name of the groups.  Double clicking on the name you can change it.

<figure><img src="https://1449894025-files.gitbook.io/~/files/v0/b/gitbook-x-prod.appspot.com/o/spaces%2FXV6dIa2ZTHDKnFjYTLCU%2Fuploads%2FNnWZOVriWBccnaA8pbu7%2FScreenshot%202025-03-13%20at%208.29.47%E2%80%AFPM.png?alt=media&amp;token=5d1144e9-820f-4c17-9bdd-c91fb27bc0ef" alt="" width="129"><figcaption></figcaption></figure>

Once you select a color swatch you can click on shots to group them. The first shot selected is the hero shot.

To remove a clip from the group, with the group selected just click again on the clip.

A right click on any thumbnail will reveal a dropdown menu from which you can remove the clip from the group, assign it as the hero shot for the group, and copy and paste corrections between clips.

<figure><img src="https://1449894025-files.gitbook.io/~/files/v0/b/gitbook-x-prod.appspot.com/o/spaces%2FXV6dIa2ZTHDKnFjYTLCU%2Fuploads%2FSyVTapDtDsZVZvBHOgxa%2FScreenshot%202025-03-13%20at%208.30.29%E2%80%AFPM.png?alt=media&amp;token=9b80edeb-0386-48c2-9e7a-7d1b1e73a263" alt="" width="202"><figcaption></figcaption></figure>


# Match Shots

At the center of this section you’ll find the side by side viewer with the Hero shot at the left and the other images in the group at the right.

<figure><img src="https://1449894025-files.gitbook.io/~/files/v0/b/gitbook-x-prod.appspot.com/o/spaces%2FXV6dIa2ZTHDKnFjYTLCU%2Fuploads%2F87MqoPiKawgydDNrmdnO%2FScreenshot%202025-03-13%20at%208.15.31%E2%80%AFPM.png?alt=media&amp;token=8379251f-93b2-4837-8a46-055c9c7dc279" alt=""><figcaption><p>Match Shots</p></figcaption></figure>

**Tools Top Layout**

**First row**, starting from the left:

<figure><img src="https://1449894025-files.gitbook.io/~/files/v0/b/gitbook-x-prod.appspot.com/o/spaces%2FXV6dIa2ZTHDKnFjYTLCU%2Fuploads%2FryY40n6QRJ2W09hWNbQ4%2FScreenshot%202025-03-13%20at%208.21.58%E2%80%AFPM.png?alt=media&amp;token=06aaa041-e444-402f-947e-a7483f767742" alt=""><figcaption></figcaption></figure>

**Zoom Slider:** to control the size of the image in the viewer that is selected, click over the left or right viewer to select it

**Fit:** To fit the size of the image selected to the available space for the viewer.&#x20;

**1:1:** To show the image selected at 100% of its size regardless of the size of the viewer.

**Full screen icon:** to go to Full Screen mode

**Reset all:** To reset all corrections done to the image selected

**Undo:** to undo corrections

**Redo:** To redo corrections

**Presets:** To save or apply correction presets.

**Second row**, starting from the left:

<figure><img src="https://1449894025-files.gitbook.io/~/files/v0/b/gitbook-x-prod.appspot.com/o/spaces%2FXV6dIa2ZTHDKnFjYTLCU%2Fuploads%2FTOEZvAbz4ZsjQYFyr4RE%2FScreenshot%202025-03-13%20at%208.32.48%E2%80%AFPM.png?alt=media&amp;token=3143733e-37ec-4dc1-8064-bf17cf234c41" alt=""><figcaption></figcaption></figure>

**Develop:** to open and close the Develop panel on the left hand side of the UI.

**Basic Tools:** Four icons representing the 4 basic correction bundles of tools.  Each icon has an arrow pointing downwards. By clicking on each arrow, a dropdown menu displays showing the tools that are part of that section.  If you click on the icon itself you’ll be selecting the first tool in the dropdown list.

**Advanced Tools:** Three icons representing 3 bundle of tools.

**Effects:** With two tools, vignette and gradient.

**Scopes:** Icons to disable and enable the scopes, false color and skin false color.

<figure><img src="https://1449894025-files.gitbook.io/~/files/v0/b/gitbook-x-prod.appspot.com/o/spaces%2FXV6dIa2ZTHDKnFjYTLCU%2Fuploads%2FCg3NhTRoLeGj7kOeivmf%2FScreenshot%202025-03-13%20at%208.24.16%E2%80%AFPM.png?alt=media&amp;token=251764c7-437a-4042-95a7-37f9340efd35" alt="" width="180"><figcaption></figcaption></figure>

**Compare:** Eye icon to bypass the final grade or bypass all.  And wipe icon to enable a before/after wipe view.

<figure><img src="https://1449894025-files.gitbook.io/~/files/v0/b/gitbook-x-prod.appspot.com/o/spaces%2FXV6dIa2ZTHDKnFjYTLCU%2Fuploads%2F17ofk1W7jkX4CvU7H3Mz%2FScreenshot%202025-03-13%20at%208.24.21%E2%80%AFPM.png?alt=media&amp;token=c4f7a147-b6d7-4b89-bb62-096483bc146f" alt="" width="159"><figcaption></figcaption></figure>

**Side by Side viewer**

The left viewer contains the Hero shot of the current group. Right bellow it you’ll find the Copy Correction button that lets you apply the corrections from the Hero shots to the image in the right viewer or to the whole group.

<figure><img src="https://1449894025-files.gitbook.io/~/files/v0/b/gitbook-x-prod.appspot.com/o/spaces%2FXV6dIa2ZTHDKnFjYTLCU%2Fuploads%2FIHOsvSXlbqrmIZbVHW9u%2FScreenshot%202025-03-13%20at%208.36.54%E2%80%AFPM.png?alt=media&amp;token=7defece7-29b1-4e05-bf3d-fe79e54eb367" alt=""><figcaption><p>Side by Side viewer</p></figcaption></figure>

The right viewer contains the other images in the group. Right below the viewer on the left hand side you can switch to grid view to see all the images in the group.  And at the center you’ll find the left and right arrows to cycle through the images in the group.

When in grid view mode you can use the Image Size slider to change the size of the thumbnails.

<figure><img src="https://1449894025-files.gitbook.io/~/files/v0/b/gitbook-x-prod.appspot.com/o/spaces%2FXV6dIa2ZTHDKnFjYTLCU%2Fuploads%2FUEjdUil8iBY3Qz2FxX5L%2FScreenshot%202025-03-13%20at%208.37.52%E2%80%AFPM.png?alt=media&amp;token=4bb32570-7a72-4020-86c8-8b3336ee28eb" alt=""><figcaption></figcaption></figure>

Above the right viewer, at the right, you’ll find the Viewing options which will let you switch between base correction mode and final grading mode.

<figure><img src="https://1449894025-files.gitbook.io/~/files/v0/b/gitbook-x-prod.appspot.com/o/spaces%2FXV6dIa2ZTHDKnFjYTLCU%2Fuploads%2FGwwQE9uezfLQlmiXu7IS%2FScreenshot%202025-03-13%20at%208.38.37%E2%80%AFPM.png?alt=media&amp;token=63f9a431-0051-48c8-b976-1f6b607647fa" alt="" width="144"><figcaption></figcaption></figure>

While in base correction mode, all the corrections performed will be made to the base correction and in final grading mode, the changes will affect the final grade.

**Panels**

**Presets panel:** Hover the cursor over the arrow situated at the top of the viewer.

**Group swatches:** Located on the left edge of the interface you can switch between groups by selecting the color swatches.

**Develop panel:** Hover the cursor over the arrow situated at the right side of the Group Swatches.

**Color Correction tools panel:** Hover the cursor over the arrow situated at the right edge of the interface.

**FilmStrip:** Hover the cursor over the arrow situated at the bottom edge of the interface.


# Final Grading Page

Here you can create looks for each group, dialing in the final cinematic look that fits the narrative of your film.

<figure><img src="https://1449894025-files.gitbook.io/~/files/v0/b/gitbook-x-prod.appspot.com/o/spaces%2FXV6dIa2ZTHDKnFjYTLCU%2Fuploads%2Fti1Kb9uNywBbTtxMXSvG%2FScreenshot%202025-03-13%20at%208.15.48%E2%80%AFPM.png?alt=media&amp;token=f7efe8ae-6a55-46ae-8147-410cbc538142" alt=""><figcaption><p>Final Grading Page</p></figcaption></figure>

**Tools Top Layout**

**First row**, starting from the left:

<figure><img src="https://1449894025-files.gitbook.io/~/files/v0/b/gitbook-x-prod.appspot.com/o/spaces%2FXV6dIa2ZTHDKnFjYTLCU%2Fuploads%2FryY40n6QRJ2W09hWNbQ4%2FScreenshot%202025-03-13%20at%208.21.58%E2%80%AFPM.png?alt=media&amp;token=06aaa041-e444-402f-947e-a7483f767742" alt=""><figcaption></figcaption></figure>

**Zoom Slider:** to control the size of the image in the viewer that is selected, click over the left or right viewer to select it

**Fit:** To fit the size of the image selected to the available space for the viewer.&#x20;

**1:1:** To show the image selected at 100% of its size regardless of the size of the viewer.

**Full screen icon:** to go to Full Screen mode

**Reset all:** To reset all corrections done to the image selected

**Undo:** to undo corrections

**Redo:** To redo corrections

**Presets:** To save or apply correction presets.

**Second row**, starting from the left:

<figure><img src="https://1449894025-files.gitbook.io/~/files/v0/b/gitbook-x-prod.appspot.com/o/spaces%2FXV6dIa2ZTHDKnFjYTLCU%2Fuploads%2FSoug54ME1okWK2yBHwgD%2FScreenshot%202025-03-13%20at%208.40.53%E2%80%AFPM.png?alt=media&amp;token=f8206165-30b3-4607-8122-280a76337bd1" alt=""><figcaption></figcaption></figure>

**Look:** to open and close the Look panel on the left hand side of the UI.

**Basic Tools:** Four icons representing the 4 basic correction bundles of tools.  Each icon has an arrow pointing downwards. By clicking on each arrow, a dropdown menu displays showing the tools that are part of that section.  If you click on the icon itself you’ll be selecting the first tool in the dropdown list.

**Advanced Tools:** Three icons representing 3 bundle of tools.

**Effects:** With two tools, vignette and gradient.

**Scopes:** Icons to disable and enable the scopes, false color and skin false color.

<figure><img src="https://1449894025-files.gitbook.io/~/files/v0/b/gitbook-x-prod.appspot.com/o/spaces%2FXV6dIa2ZTHDKnFjYTLCU%2Fuploads%2FCg3NhTRoLeGj7kOeivmf%2FScreenshot%202025-03-13%20at%208.24.16%E2%80%AFPM.png?alt=media&amp;token=251764c7-437a-4042-95a7-37f9340efd35" alt="" width="180"><figcaption></figcaption></figure>

**Compare:** Eye icon to bypass the final grade or bypass all.  And wipe icon to enable a before/after wipe view.

<figure><img src="https://1449894025-files.gitbook.io/~/files/v0/b/gitbook-x-prod.appspot.com/o/spaces%2FXV6dIa2ZTHDKnFjYTLCU%2Fuploads%2F17ofk1W7jkX4CvU7H3Mz%2FScreenshot%202025-03-13%20at%208.24.21%E2%80%AFPM.png?alt=media&amp;token=c4f7a147-b6d7-4b89-bb62-096483bc146f" alt="" width="159"><figcaption></figcaption></figure>

**Panels**

**Presets panel:** Hover the cursor over the arrow situated at the top of the viewer.

**Look panel:** Hover the cursor over the arrow situated at the right edge of the interface.

**Color Correction tools panel:** Hover the cursor over the arrow situated at the right edge of the interface.

**FilmStrip:** Hover the cursor over the arrow situated at the bottom edge of the interface.


# Panels & Tools

As mentioned in the previous section each CineDream Page includes several hidden panels containing color correction and grading tools as well as navigation tools and presets saving and management tools.  All these panels are hidden by default and can be opened by hovering the cursor over it's corresponding arrow.

Those Panels are:

**Develop Panel:** Located at the left hand side of the interface in the Base Correction and Shot Matching Pages

**Filmstrip:** Located at the bottom of the interface in all three pages.

**Presets Panel:** Located at the top of the viewer in all three pages.

**Color Correction tools Panel:** Located at the right hand side of the interface in all three pages.

**Look Panel:** Located at the left hand side of the interface in the Final Grading Page.


# Develop Panel

The Develop panel is present in the Base Correction and Shot Matching Pages.

<figure><img src="https://1449894025-files.gitbook.io/~/files/v0/b/gitbook-x-prod.appspot.com/o/spaces%2FXV6dIa2ZTHDKnFjYTLCU%2Fuploads%2F5iNJ6LylpPQqMboloyKY%2FScreenshot%202025-03-13%20at%208.42.27%E2%80%AFPM.png?alt=media&amp;token=6ef52bba-dfb7-46f9-80c4-ee9e257e6643" alt="" width="231"><figcaption></figcaption></figure>

With the **Input Color Profile** section you can set the color management for your images. By selecting the color space or profile in which your images were captured.  This enables CineDream to correctly integrate your images to our color pipeline and in the case of log footage it transforms it to REC709 or any other color space the timeline/sequence in the host application is set to.

By default, after selecting the input color profile, the **CineDream emulations** get enabled, applying a film emulation to the image. You can choose between 4 emulations.  In case you don’t want to apply the emulations you can use the Switch next to the CineDream logo to disable them.

Right below the emulations you’ll find sliders to control the **Temperature**, **Tint** and **Exposure** of the image.&#x20;

And below that the **Tone Curve** slider to control the intensity of the luminosity and contrast components of the CineDream Emulations.

And the **Film Color** slider to control the intensity of the chromatic components of the CineDream Emulations.

You can pin this panel with the icon on the top right corner so it won’t close. At any moment you can unpinned and click outside the panel to close it.


# FilmStrip Panel

The FilmStrip panel is present in the Base Correction and Final Grading Pages.

<figure><img src="https://1449894025-files.gitbook.io/~/files/v0/b/gitbook-x-prod.appspot.com/o/spaces%2FXV6dIa2ZTHDKnFjYTLCU%2Fuploads%2F1O4yRnNT6AA2XKf2Pwmv%2FScreenshot%202025-03-13%20at%208.43.30%E2%80%AFPM.png?alt=media&amp;token=133f6c95-0f66-4d1b-9460-f8967f93c140" alt=""><figcaption></figcaption></figure>

It lets you navigate between images and groups.

You can scroll left and right through the strip and click on any thumbnail to select the corresponding image.

To filter the images displayed in the Filmstrip, use the controls on the left side of the panel.

**Group** let’s you filter by group, then **Show all images**, **Show uncorrected images** only (ungraded images only in the Final Grading Page), **Show corrected images only** (Graded images only in the Final Grading Page), and **Show Hero Images only**.


# Presets Panel

The Presets Panel let’s you save your current set of corrections or grades.  In the Base Correction and Shot Matchings pages it will save your Base Correction and in the Final Grading Page it will save the final grade.

<figure><img src="https://1449894025-files.gitbook.io/~/files/v0/b/gitbook-x-prod.appspot.com/o/spaces%2FXV6dIa2ZTHDKnFjYTLCU%2Fuploads%2FOAxZL45dykp9eDyZv2hm%2FScreenshot%202025-03-13%20at%208.45.55%E2%80%AFPM.png?alt=media&amp;token=30288ab5-5c36-448c-b784-74722e5535e1" alt=""><figcaption></figcaption></figure>

To save a preset click over the thumbnail containing the plus icon, labeled **Save Custom Preset**.  By default the preset will be named with a number but you can change the name by double clicking on it.  To apply a preset select it and hit Apply or double click over its thumbnail.

When in the Final Grading Page, the Presets Panel has a section named Built-in Presets which contains presets that come preloaded in CineDream.


# Color Correction Tools Panel

This panel is present on all three pages and is divided into three sections, Basic, Advanced and Effects.  You can switch between these sections with the icons at the top.

**Basic contains:**

<figure><img src="https://1449894025-files.gitbook.io/~/files/v0/b/gitbook-x-prod.appspot.com/o/spaces%2FXV6dIa2ZTHDKnFjYTLCU%2Fuploads%2FmQ3o3IWcagJd6Jee840e%2FScreenshot%202025-03-13%20at%208.46.37%E2%80%AFPM.png?alt=media&amp;token=95725e79-e996-4172-b284-f93d1f7d01ab" alt="" width="229"><figcaption></figcaption></figure>

**Exposure:** To control the general exposure of the image.

**Highlights:** To control the exposure of highlights.

**Midtones:** To control the exposure of midtones.

**Shadows:** To control the exposure of shadows.

**Contrast:** To control the contrast of the overall image.

**Pivot:** To control the pivot point for contrast.

**Temperature:** To control the overall temperature of the image.

**Tint:** To control the overall tint of the image.

**Auto White Balance:** To apply an automatic white balance to the image.

**Saturation:** To control the overall saturation of the image.

**Highlights:** To control the saturation of highlights.

**Midtones:** To control the saturation of midtones.

**Shadows:** To control the saturation of shadows.

\
**Advanced contains:**

<figure><img src="https://1449894025-files.gitbook.io/~/files/v0/b/gitbook-x-prod.appspot.com/o/spaces%2FXV6dIa2ZTHDKnFjYTLCU%2Fuploads%2Fp8P89lHwWWK9qWFZYX5y%2FScreenshot%202025-03-13%20at%208.46.47%E2%80%AFPM.png?alt=media&amp;token=ec9ac1ce-1136-48c0-b9ab-255ee698f025" alt="" width="231"><figcaption></figcaption></figure>

**Wheels:**  The icons right above the wheels let you switch between a Global wheel or 3 wheels for Highligths, Midtones and Shadows.  With the center pug at each wheel you can control the tint of each range, the curves sliders at the left control exposure and the curve sliders at the right control saturation.

**RGB Curves:** It contains 4 curves for Luma, Red, Green and Blue.  You can switch between curves clicking on the labels above the curve.  Each curve contains 5 fixed points, representing from top to bottom, Whites, Overtones, Midtones, Undertones and Blacks.  Each point and be dragged up or down.

**HSL:** The HSL tool is divided into 6 color ranges represented by swatches.  You can click on each swatch to change from one range to the other.  Each color range contains 3 sliders, for Hue, saturation and Luminance.

\
**Effects contains:**

<figure><img src="https://1449894025-files.gitbook.io/~/files/v0/b/gitbook-x-prod.appspot.com/o/spaces%2FXV6dIa2ZTHDKnFjYTLCU%2Fuploads%2FZ9JOHoe5YsGf5TB1cR8l%2FScreenshot%202025-03-13%20at%208.46.56%E2%80%AFPM.png?alt=media&amp;token=534eac30-e841-46b0-b39f-83c82b697ca0" alt="" width="232"><figcaption></figcaption></figure>

**Vignette:** To create a vignette that can be modified in its size, position and feather amount with the controls that show up on top of the image in the viewer when the tool is selected.  Use the color wheel and curve sliders to control the tint, exposure and saturation outside or inside the vignette.  Switch between inside and outside with the button above the wheel.  You can modify the overall intensity of the vignette with the Overall Mix slider.

**Gradient:** To create a gradient that can be modified in its position and feather amount with the controls that show up on top of the image in the viewer when the tool is selected.  Use the color wheel and curve sliders to control the tint, exposure and saturation of the gradient. You can modify the overall intensity of the vignette with the Overall Mix slider.

\
You can pin this panel with the icon on the top right corner so it won’t close. At any moment you can unpinned and click outside the panel to close it.  At the bottom of the panel you’ll find the Show Hotkeys option which will enable text showing the hotkeys for the tools next to each tool.

<figure><img src="https://1449894025-files.gitbook.io/~/files/v0/b/gitbook-x-prod.appspot.com/o/spaces%2FXV6dIa2ZTHDKnFjYTLCU%2Fuploads%2FtFg09Rj8PaIkC68rNlNK%2FScreenshot%202025-03-13%20at%208.48.35%E2%80%AFPM.png?alt=media&amp;token=bcd1d3c5-fb1f-45bc-928e-140fadb87929" alt="" width="69"><figcaption></figcaption></figure>

<br>


# Look Panel & LUTs

The Look panel is present in the Final Grading page and it lets you apply multiple Look LUTs as well as apply different tools aimed at film emulation.

<figure><img src="https://1449894025-files.gitbook.io/~/files/v0/b/gitbook-x-prod.appspot.com/o/spaces%2FXV6dIa2ZTHDKnFjYTLCU%2Fuploads%2FZs37RSohlRrOVEC4Cm3S%2FScreenshot%202025-03-13%20at%208.50.03%E2%80%AFPM.png?alt=media&amp;token=87725edb-ff65-4725-8dad-92ea952ae258" alt="" width="215"><figcaption></figcaption></figure>

The LUTs you’ll find in this section are the ones imported into CineDream from the Preferences menu as well as some preloaded LUTs that come as part of CineDream.

Once you click on **Apply Look LUT**, they are displayed as preview thumbnails in a grid view. At the top left corner of the grid you’ll find options to search LUTs by name or group, as well as an Image Size slider.  On the top right corner, a Mix slider to control the intensity in which the LUTs are shown in the preview thumbnails, a Cancel button to close the grid view and Accept to apply the selected LUT.

<figure><img src="https://1449894025-files.gitbook.io/~/files/v0/b/gitbook-x-prod.appspot.com/o/spaces%2FXV6dIa2ZTHDKnFjYTLCU%2Fuploads%2FWnXRfalAMX0vqMDAK6ZG%2FScreenshot%202025-03-13%20at%208.51.53%E2%80%AFPM.png?alt=media&amp;token=ed6c981f-d12c-452b-b0db-1ad38c8c413c" alt=""><figcaption></figcaption></figure>

Back to the Look panel, below the LUT selection you’ll find a slider for **Luma**, to control the intensity of the luminance component of the LUT and **Color**, to control the intensity of the color component of the LUT. And an **Overall Mix** slider for the overall intensity of the LUT.  This sliders let you control any LUT so you can apply its luma and color components in different intensities, giving you a wider range of possibilities to make those LUTs work with your images.

<figure><img src="https://1449894025-files.gitbook.io/~/files/v0/b/gitbook-x-prod.appspot.com/o/spaces%2FXV6dIa2ZTHDKnFjYTLCU%2Fuploads%2FRAgTg2an1rTz0qAKyfeu%2FScreenshot%202025-03-13%20at%208.54.17%E2%80%AFPM.png?alt=media&amp;token=3842f665-7c47-4676-9c5a-667ea69ac13c" alt="" width="225"><figcaption></figcaption></figure>

Below this section you’ll find a plus icon that let’s you apply a second LUT.  The options for this second LUT are identical to the ones for the first LUT.  This allows you to mix LUTs, for example you can use the Luma from the first LUT and the Colors from the second one.

<figure><img src="https://1449894025-files.gitbook.io/~/files/v0/b/gitbook-x-prod.appspot.com/o/spaces%2FXV6dIa2ZTHDKnFjYTLCU%2Fuploads%2F0gDXECFmDd3zaBGDE5Xs%2FScreenshot%202025-03-13%20at%208.55.05%E2%80%AFPM.png?alt=media&amp;token=be6bba88-1bca-468b-80fd-9b31a855cda7" alt="" width="226"><figcaption></figcaption></figure>

Then there is a **CineDream section** where you can enable/disable CineDream and access additional tools to mimic the look of Film:

**Film Density:** From here you can add Highlights Roll-Off, Fade Film for shadows, Global Density, to make the color more dense, or use the color swatches to control the density of specific colors.

<figure><img src="https://1449894025-files.gitbook.io/~/files/v0/b/gitbook-x-prod.appspot.com/o/spaces%2FXV6dIa2ZTHDKnFjYTLCU%2Fuploads%2FyPBimKZd2vEzQ0hJS52E%2FScreenshot%202025-03-13%20at%208.50.12%E2%80%AFPM.png?alt=media&amp;token=2e90bb6c-df25-4999-82c8-eb6765e2e355" alt="" width="221"><figcaption></figcaption></figure>

**Bloom:** To add a Bloom effect, controlling the amount, threshold and softness while at the same time preserving the highlights.

<figure><img src="https://1449894025-files.gitbook.io/~/files/v0/b/gitbook-x-prod.appspot.com/o/spaces%2FXV6dIa2ZTHDKnFjYTLCU%2Fuploads%2F6gdYghGghhL5fa57BLvI%2FScreenshot%202025-03-13%20at%208.50.20%E2%80%AFPM.png?alt=media&amp;token=9dbae757-f6ae-44f2-b972-d74d5ab524ac" alt="" width="222"><figcaption></figcaption></figure>

**Halation:** To add a Halation effect, controlling the amount, threshold, softness and saturation.

<figure><img src="https://1449894025-files.gitbook.io/~/files/v0/b/gitbook-x-prod.appspot.com/o/spaces%2FXV6dIa2ZTHDKnFjYTLCU%2Fuploads%2FL74h7Sn7OdoAjehLbIyK%2FScreenshot%202025-03-13%20at%208.50.28%E2%80%AFPM.png?alt=media&amp;token=f11ce217-983b-4b96-b2c7-f4bcb23d77fd" alt="" width="215"><figcaption></figcaption></figure>

**Grain:** To add a Grain effect, controlling the amount and size of the grain, the amount of it specifically on shadows and the amount of color in the grain.

<figure><img src="https://1449894025-files.gitbook.io/~/files/v0/b/gitbook-x-prod.appspot.com/o/spaces%2FXV6dIa2ZTHDKnFjYTLCU%2Fuploads%2F7mwnos9Xd220k7wk9rMG%2FScreenshot%202025-03-13%20at%208.50.34%E2%80%AFPM.png?alt=media&amp;token=7fdb8af5-3470-4e37-96f0-a443439211a6" alt="" width="222"><figcaption></figcaption></figure>


# Scopes


# Regular Scopes

<figure><img src="https://1449894025-files.gitbook.io/~/files/v0/b/gitbook-x-prod.appspot.com/o/spaces%2FXV6dIa2ZTHDKnFjYTLCU%2Fuploads%2F13iSwFqd9XLFoRKUppha%2FScreenshot%202025-03-13%20at%208.57.25%E2%80%AFPM.png?alt=media&amp;token=9d32301c-e6f7-466b-be0c-cad22d104120" alt=""><figcaption></figcaption></figure>

When this option is enabled, a panel containing the scopes shows up at the bottom of the interface.  It contains 4 scopes, Waveform, Parade, Vectorscope and Histogram.

The **Waveform** scope can be switched into an **RGB Parade** scope with the buttons at the left side of the Waveform.

The **Vectorscope** can be switched between trace displayed at 100% and 133% with the control at the top right corner of the scope.

At the top left corner of the scopes panel the **Detach Scopes** button.  When enabled the panel will be detached from the main interface.  That way you can move it to a second screen, and have more real state for the main viewer on your main monitor.


# False Colors

<figure><img src="https://1449894025-files.gitbook.io/~/files/v0/b/gitbook-x-prod.appspot.com/o/spaces%2FXV6dIa2ZTHDKnFjYTLCU%2Fuploads%2FUWftx7lGnVtqOPYNqrfK%2FScreenshot%202025-03-13%20at%208.58.13%E2%80%AFPM.png?alt=media&amp;token=ac4aa50c-8e20-4b56-b6d7-8a34b87a9c0d" alt=""><figcaption></figcaption></figure>

The False Colors scope when enabled will display the image in the main viewer in False Color Mode.  At the left side of the viewer you’ll find a legend showing the range from 0 to 100 IRE with the corresponding colors.


# False Color Skin Tones

<figure><img src="https://1449894025-files.gitbook.io/~/files/v0/b/gitbook-x-prod.appspot.com/o/spaces%2FXV6dIa2ZTHDKnFjYTLCU%2Fuploads%2FepDGxIELjJ2NnfI16IOi%2FScreenshot%202025-03-13%20at%208.58.22%E2%80%AFPM.png?alt=media&amp;token=bb9b1bc0-6873-426f-9b12-a38c9fa61018" alt=""><figcaption></figcaption></figure>

The False Color Skin Tones scope when enabled will display the image in the main viewer in False Color Skin Tones Mode.  At the bottom of the viewer you’ll find a legend showing the colors that represent skin tones.


# Direct On-Screen Grading

Direct On-Screen Grading consist in the ability to control most of the color correction tools in CineDream by clicking and dragging directly over the image in the main viewer and the scopes.

<figure><img src="https://1449894025-files.gitbook.io/~/files/v0/b/gitbook-x-prod.appspot.com/o/spaces%2FXV6dIa2ZTHDKnFjYTLCU%2Fuploads%2FXx1RFBdkt2eGrOCoQwK7%2FScreenshot%202025-03-13%20at%209.06.16%E2%80%AFPM.png?alt=media&amp;token=cb83fa5e-2cb8-44df-bac0-8a8a2f340193" alt=""><figcaption></figcaption></figure>

You can select a tool using the button in the top tools layout or with a hotkey.  For tools that affect global parameters like exposure or temperature, you can click anywhere on the image and drag up or down.  But those that affect exclusively a luminance range or a color, click over the area of the image you want to change and CineDream will automatically know at want luma range or color you are pointing at and modify its parameters.

For example, select the shadows/midtones/highlights tool with the Shift-E hotkey, click over the image, and CineDream will know if you are pointing a shadows, midtones or highlights area and modify that specific range as you drag up or down.

This same principle applies to the shadows/midtones/highlights saturation tool, Color Wheels, Curves and HSL.

<figure><img src="https://1449894025-files.gitbook.io/~/files/v0/b/gitbook-x-prod.appspot.com/o/spaces%2FXV6dIa2ZTHDKnFjYTLCU%2Fuploads%2FJLiDSw5MkrS6Z1iYDxpJ%2FScreenshot%202025-03-13%20at%209.06.57%E2%80%AFPM.png?alt=media&amp;token=b64d0160-5abd-4fbe-a271-424c6e0f6bd0" alt=""><figcaption></figcaption></figure>

Further more some of the tools have modifiers that are shown at the bottom left corner of the viewer once the tool is selected. For example by clicking H you select the HSL tool. If you click over a color and drag up or down you’ll be modifying its hue, but if you press the Option key while dragging, it will modify the Luma, and by pressing command it will modify Saturation.

<figure><img src="https://1449894025-files.gitbook.io/~/files/v0/b/gitbook-x-prod.appspot.com/o/spaces%2FXV6dIa2ZTHDKnFjYTLCU%2Fuploads%2Fm5Xw8wse0lf0EAbYYYOX%2FScreenshot%202025-03-13%20at%209.12.30%E2%80%AFPM.png?alt=media&amp;token=d95d364c-8466-44fa-a078-2a271db5af07" alt="" width="285"><figcaption></figcaption></figure>

Direct On-Screen Grading can be applied to the scopes too.  Click over the waveform, parade or histogram scopes to affect exposure, color balance and saturation.  Use the HSL tool over the vectorscope to affect hue, saturation and luma of specific color ranges.

<figure><img src="https://1449894025-files.gitbook.io/~/files/v0/b/gitbook-x-prod.appspot.com/o/spaces%2FXV6dIa2ZTHDKnFjYTLCU%2Fuploads%2F13iSwFqd9XLFoRKUppha%2FScreenshot%202025-03-13%20at%208.57.25%E2%80%AFPM.png?alt=media&amp;token=9d32301c-e6f7-466b-be0c-cad22d104120" alt=""><figcaption></figcaption></figure>


# Legal & Policies

{% content-ref url="/spaces/XV6dIa2ZTHDKnFjYTLCU/pages/hk1q7a8u1Cxsh4ke0IIf" %}
[End User License Agreement](/legal-and-policies/end-user-license-agreement)
{% endcontent-ref %}

{% content-ref url="/spaces/XV6dIa2ZTHDKnFjYTLCU/pages/qneS9tTASWmp9P5KEc6p" %}
[Privacy Policy](/legal-and-policies/privacy-policy)
{% endcontent-ref %}

{% content-ref url="/spaces/XV6dIa2ZTHDKnFjYTLCU/pages/dql8SCMPVszGvehg3s2k" %}
[Refund Policy](/legal-and-policies/refund-policy)
{% endcontent-ref %}


# End User License Agreement

**Effective Date: 28 January 2025**

This End-User License Agreement (“EULA”) is a legal agreement between you (either an individual or an entity, hereinafter referred to as “Licensee” or “you”) and Color Grading LLC (“Licensor” or “we”), governing the use of the CineDream desktop software (“Software”). CineDream is a registered trademark of Color Grading LLC (U.S. Trademark Reg. No. 7670378).

By installing, copying, downloading, accessing, or otherwise using the Software, Licensee agrees to be bound by the terms and conditions set forth in this EULA. If Licensee does not agree to these terms, Licensee may not install or use the Software.

This EULA may be accepted electronically, such as by clicking an "I Agree" button, checking a box, or otherwise indicating your acceptance online. This electronic acceptance shall be deemed to have the same legal force and effect as a handwritten signature. By agreeing to this EULA, you represent and warrant that you:\
(A) are at least 18 years old or the age of majority in your jurisdiction,\
(B) have the legal capacity to enter into this EULA or are acting as an authorized user on behalf of an entity, and\
(C) will use the Software in compliance with all applicable laws and regulations.

If you are accessing or using the Software on behalf of an entity, you represent and warrant that you are authorized by that entity to act on its behalf and the concerned entity shall be responsible for ensuring compliance with this EULA by you.

***

### 1. DEFINITIONS

1.1. **Software**: Refers to the CineDream desktop software, including but not limited to all associated media, printed and digital materials, “online” or electronic documentation, updates, patches, bug fixes, and any authorized copies of the Software. This definition also encompasses any integrated plugins for third-party host applications where applicable.\
1.2. **Annual Subscription License**: Refers to the license type billed annually, granting ongoing access to the latest Software including all available updates and upgrades for as long as the subscription is active and paid.\
1.3. **Perpetual License**: Refers to the license type that grants the Licensee the right permitting ongoing use of the Software indefinitely in perpetuity but with a limited period of included updates and support as specified at the time of purchase.\
1.4. **Seats**: Indicates the maximum number of simultaneous activations (or installations) permitted allowed under a single license as specified at the time of purchase. Unless explicitly permitted, a license may not be shared across multiple users.\
1.5. **Support Term**: The defined period during which Licensee is entitled to technical support, maintenance, and Software updates as specified in the license type and at the time of purchase described in this EULA.\
1.6. **Licensor**: Refers to Color Grading LLC, having an address at 7533 S Center View Ct #8023, West Jordan, UT 84084-5527, USA, email: <support@cinedream.io>.

***

### 2. GRANT OF LICENSE

#### 2.1. Scope of License

Subject to the terms of this EULA and upon Licensee’s valid and active purchase or subscription, Licensor grants Licensee a non-exclusive, non-transferable, term-based, revocable, limited license to install, activate, and use the Software.

The Software can be used:

* As a plugin for video editing software, including Premiere Pro, DaVinci Resolve, and Final Cut Pro.
* As a plugin for image editing software, including Photoshop and Lightroom.
* As a standalone application supporting .jpg, .tiff, and .png file formats.

This license is granted for personal and commercial use, subject to the restrictions outlined below.

#### 2.2. Seat Limit

Licensee may install and activate the Software on up to two (2) computers or “seats” per license for Licensee’s internal business or personal purposes.

#### 2.3. Internet Connection

Licensee acknowledges that an active internet connection may be required for the Software to verify an active subscription (for an Annual Subscription License) or a valid license (for a Perpetual License). If the Software is unable to verify the license, functionalities may be limited, suspended, or terminated.

#### 2.4. Restrictions

Licensee shall not:

* Modify, translate, reverse-engineer, decompile, or disassemble the Software, except to the extent applicable laws allow such acts despite this limitation.
* Separate any component of the Software for use on more devices than the license permits.
* Rent, lease, sublicense, or otherwise commercially distribute the Software without prior written approval from Licensor.
* Circumvent or attempt to circumvent license verification or activation mechanisms.
* Attempt to discover or access or derive the source code, or underlying structure, relating to the Software.
* Republish, reproduce, or copy any part of the Software.
* Copy any ideas, functions, or graphics of the Service.
* Commercially exploit or create derivative works based on the Software.
* Make the Software available to any person other than the authorized users in case the license is granted to an entity.
* Use or access the Software to provide service bureau, time-sharing, or other computer hosting services to third parties.
* Conduct any penetration testing or load testing or any similar testing.
* Access the Software for any benchmarking purpose.
* Build a product using similar ideas, features, functionality, or graphics of the Software.

We reserve the right to periodically conduct audits to verify your compliance with the terms of this EULA. The Licensor reserves the right to implement license verification mechanisms, including periodic online validation. Failure to comply with license verification requests may result in suspension or termination of the license.

#### 2.5. Duties

You are responsible for maintaining the confidentiality of the password that you may use to access the Software and for any activities or acts conducted using your password.

You agree to use the Software only for its intended purpose of color correction for videos and images. You shall not misuse the Software in any manner that violates applicable laws, including but not limited to, the creation or distribution of unlawful, defamatory, or infringing content.

You shall not bypass, disable, or circumvent any licensing control, activation mechanism, or security feature of the Software. Any attempt to manipulate seat limitations or licensing models will result in immediate termination of this license.\
\
3\. LICENSE TYPES AND TERMS

#### 3.1. Annual Subscription License

**Subscription Period**\
The Annual Subscription License renews automatically every year, unless canceled by Licensee prior to the renewal date or terminated by Licensor as per this EULA.

**Payment and Renewal**\
Licensee will be charged on an annual basis. If payment is not received when due, the license may be suspended or terminated according to this EULA. Licensee will receive an email notification at least \[X] days before the renewal charge is processed.

**Updates and Upgrades**\
During an active subscription, Licensee is entitled to all updates, patches, and upgrades of the Software at no additional cost subject to the Licensee not being in breach of any terms of this EULA. You understand, agree, and accept that any such updates, patches, and upgrades will be provided on a reasonable endeavors basis at the Company’s sole discretion.

**Support**\
Licensee is entitled to technical support as long as the subscription is active and the Licensee is not in breach of any terms of this EULA.

**Cancellation**\
Licensee may cancel the Annual Subscription at any time by contacting Licensor via email (<support@cinedream.io>).\
If Licensee cancels outside the 30-day refund window (see Section 6.1 below), no prorated or partial refund will be provided. Licensee will retain access to and use of the Software until the end of the current subscription term.

***

#### 3.2. Perpetual License

**Perpetual Use**\
Licensee may use the Software indefinitely, subject to compliance with this EULA.

**Included Support Term**\
The purchase of a Perpetual License includes up to 30 months (or the period stated in the offer at time of purchase) of technical support, patches, and maintenance updates.

**Extension**\
After the included Support Term, Licensee may choose to renew technical support and maintenance updates for an additional one-year period at a nominal cost (currently $49). This renewal is not auto-renewing and must be purchased separately. Once the included Support Term expires, the Licensee will no longer receive technical assistance, updates, or security patches unless they renew support under the terms offered at that time.

**Limitations of ‘Lifetime’ Use**\
“Lifetime” or “in perpetuity” refers to the functional lifetime of the version of the Software at the time of purchase. Licensor does not guarantee continued compatibility or support if hardware, operating systems, or third-party applications undergo significant changes. Licensor’s obligations and ability to support the Software may cease if Licensor discontinues the product line, ceases operations, or becomes insolvent. Major version upgrades (e.g., version 1.x to 2.0) may require a separate purchase. Licensee may continue using the purchased version indefinitely, subject to compatibility limitations.

**Fees**\
The applicable fees for the Software are specified at the time of purchase on our official website (website.com/pricing), within the order confirmation or in a separate agreement with the Licensee. Licensor reserves the right to modify fees for future renewals, additional features, or upgrades. Any changes will be communicated in advance and will apply to subsequent billing cycles. Licensee is responsible for all applicable taxes, duties, or transaction fees related to the purchase of the Software. Payments are processed through third-party providers, and Licensor is not responsible for any payment processing errors or additional fees imposed by such providers.

**Authorization**\
You authorize us and our nominated payment processor to charge your applicable payment method for the purpose of collection of necessary fees and charges for the use of Software. Unpaid amounts are subject to an interest charge as per maximum permitted by law, plus all expenses of collection. All amounts payable to us hereunder shall be paid by you in full without any setoff, recoupment, counterclaim, deduction, debit or withholding for any reason except as may be required by applicable law.

***

### 4. MAINTENANCE, SUPPORT, AND UPDATES

#### 4.1. Coverage

During the applicable Support Term (whether via an active Annual Subscription or the included/extended Support Term for Perpetual Licenses), Licensor will make reasonable efforts to:

1. Provide technical support via email.
2. Provide maintenance patches and minor updates at no additional charge.
3. Offer upgrades to major releases if included under the then-current support arrangement.

#### 4.2. Scope

Maintenance and support do not cover compatibility issues arising from Licensee’s substantial changes to hardware or operating system environments beyond what the Software originally supported.

#### 4.3. No Obligation to Continue

Licensor may discontinue updating or supporting the Software if it ceases to provide the Software commercially, becomes insolvent, or faces other circumstances outside its reasonable control. In such events, the Software may continue to function in its last released form but without further updates or support.

### 5. INTELLECTUAL PROPERTY

#### 5.1. Ownership

The Software and all associated intellectual property rights, including but not limited to copyrights, trademarks, and trade secrets, are the exclusive property of Licensor and/or its suppliers. CineDream is a registered trademark of Color Grading LLC. This EULA does not transfer any ownership rights to the Licensee. Licensee acknowledges that the purchase of a Perpetual License grants only a right to use the Software in accordance with this EULA and does not confer any ownership interest in the Software, its source code, or any associated intellectual property.

#### 5.2. No Removal of Notices

Licensee must not remove or alter any copyright, trademark, or other proprietary rights notices contained in or on the Software.

#### 5.3. Third-Party Software

To the extent that the Software incorporates any third-party software, then subject to all applicable terms and conditions in this EULA and in accordance with and subject to any third-party license terms and your compliance therewith, Licensor hereby grants you a non-exclusive, non-sublicensable license to use the third-party software solely for access and to use with the Service.

***

### 6. REFUND AND CANCELLATION POLICY

#### 6.1. 30-Day Money-Back Guarantee

**Initial Purchase (Annual Subscription or Perpetual):**\
Licensee may request in writing (per email as noted below) a full refund within 30 days from the date of the initial purchase.

**Annual Subscription Renewal:**\
Upon each annual renewal, Licensee may request a full refund if they (a) cancel within 30 days of the renewal charge, and (b) contact Licensor via email at <support@cinedream.io> to initiate the refund. No other communication channels (e.g., social media, phone) will suffice.

#### 6.2. Refund Processing

If a refund is approved, please allow 3 to 5 business days from the date of approval for the funds to be posted to Licensee’s account.

#### 6.3. Refund Eligibility Conditions

* **Annual Subscription Outside the 30-Day Window:** If Licensee cancels an Annual Subscription after 30 days from the initial purchase or the renewal date, no partial or prorated refund is provided. However, Licensee retains access to and use of the Software until the end of the current subscription term.
* **Perpetual License Outside the 30-Day Window:** If Licensee requests a refund more than 30 days after purchasing a Perpetual License, no refund is issued. Licensee is entitled to keep and use the Software in perpetuity, subject to this EULA.

#### 6.4. License Revocation Upon Refund

If a refund is issued, Licensor reserves the right to deactivate and revoke the Software license key(s).

### 7. LIMITED WARRANTY AND DISCLAIMER

#### 7.1. Warranty Disclaimer

EXCEPT AS MAY BE EXPRESSLY PROVIDED IN A SEPARATE WRITTEN AGREEMENT BETWEEN LICENSOR AND LICENSEE, THE SOFTWARE IS PROVIDED “AS IS” AND "AS AVAILABLE" WITH ALL FAULTS, AND WITHOUT WARRANTY OF ANY KIND. LICENSOR EXPRESSLY DISCLAIMS ALL WARRANTIES, WHETHER EXPRESS, IMPLIED, OR STATUTORY, INCLUDING BUT NOT LIMITED TO THE WARRANTIES OF MERCHANTABILITY, FITNESS FOR A PARTICULAR PURPOSE, TITLE, PERFORMANCE AND NON-INFRINGEMENT OF THIRD-PARTY RIGHTS TO THE FULLEST EXTENT PERMITTED BY APPLICABLE LAW.

#### 7.2. No Guarantee of Compatibility

Licensor does not warrant that the Software will meet Licensee’s requirements or operate uninterrupted or error-free or virus-free or bug-free. The Software is designed to function with supported host applications, operating systems, and hardware as specified in the documentation. Licensor does not guarantee compatibility with all versions of host applications, operating systems, or hardware. Performance may vary depending on system configurations, third-party software, and user-specific workflows. You are responsible for verifying compatibility before purchase. Licensee assumes responsibility for the selection, installation, and use of the Software to achieve its intended results. There may be problems inherent in the use of internet and electronic communications. Licensor is not responsible for any such delays, delivery failures or other damages or loss or claims resulting from such problems nor does the Licensor provide any warranties regarding any third-party software being incorporated in the Software.

#### 7.3. Responsibility for User Content

The Software does not enable you to publish, distribute, or post content directly to any public platform. You acknowledge that any content edited or processed using the Software remains your sole responsibility. The Licensor shall not be liable for any claims, damages, or disputes arising from the User’s use of the Software to create, modify, or distribute content.

#### 7.4. Creative Outcomes

The Software is a tool designed to assist you in color correction of video and images. Licensor does not guarantee that the Software will achieve any specific artistic, professional, or commercial outcome. You remain solely responsible for your creative decisions, final output quality, and any professional or commercial obligations.

#### 7.5. Deadlines

The Software may be used in professional environments where users or companies operate under strict deadlines. Licensor shall not be responsible for any delays, missed deadlines, financial losses, or damages arising from Software performance issues, bugs, technical failures, or incompatibilities with third-party applications.

#### 7.6. Perpetual License Holders

For Perpetual License holders, Licensor makes no guarantees regarding continued Software compatibility with future versions of operating systems, third-party applications, or hardware beyond the support term. Users who require ongoing updates and support are encouraged to opt for a Subscription License.

#### 7.7. Data Loss

The Software processes and modifies image and video files based on user input. Licensor shall not be liable for any data loss, file corruption, or unintended modifications to your files. It is your responsibility to create backups before using the Software on any critical files.

#### 7.8. Host Applications

For plugin users: The Software functions as a plugin within third-party host applications such as Premiere Pro, DaVinci Resolve, Final Cut Pro, Photoshop, and Lightroom. Licensor is not responsible for any bugs, crashes, workflow disruptions, or performance issues caused by these third-party host applications or their updates.

#### 7.9. AI-Assisted Features

The Software may include AI-assisted features for color correction. Licensor makes no guarantees regarding the accuracy, consistency, or suitability of AI-generated results for professional use. You should verify outputs before using them in commercial projects.

***

### 8. LIMITATION OF LIABILITY

#### 8.1. Exclusion of Damages

TO THE MAXIMUM EXTENT PERMITTED BY APPLICABLE LAW, LICENSOR SHALL NOT BE LIABLE FOR ANY INDIRECT, INCIDENTAL, SPECIAL, CONSEQUENTIAL, OR PUNITIVE DAMAGES, INCLUDING BUT NOT LIMITED TO LOSS OF PROFITS, DATA, OR BUSINESS OPPORTUNITIES, ARISING OUT OF OR RELATED TO THE USE OR INABILITY TO USE THE SOFTWARE, EVEN IF ADVISED OF THE POSSIBILITY OF SUCH DAMAGES.

#### 8.2. Maximum Liability

IN NO EVENT WILL LICENSOR’S TOTAL, CUMULATIVE LIABILITY EXCEED THE AMOUNT LICENSEE PAID FOR THE SOFTWARE OR THE SUBSCRIPTION FEE IN THE TWELVE (12) MONTHS PRECEDING THE EVENT GIVING RISE TO LIABILITY.

#### 8.3. Indemnity

You will indemnify and hold harmless Licensor, its affiliates, officers, agents, employees, suppliers, and successors and assigns against any claims, losses, damages, liabilities, and reasonable legal fees that result from the gross negligence of or breach of this EULA by you or infringement or alleged infringement of any intellectual property rights that occurs in connection with this EULA or use of Software.

***

### 9. TERM AND TERMINATION

#### 9.1. Term

This EULA is effective from the time Licensee first installs or uses the Software and continues until terminated. For Subscription Licenses, this EULA remains in effect until the end of the Subscription Period or earlier termination as provided herein. For Perpetual Licenses, this EULA remains in effect indefinitely, subject to Licensee’s continued compliance with its terms.

#### 9.2. Termination by Licensee

Licensee may terminate this EULA at any time by uninstalling the Software and destroying all copies. No refunds are due except as provided in Section 6 above.

#### 9.3. Termination by Licensor

Licensor may terminate or suspend this EULA immediately if:

1. Licensee breaches any material term of this EULA.
2. Licensee fails to pay any subscription fee or renewal fee when due.
3. Licensor decides, in its sole discretion, to cease providing the Software or licensing it to Licensee (with or without cause, subject to refunds if required by law or a separate agreement).
4. Licensor decides, in its sole discretion, that your use of the Software is causing immediate or ongoing harm to Licensor or others.

We shall not be liable to you or any third party for any liabilities, claims, or expenses arising from or relating to suspension or termination of the use of the Software resulting from your non-payment or for any other reasons stated above.

#### 9.4. Effect of Termination

Upon termination, Licensee must immediately cease using the Software, uninstall it, and destroy all copies in Licensee’s possession or control. Upon termination of this EULA, we may at our discretion destroy or dispose of any of your data in your control subject to any rights to retain such data as per applicable law.

### 10. PRIVACY POLICY

**Last Updated: 28 January 2025**

Your use of the Software is subject to the Privacy Policy outlined below, describing how we collect, use, and share your information. If you have any questions or concerns about our practices regarding your personal data, please contact us at <support@cinedream.io>. By agreeing to this EULA, you consent to our collection and processing of your data as stated herein.

#### 10.1. Information We Collect

1. **Personal Data Provided by You:** Such as name, email address, payment information, etc.
2. **Automatically Collected Data:** When activating or verifying your license, we collect certain technical information, including:
   * IP address
   * Operating system and version
   * Hardware specifications (e.g., RAM)
   * Computer/device name
   * Other basic system details necessary for license validation
3. **Cookies and Tracking:** We may use cookies or similar technologies to gather usage data and to help improve user experience. You can manage cookie preferences through your browser settings. Note that disabling cookies may impact your experience on the use of the Software.

#### 10.2. How We Use Your Information

1. To provide, maintain, and improve the Software’s functionality.
2. To process orders, payments, and respond to inquiries.
3. To communicate with you about updates, offers, or relevant product information.
4. To comply with legal obligations or enforce our rights.

Licensor will not sell or share your data with third parties except as required by law.

#### 10.3. Cookies and Tracking

We may use cookies or similar technologies to gather usage data and to help improve user experience. You can manage cookie preferences through your browser settings. Note that disabling cookies may impact your experience on the use of the Software.

#### 10.4. Data Retention

We only retain your personal information for as long as necessary to fulfill the purposes for which it was collected, unless a longer retention period is required or permitted by law.

#### 10.5. Data Security

We strive to protect your information with appropriate organizational and technical measures. However, no internet-based system can be 100% secure.

#### 10.6. Minors

We do not knowingly collect personal information from children under 18. If you learn that a minor’s personal data has been collected, please contact us at <support@cinedream.io>.

#### 10.7. GDPR and Other Rights

If you are located in the European Economic Area or other regions with data protection laws, you may have additional rights to access, correct, or delete your personal information. In brief, you have the following rights subject to any restrictions as stated in GDPR:\
(A) Access and Correction: Request access to or correction of your personal information.\
(B) Data Portability: Right to request that we move, copy, or transfer your personal information from one technological environment to another safely and securely, without affecting its usability.\
(C) Opt-Out: Opt-out of receiving marketing communications or certain data processing activities.\
(D) Deletion: Request deletion of your personal information.\
(E) Restrict processing: Right to limit the way that we use your personal information.\
(F) Object to processing: Right to object to our processing of your personal information.\
(G) Transparency: The right to know how your personal information is collected, used, shared, and stored.

You may contact us at <support@cinedream.io> regarding your above rights.

#### 10.8. California Residents

California residents have certain rights regarding access to and deletion of their personal information. For details, see our full Privacy Policy on our website.

#### 10.9. Policy Updates

We may update our Privacy Policy from time to time. Substantive changes will be posted or communicated by reasonable means.

***

### 11. GOVERNING LAW AND JURISDICTION

This EULA shall be governed by and construed in accordance with the laws of the State of Utah, without regard to its conflict of laws principles. Any dispute arising out of or in connection with this EULA shall be subject to the exclusive jurisdiction of the state and federal courts located in Utah, and each party consents to the personal jurisdiction of such courts. YOU AGREE THAT DISPUTES WILL BE RESOLVED ON AN INDIVIDUAL BASIS ONLY. YOU SHALL NOT BRING ANY CLAIM AS A PLAINTIFF OR CLASS MEMBER IN ANY PURPORTED CLASS, CONSOLIDATED, OR REPRESENTATIVE PROCEEDING.

***

### 12. SEVERABILITY

If any provision of this EULA is held by a court of competent jurisdiction to be invalid or unenforceable, such provision will be deemed modified to the minimum extent necessary to make it valid and enforceable, and the remainder of this EULA shall continue in full force and effect.

***

### 13. GENERAL WAIVER

No failure or delay by Licensor in exercising any right or remedy hereunder shall operate as a waiver thereof, nor shall any single or partial exercise of any right or remedy preclude any further exercise of any other right or remedy hereunder.

We are not responsible nor liable for any delays or failures in performance from any cause beyond our control, including, but not limited to acts of God, changes to law or regulations, embargoes, war, terrorist acts, acts or omissions of third party technology providers, lockdowns, riots, fires, earthquakes, floods, power blackouts, strikes, weather conditions or acts of hackers, internet service providers or any other third party or acts or omissions of users.

You shall not assign this EULA without the prior written consent of Licensor.

Both parties shall comply with all applicable laws including any export laws concerning the provision and use of the Software.

This EULA shall not be construed to give any third party any interest or rights (including, without limitation, any third-party beneficiary rights) concerning any provision hereunder.

Each party agrees that no partnership, joint venture, employment, or agency relationship exists herein.

We may, in our sole discretion, make any changes to the Software that we deem necessary or useful to maintain or enhance the quality or delivery of the Software. We reserve the right to modify, suspend, or discontinue any aspect of Software at any time without notice. We shall not be liable for any losses resulting from such modifications or discontinuations.

In the event of your breach or threatened or alleged breach of this EULA, we will be irreparably harmed and may not have an adequate remedy in money or damages and shall be entitled to an injunction against such a breach from any court of competent jurisdiction. Notwithstanding the foregoing, we shall also have the right to obtain other applicable remedies available at law.

THE PARTIES HEREBY IRREVOCABLY AND UNCONDITIONALLY WAIVE, TO THE FULLEST EXTENT PERMITTED BY APPLICABLE LAW, ANY RIGHT THAT THEY MAY HAVE TO TRIAL BY JURY OF ANY CLAIM OR CAUSE OF ACTION, OR IN ANY LEGAL PROCEEDING, DIRECTLY OR INDIRECTLY BASED UPON OR ARISING OUT OF THIS AGREEMENT.

***

### 14. ENTIRE AGREEMENT AND UPDATES

This EULA (including any amendments or addenda) constitutes the entire agreement between Licensee and Licensor concerning the Software, superseding all prior or contemporaneous agreements, representations, or understandings. In the event of a conflict between this EULA and any other terms (e.g., purchase orders or promotional materials), the terms of this EULA shall prevail.

We may update this EULA from time to time to reflect changes in our business practices, the law, or for other operational reasons. We will provide you with reasonable notice of any significant changes to this EULA.

**Your Continued Use:** By continuing to use the Software after the effective date of any changes to this EULA, you acknowledge and agree to be bound by the revised EULA.

***

### 15. CONTACT INFORMATION

For any questions, concerns, or notices under this EULA, please contact:

**Color Grading LLC**\
7533 S Center View Ct #8023\
West Jordan, UT 84084-5527\
USA\
Email: <support@cinedream.io>

***

**BY CLICKING “I ACCEPT,” DOWNLOADING, INSTALLING, OR USING THE SOFTWARE, YOU ACKNOWLEDGE THAT YOU HAVE READ THIS EULA, UNDERSTAND IT, AND AGREE TO BE BOUND BY ITS TERMS.**

© 2025 Color Grading LLC. All Rights Reserved. CineDream® is a registered trademark of Color Grading LLC.


# Privacy Policy

**Effective Date:** 28 January 2025

Color Grading LLC (“we,” “our,” “us”) values your privacy. This Privacy Policy explains what information we collect when you use the CineDream software (“Software”), how we use it, and the rights you have regarding your data.

By installing or using CineDream, you consent to the collection and processing of your information as described in this Privacy Policy.

***

### 1. Information We Collect

**Personal Data Provided by You**

* Name, email address, payment information, etc.

**Automatically Collected Data**\
When activating or verifying your license, we collect certain technical information, including:

* IP address
* Operating system and version
* Hardware specifications (e.g., RAM)
* Computer/device name
* Other basic system details necessary for license validation

**Cookies and Tracking**\
We may use cookies or similar technologies to gather usage data and to help improve user experience. You can manage cookie preferences through your browser settings. Note that disabling cookies may impact your experience on the use of the Software.

***

### 2. How We Use Your Information

* To provide, maintain, and improve the Software’s functionality.
* To process orders, payments, and respond to inquiries.
* To communicate with you about updates, offers, or relevant product information.
* To comply with legal obligations or enforce our rights.

Licensor will not sell or share your data with third parties except as required by law.

***

### 3. Data Retention

We only retain your personal information for as long as necessary to fulfill the purposes for which it was collected, unless a longer retention period is required or permitted by law.

***

### 4. Data Security

We strive to protect your information with appropriate organizational and technical measures. However, no internet-based system can be 100% secure.

***

### 5. Minors

We do not knowingly collect personal information from children under 18. If you learn that a minor’s personal data has been collected, please contact us at <support@cinedream.io>.

***

### 6. GDPR and Other Rights

If you are located in the European Economic Area or other regions with data protection laws, you may have additional rights to access, correct, or delete your personal information. In brief, you have the following rights subject to any restrictions as stated in GDPR:\
(A) Access and Correction: Request access to or correction of your personal information.\
(B) Data Portability: Right to request that we move, copy, or transfer your personal information from one technological environment to another safely and securely, without affecting its usability.\
(C) Opt-Out: Opt-out of receiving marketing communications or certain data processing activities.\
(D) Deletion: Request deletion of your personal information.\
(E) Restrict processing: Right to limit the way that we use your personal information.\
(F) Object to processing: Right to object to our processing of your personal information.\
(G) Transparency: The right to know how your personal information is collected, used, shared, and stored.

You may contact us at **<support@cinedream.io>** regarding your above rights.

***

### 7. California Residents (CCPA)

California residents have certain rights regarding access to and deletion of their personal information. For details, see our full Privacy Policy on our website.

***

### 8. Policy Updates

We may update this Privacy Policy from time to time. Substantive changes will be posted or communicated by reasonable means.

***

### 9. Contact Us

**Color Grading LLC**\
7533 S Center View Ct #8023\
West Jordan, UT 84084-5527\
USA\
Email: **<support@cinedream.io>**


# Refund Policy

## Refund & Cancellation Policy

**Effective Date:** 28 January 2025

This Refund & Cancellation Policy explains the circumstances under which you may be eligible for a refund for CineDream software purchases. It is extracted from and governed by the CineDream End-User License Agreement (EULA).

***

### 1. 30-Day Money-Back Guarantee

* **Initial Purchase (Annual Subscription or Perpetual):**\
  You may request a full refund within **30 days** of your original purchase.
* **Annual Subscription Renewal:**\
  On renewal, you may request a full refund if you cancel within **30 days** of the renewal charge.

  > *Important: You must contact us by email at <support@cinedream.io> to request this refund. Other communication channels (e.g., social media, phone) are not accepted.*

***

### 2. Refund Processing

* If your refund is approved, please allow **3–5 business days** for the funds to appear in your account.

***

### 3. Refund Eligibility Conditions

* **Annual Subscription (Outside 30 Days):**\
  No refunds are provided after 30 days. However, you will retain access to CineDream until the end of your current subscription period.
* **Perpetual License (Outside 30 Days):**\
  No refunds are provided after 30 days. You may continue using the version you purchased indefinitely, subject to the EULA.

***

### 4. License Revocation on Refund

* If a refund is issued, your CineDream license key will be **deactivated** and no longer valid for use.

***

### 5. How to Request a Refund

Please send your refund request to:\
**<support@cinedream.io>**

Include the following in your request:

* Your order number
* The email address used for purchase

***

#### Note

This policy is provided for convenience. In the event of any conflict, the full **End-User License Agreement (EULA)** shall prevail.


# Frequently Asked Questions

Get answers to the most commonly asked questions.

{% content-ref url="/spaces/XV6dIa2ZTHDKnFjYTLCU/pages/836egDTO97zgzr95HjVY" %}
[General Questions](/frequently-asked-questions/general-questions)
{% endcontent-ref %}

{% content-ref url="/spaces/XV6dIa2ZTHDKnFjYTLCU/pages/rtDw3v3b4KjzNhWkFbrF" %}
[Features](/frequently-asked-questions/features)
{% endcontent-ref %}

{% content-ref url="/spaces/XV6dIa2ZTHDKnFjYTLCU/pages/nEXPEiB3OXn1wo8Nb1Ei" %}
[Pricing & Licensing](/frequently-asked-questions/pricing-and-licensing)
{% endcontent-ref %}

{% content-ref url="/spaces/XV6dIa2ZTHDKnFjYTLCU/pages/ecCPLH9J9tRf2UmQdtuI" %}
[Technical & Compatibility](/frequently-asked-questions/technical-and-compatibility)
{% endcontent-ref %}

{% content-ref url="/spaces/XV6dIa2ZTHDKnFjYTLCU/pages/cmrQj9rv0L1V1EVwWszy" %}
[Supported Camera Color Profiles and Input Color Spaces](/frequently-asked-questions/supported-camera-color-profiles-and-input-color-spaces)
{% endcontent-ref %}

{% content-ref url="/spaces/XV6dIa2ZTHDKnFjYTLCU/pages/vJSOfjT8R6pWnUyzghvO" %}
[Support](/frequently-asked-questions/support)
{% endcontent-ref %}

{% content-ref url="/spaces/XV6dIa2ZTHDKnFjYTLCU/pages/W4Z4AF787Jm4KCGkWCjt" %}
[Workflow](/frequently-asked-questions/workflow)
{% endcontent-ref %}

####

<br>


# General Questions

## What is CineDream?

CineDream is a unified color grading application that merges the functionality of Cinema Grade and Photo Grade into one comprehensive tool. It allows you to color grade both video and still images in a single application, featuring an intuitive point-and-click interface and professional-grade color tools.

​

Is CineDream a free upgrade if I own Cinema Grade and/or Photo Grade?

No, CineDream is a new product that requires a separate license purchase. However, current owners of Cinema Grade and Photo Grade will receive early adopter access and exclusive upgrade pricing.

​

Will my Cinema Grade and Photo Grade licenses continue to work?

Yes, your existing Cinema Grade and Photo Grade licenses will continue to function as perpetual licenses. We will provide necessary maintenance updates free of charge, so you can continue using them even if you decide to upgrade to CineDream.

​

Can I use my Cinema Grade 1.0 projects in CineDream?

No, CineDream is not backward compatible with Cinema Grade 1.0 projects due to extensive architectural changes. Cinema Grade will continue to work for your legacy projects.


# Features

#### What's new in CineDream compared to Cinema Grade?

Key new features include:

* Unified video and photo grading in one application
* Film emulation presets (CineLab, CineBoss, etc.)
* Advanced color wheels
* Bloom, halation, and grain effects
* Improved shot matching with split-screen views
* Film density controls
* Subtractive saturation
* Enhanced scopes (waveform, RGB parade, vectorscope)
* Preset saving and management

#### Will CineDream have AI features?

AI features are not planned for the initial release but are being explored for future updates. We're focusing first on perfecting the point-and-click color grading concept with granular manual control.

#### Does CineDream support masking?

Basic masking features like vignette and gradient ramp are supported. For more advanced masking including tracking, you can use your NLE's built-in masking tools in combination with CineDream.

#### Can I export LUTs from CineDream?

LUT export is not planned for the initial release due to our proprietary emulations, but this may be considered for future updates.

#### Will there be support for control surfaces?

Control surface support is on our development roadmap but won't be available in the initial release.


# Pricing & Licensing

#### Will there be an upgrade discount for existing users?

Yes, current owners of Cinema Grade and/or Photo Grade will receive exclusive upgrade pricing and early adopter access.

#### Do I need separate licenses for Mac and Windows?

No, CineDream uses a single license that works on both Mac and Windows platforms.

#### Do I need to purchase CineDream separately for each NLE?

No, one CineDream license works across all supported editing platforms (Premiere Pro, DaVinci Resolve, Final Cut Pro, Photoshop, and Lightroom Classic).


# Technical & Compatibility

#### What editing software does CineDream support?

CineDream supports:

* Adobe Premiere Pro
* DaVinci Resolve
* Final Cut Pro
* Adobe Photoshop
* Adobe Lightroom Classic

#### Is CineDream a standalone application or a plugin?

CineDream is a standalone application that requires plugins for video editing software (Premiere, DaVinci, FCP) and can work with still images directly. It also includes plugins for Photoshop and an extension for Lightroom Classic.

#### Does CineDream support HDR workflows?

Not currently at this time as we are targeting Rec709 workflows for 1.0 release. But we do plan to revisit this as part of our development roadmap once color pipelines become more standardized and fully implemented in the major three NLEs.

#### Will CineDream work with Final Cut Pro 11.1?

Yes, CineDream is being tested and will be compatible with Final Cut Pro 11.1, including support for adjustment clips.


# Supported Camera Color Profiles and Input Color Spaces

#### What camera color profiles and input color spaces does CineDream support?

CineDream uses ARRI LogC as its internal working color space and supports various camera log formats including:

* ACEScc
* ACEScct
* Apple Log
* Apple Log 2
* Arri Log C3
* Arri Log C4
* Blackmagic Design Film Gen 4
* Blackmagic Design Film Gen 5
* Canon Log
* Canon Log 2
* Canon Log 3
* Cineon Film Log
* DJI D-Log
* DJI D-Log M
* DaVinci Wide Gamut
* Filmic Pro Flat V2
* Filmic Pro HLG V3
* Filmic Pro Log V2
* Filmic Pro Log V3
* Fuji Film F-Log
* Fuji Film F-Log 2
* Fuji Film F-Log 2C
* GoPro Protune Flat
* GoPro GP-Log
* Generic Log
* Linear
* Nikon N-Log
* Panasonic V-Log
* Rec709 Gamma 2.4
* RED Log3G10
* RED LogFilm
* Sony S-Log2
* Sony S-Log3
* Sony S-Log3 Cine
* sRGB
* Zcam Zlog2
* Don't see yours? Reach out to us at <support@cinedream.cio>


# Support

#### Where can I get help with CineDream issues?

For the technical support, please email <support@cinedream.io>. This creates a support ticket that we can track until resolution.


# Workflow

#### How does the unified photo/video workflow function?

While CineDream handles both photos and video, they are managed in separate "sessions" within the application. You won't mix video frames and still photos in the same project, but you can easily switch between photo and video sessions.

#### Can I copy grades between clips?

Yes, CineDream includes improved grade management with groups and the ability to save custom presets that can be applied across multiple clips or projects.

#### Does CineDream work with vertical video?

We're aware that vertical footage currently displays sideways in the grading interface and are working on a solution to handle this properly.


# CineDream HotKeys Guide

<table><thead><tr><th>Option</th><th width="251">Mac</th><th>Windows</th></tr></thead><tbody><tr><td>Preferences</td><td>⌘ ,</td><td>Ctrl ,</td></tr><tr><td>Hide CineDream</td><td>⌘ H</td><td>Ctrl H</td></tr><tr><td>Hide Others</td><td>⌥ ⌘ H</td><td>ALT Ctrl H</td></tr><tr><td>Quit CineDream</td><td>⌘ Q</td><td>Ctrl Q</td></tr></tbody></table>

| Option                         | Mac   | Windows   |
| ------------------------------ | ----- | --------- |
| New                            | ⌘ N   | Ctrl N    |
| Open Project                   | ⌘ O   | Ctrl O    |
| Save Project                   | ⌘ S   | Ctrl S    |
| Save Project As                | ⇧ ⌘ S | ⇧ CtrlL S |
| Close Project                  | ⌘ W   | Ctrl W    |
| Import Images                  | ⌘ I   | Ctrl I    |
| Quick Save (Duplicate)         | ⌘ D   | Ctrl D    |
| Export Image(s)                | ⌘ E   | Ctrl E    |
| Batch Export All Graded Images | ⇧ ⌘ E | ⇧ Ctrl E  |

| Option                                      | Mac   | Windows  |
| ------------------------------------------- | ----- | -------- |
| Undo                                        | ⌘ Z   | Ctrl Z   |
| Redo                                        | ⇧ ⌘ Z | ⇧ Ctrl Z |
| Copy Base Correction                        | ⌘ C   | Ctrl C   |
| Paste Base Correction                       | ⌘ V   | Ctrl V   |
| Paste Selected                              | ⇧ ⌘ V | ⇧ Ctrl V |
| Save Base Correction / Final Grading Preset | ⌥ \`  | ALT \`   |

| Tool                     | Mac | Windows |
| ------------------------ | --- | ------- |
| Exposure                 | E   | E       |
| Shad/Mid/High Exposure   | ⇧ E | ⇧ E     |
| Contrast                 | C   | C       |
| Pivot                    | ⇧ C | ⇧ C     |
| Temperature              | T   | T       |
| Tint                     | ⇧ T | ⇧ T     |
| Auto WB                  | A   | A       |
| Saturation               | S   | S       |
| Shad/Mid/High Saturation | ⇧ S | ⇧ S     |
| Wheels                   | W   | W       |
| Offset                   | ⇧ W | ⇧ W     |
| Luma Curve               | R   | R       |
| RGB Curves               | ⇧ R | ⇧ R     |
| HSL Vectors              | H   | H       |
| Film Density             | D   | D       |
| Vignette                 | V   | V       |
| Gradient                 | G   | G       |
| Crop                     | I   | I       |

| Option                         | Mac    | Windows  |
| ------------------------------ | ------ | -------- |
| Base Correction                | ⌘ 2    | Ctrl 2   |
| Shot Matching                  | ⌘ 3    | Ctrl 3   |
| Final Grading                  | ⌘ 4    | Ctrl 4   |
| Zoom In                        | ⌘ +    | Ctrl +   |
| Zoom Out                       | ⌘ -    | Ctrl -   |
| Fit                            | ⌘ 0    | Ctrl 0   |
| 100%                           | ⌘ 1    | Ctrl 1   |
| Show Full Resolution Image     | ⇧ ⌘ 1  | ⇧ Ctrl 1 |
| Scopes                         | ⌘ M    | Ctrl M   |
| Scopes show visible image only | ⇧ ⌘ M  | ⇧ Ctrl M |
| False Color                    | Ctrl L | Ctrl L   |
| False Skin Color               | ⇧ ⌘ L  | ⇧ Ctrl L |

| Option             | Mac        | Windows    |
| ------------------ | ---------- | ---------- |
| Bypass All         | B          | B          |
| Bypass Final Grade | ⇧ B        | ⇧ B        |
| Show Split-Screen  | ⌘ B        | Ctrl B     |
| Show Presets       | ⌘ P        | Ctrl P     |
| Show Filmstrip     | ⇧ Z        | ⇧ Z        |
| Hide Open Panels   | Tab        | Tab        |
| Full Screen        | ⌘ F        | Ctrl F     |
| Previous Project   | Ctrl ⇧ Tab | Ctrl ⇧ Tab |
| Next Project       | Ctrl Tab   | Ctrl Tab   |


# Troubleshooting

{% content-ref url="/pages/NiMpxiZKZrAfb1O0WZ29" %}
[Colors in CineDream don't match viewer in editor](/troubleshooting/colors-in-cinedream-dont-match-viewer-in-editor)
{% endcontent-ref %}

{% content-ref url="/pages/PppdTP3JXuwpaeZNhfyQ" %}
[Images turn black after applying CineDream to clips (Windows)](/troubleshooting/images-turn-black-after-applying-cinedream-to-clips-windows)
{% endcontent-ref %}

{% content-ref url="/pages/LHF9TN0Sg02HYoTawNjl" %}
[Error message: Failed to Fetch](/troubleshooting/error-message-failed-to-fetch)
{% endcontent-ref %}

{% content-ref url="/pages/GYyyyxHjut5RCZnXdlmV" %}
[The Shot Matching page doesn’t show up (DaVinci Resolve)](/troubleshooting/the-shot-matching-page-doesnt-show-up-davinci-resolve)
{% endcontent-ref %}

{% content-ref url="/pages/BSTxkV0W0QTMrgnDV9xD" %}
[Grain looks different in CineDream’s viewer vs the host application viewer](/troubleshooting/grain-looks-different-in-cinedreams-viewer-vs-the-host-application-viewer)
{% endcontent-ref %}

{% content-ref url="/pages/klFdha99V5ADFgyyzPHb" %}
[I don't get real time playback in the host application after applying CineDream](/troubleshooting/i-dont-get-real-time-playback-in-the-host-application-after-applying-cinedream)
{% endcontent-ref %}

{% content-ref url="/pages/I10BXbwga4YxK8ygg72p" %}
[CineDream crashes frequently](/troubleshooting/cinedream-crashes-frequently)
{% endcontent-ref %}

{% content-ref url="/pages/omm13yzrUMJYhXg8ecbv" %}
[Anamorphic footage shows up squeezed/ Footage from a vertical timeline shows up horizontal](/troubleshooting/anamorphic-footage-shows-up-squeezed-footage-from-a-vertical-timeline-shows-up-horizontal)
{% endcontent-ref %}

{% content-ref url="/pages/3pWcD6Onn4stahSJYlVf" %}
[Error message: Failed to set parameters (Premiere)](/troubleshooting/error-message-failed-to-set-parameters-premiere)
{% endcontent-ref %}

{% content-ref url="/pages/OX8VnpSaRLQJ4k83YBn2" %}
[I don’t see the Open Control Button when applying CineDream to a multicam clip (Final Cut Pro)](/troubleshooting/i-dont-see-the-open-control-button-when-applying-cinedream-to-a-multicam-clip-final-cut-pro)
{% endcontent-ref %}

{% content-ref url="/pages/Xe1KC27BbHyDVO4GZUVH" %}
[Fixing Extension Issues on Adobe Premiere Pro (Mac)](/troubleshooting/fixing-extension-issues-on-adobe-premiere-pro-mac)
{% endcontent-ref %}

{% content-ref url="/pages/vbhO8C8YjZYDCiNUxgSb" %}
[Fixing Extension Issues on Adobe Premiere Pro (Windows)](/troubleshooting/fixing-extension-issues-on-adobe-premiere-pro-windows)
{% endcontent-ref %}

{% content-ref url="/pages/X1peexFFfAQpenX38VH4" %}
[FCP 12: CineDream missing from Effects Panel](/troubleshooting/fcp-12-cinedream-missing-from-effects-panel)
{% endcontent-ref %}


# Colors in CineDream don't match viewer in editor

<figure><img src="https://1449894025-files.gitbook.io/~/files/v0/b/gitbook-x-prod.appspot.com/o/spaces%2FXV6dIa2ZTHDKnFjYTLCU%2Fuploads%2FothHCXhIGrVOOrx0osvu%2Fmismatch.png?alt=media&amp;token=a29bde7e-7db5-4d24-bc77-b61497320d7a" alt=""><figcaption><p>CineDream viewer vs Adobe Premiere Pro Viewer mismatch</p></figcaption></figure>

If you are experiencing mismatch issues between what you see in CineDream’s viewer and in the host application, it is most likely a color management issue.&#x20;

We want to make sure both the host application and CineDream are working in the same color space and gamma.  CineDream delivers in the Rec709 color space and can be set to use gamma 2.4 for broadcast, 2.2 for web and 1.96 for quicktime.

The other setting to consider is you monitor’s ICC profile. The ICC profile does the corresponding transformations so your images are displayed correctly in your specific monitor. &#x20;

The ICC profile settings should match between the host application and CineDream.

In the next sections we’ll show you how to change these settings on both the host application and CineDream in order to achieve a 1:1 match.

You’ll find CineDream color management settings under Preferences/Color.\
\
Mac: CineDream menu → Preferences\
\
Windows: Edit menu → Preferences

<figure><img src="https://1449894025-files.gitbook.io/~/files/v0/b/gitbook-x-prod.appspot.com/o/spaces%2FXV6dIa2ZTHDKnFjYTLCU%2Fuploads%2Fli0KMCrCSFdrACCbc8XK%2Fpreferences%20color%20menu.png?alt=media&amp;token=f76df011-0088-4321-b75a-d3a757a46a2d" alt=""><figcaption></figcaption></figure>


# Color Management Adobe Premiere Pro

{% embed url="<https://colorgradingcentral.wistia.com/medias/ritxeg3f6b?embedType=async&seo=false&videoFoam=true&videoWidth=1920>" %}

In Adobe Premiere Pro there are 3 color management menus to pay attention to.

Settings→Color

<figure><img src="https://1449894025-files.gitbook.io/~/files/v0/b/gitbook-x-prod.appspot.com/o/spaces%2FXV6dIa2ZTHDKnFjYTLCU%2Fuploads%2FI8jo4LiaQZ4FdVjijsZn%2FScreenshot%202025-09-19%20at%208.14.41%E2%80%AFAM.png?alt=media&amp;token=8a0da747-f077-4811-93a4-25085e88e200" alt="" width="375"><figcaption></figcaption></figure>

In this menu you’ll find the option to enable/disable Display Color Management. Enabling Display Color Management means Premiere will do the necessary conversions to ensure the image displayed in Premiere’s viewer adapts to the characteristics and color space of your monitor. This is equivalent to switching the ICC Profile on.

<figure><img src="https://1449894025-files.gitbook.io/~/files/v0/b/gitbook-x-prod.appspot.com/o/spaces%2FXV6dIa2ZTHDKnFjYTLCU%2Fuploads%2FhrshycIZeGxAj9F0Ccrx%2FScreenshot%202025-09-19%20at%208.11.53%E2%80%AFAM.png?alt=media&amp;token=cd5dd40e-86d0-45fe-a9a8-aef1e1dc5dc0" alt="" width="375"><figcaption></figcaption></figure>

This option not always yields the expected results and the conversion might not be accurate. We encourage you to run some tests and see if the images displayed in Premiere look closer or not to what you see on other devices like smartphones, tablets and TVs with this option enabled.  Based on that you can opt to keep it on or off.

Then make sure to match these same setting inside CineDream.
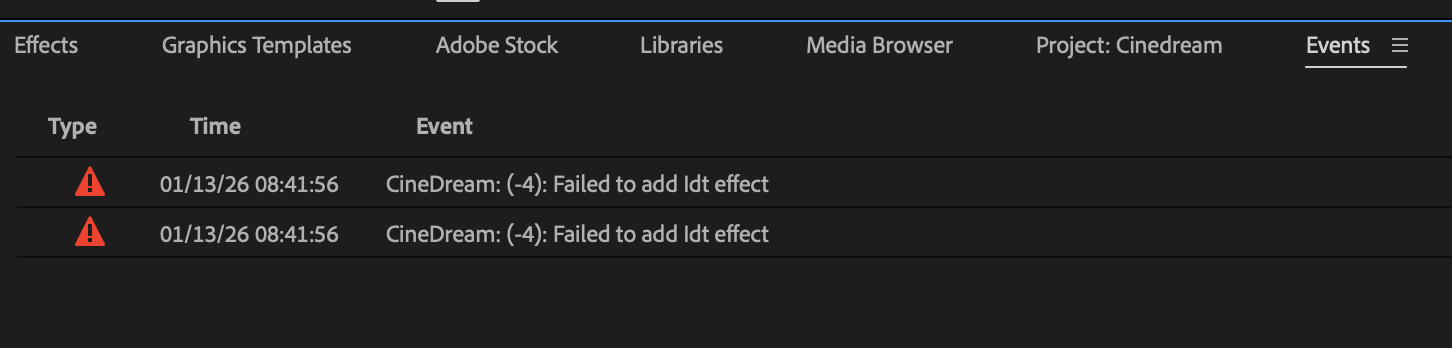
In Preferences/Color, make sure ICC Profile is checked if you chose to keep Display Color Management enabled in Premiere, and unchecked if you chose to keep Display Color Management disabled.

<figure><img src="https://1449894025-files.gitbook.io/~/files/v0/b/gitbook-x-prod.appspot.com/o/spaces%2FXV6dIa2ZTHDKnFjYTLCU%2Fuploads%2FlAjWO7U552997m04Kpjl%2Fpreferences%20color%20menu%20prmiere.png?alt=media&amp;token=b7331675-4f58-4a2d-9f19-cdf450f83f34" alt="" width="375"><figcaption></figcaption></figure>

It is important to remember these settings are not changing your images, just how those images are displayed in the viewer.  Changing these settings won’t change the grade or the look of the exported file.

The next menu to look at in Premiere is Project Settings→Color

<figure><img src="https://1449894025-files.gitbook.io/~/files/v0/b/gitbook-x-prod.appspot.com/o/spaces%2FXV6dIa2ZTHDKnFjYTLCU%2Fuploads%2FJ7BFQ0lqa3oQQmw06HcO%2FScreenshot%202025-09-19%20at%208.12.14%E2%80%AFAM.png?alt=media&amp;token=7a97897a-20dd-48ce-b876-71dad8b6ea19" alt="" width="375"><figcaption></figcaption></figure>

Here we can change the Gamma of the project depending on your intended delivery. 2.4 for broadcast, 2.2 for web, 1.96 for quicktime.

<figure><img src="https://1449894025-files.gitbook.io/~/files/v0/b/gitbook-x-prod.appspot.com/o/spaces%2FXV6dIa2ZTHDKnFjYTLCU%2Fuploads%2FZETUryk7Hgwa9LKgjyBP%2FScreenshot%202025-09-19%20at%208.12.25%E2%80%AFAM.png?alt=media&amp;token=188bde9b-99b9-40ba-8023-215714704268" alt="" width="375"><figcaption></figcaption></figure>

Back to CineDream, in the Preferences/Color menu, change the gamma accordingly.

<figure><img src="https://1449894025-files.gitbook.io/~/files/v0/b/gitbook-x-prod.appspot.com/o/spaces%2FXV6dIa2ZTHDKnFjYTLCU%2Fuploads%2Fghbheh3NukkMs4dAtJgW%2FScreenshot%202025-09-19%20at%208.31.39%E2%80%AFAM.png?alt=media&amp;token=100f0908-9670-4fd4-9650-f574186c86d7" alt="" width="375"><figcaption></figcaption></figure>

And finally, go to the Sequence Settings Menu

<figure><img src="https://1449894025-files.gitbook.io/~/files/v0/b/gitbook-x-prod.appspot.com/o/spaces%2FXV6dIa2ZTHDKnFjYTLCU%2Fuploads%2FjnrPLwiz02hyt7NOy68y%2FScreenshot%202025-09-19%20at%208.32.40%E2%80%AFAM.png?alt=media&amp;token=d82554e2-a231-44c3-8c6d-0f179c6dc16a" alt="" width="375"><figcaption></figcaption></figure>

Make sure the sequence is set to Rec709 as CineDream works in Rec709 by default.

<figure><img src="https://1449894025-files.gitbook.io/~/files/v0/b/gitbook-x-prod.appspot.com/o/spaces%2FXV6dIa2ZTHDKnFjYTLCU%2Fuploads%2FZpSHsAO6dAuDCe15LZom%2FScreenshot%202025-09-19%20at%208.13.03%E2%80%AFAM.png?alt=media&amp;token=86b094d3-76e7-48a4-a1d0-887714310138" alt="" width="375"><figcaption></figcaption></figure>

After reviewing these 3 Premiere menus and setting CineDream accordingly, both the CineDream viewer and Premiere Viewer/Monitor should match perfectly.

If you notice that your log footage shows transformed to Rec709 inside Premiere without ever doing any color correction, it means Premiere is applying a LUT or color space override onto your footage based on its metadata.&#x20;

We don’t want this as CineDream is designed to handle all your color space management and it is expecting to get the native image untouched.  To disable any Premiere conversion, select all your clips in the Project panel, right click and go to Modify/Color.

<figure><img src="https://1449894025-files.gitbook.io/~/files/v0/b/gitbook-x-prod.appspot.com/o/spaces%2FXV6dIa2ZTHDKnFjYTLCU%2Fuploads%2FTJslUiSFJqYKe4iGcAdg%2FScreenshot%202025-09-19%20at%208.55.05%E2%80%AFAM.png?alt=media&amp;token=9675ff32-2634-480b-badb-a3d38b4a9c54" alt="" width="375"><figcaption></figcaption></figure>

Make sure no input LUT is applied and the used color space is Rec709, with Override Media Color Space disabled.

<figure><img src="https://1449894025-files.gitbook.io/~/files/v0/b/gitbook-x-prod.appspot.com/o/spaces%2FXV6dIa2ZTHDKnFjYTLCU%2Fuploads%2FDMabrnivTKJl8UCjgZtX%2FScreenshot%202025-09-19%20at%208.55.14%E2%80%AFAM.png?alt=media&amp;token=e19a9670-96d4-47f0-9d64-f58643761f25" alt="" width="375"><figcaption></figcaption></figure>

With the color management settings matched between CineDream and Adobe Premiere Pro you can expect a 1:1 match.

<figure><img src="https://1449894025-files.gitbook.io/~/files/v0/b/gitbook-x-prod.appspot.com/o/spaces%2FXV6dIa2ZTHDKnFjYTLCU%2Fuploads%2F7X7iziikGDOJ0jRdDlx9%2Fpremiere%20match.png?alt=media&amp;token=9312bcd9-c83b-4d45-b3e1-fafec7d5dbfc" alt=""><figcaption></figcaption></figure>


# Color Management Final Cut Pro

{% embed url="<https://colorgradingcentral.wistia.com/medias/g80sbejhjz?embedType=web_component&seo=true&videoWidth=960>" %}

Inside Final Cut Pro there are 4 settings to pay attention to.

First the Library’s color space.  Select the library and go to Library Properties. Make sure it is set to Standard Gamut SDR.  If that’s not the case, click Modify and change it.

<figure><img src="https://1449894025-files.gitbook.io/~/files/v0/b/gitbook-x-prod.appspot.com/o/spaces%2FXV6dIa2ZTHDKnFjYTLCU%2Fuploads%2FkjUOdmIIVvIbr2N3uiNC%2FScreenshot%202025-09-19%20at%208.43.12%E2%80%AFAM.png?alt=media&amp;token=26d56279-e44e-4c33-bd34-09682e615924" alt="" width="375"><figcaption></figcaption></figure>

<figure><img src="https://1449894025-files.gitbook.io/~/files/v0/b/gitbook-x-prod.appspot.com/o/spaces%2FXV6dIa2ZTHDKnFjYTLCU%2Fuploads%2FCSQK54ALFEl2ChXow5rK%2FScreenshot%202025-09-19%20at%208.43.28%E2%80%AFAM.png?alt=media&amp;token=623a89c4-e569-42f3-aeab-0e20871cce62" alt="" width="375"><figcaption></figcaption></figure>

By default the project inside a Standard Gamut SDR Library should be set to Rec709. If you want to make sure, select a project and it should be tagged as Rec709 in the inspector.

<figure><img src="https://1449894025-files.gitbook.io/~/files/v0/b/gitbook-x-prod.appspot.com/o/spaces%2FXV6dIa2ZTHDKnFjYTLCU%2Fuploads%2FH795JdmRNp1ZK6tbRbuT%2FScreenshot%202025-09-19%20at%208.47.58%E2%80%AFAM.png?alt=media&amp;token=2bebc170-9230-4b39-8406-1e696b2ac4b4" alt="" width="375"><figcaption></figcaption></figure>

If that’s not the case, click modify and change it.

<figure><img src="https://1449894025-files.gitbook.io/~/files/v0/b/gitbook-x-prod.appspot.com/o/spaces%2FXV6dIa2ZTHDKnFjYTLCU%2Fuploads%2Fzbfx6SzDfswSbzHz13JD%2FScreenshot%202025-09-19%20at%208.48.08%E2%80%AFAM.png?alt=media&amp;token=d7fae753-3cca-4e43-a49a-2f6c8fab36ea" alt="" width="375"><figcaption></figcaption></figure>

By default Final Cut Pro works with ICC Profile on and Gamma 1.96. This means that the software is always doing the necessary transformations for the image to display correctly inside Final Cut. Back to CineDream, you’ll see this settings are displayed but greyed out as there is no need to change them.

<figure><img src="https://1449894025-files.gitbook.io/~/files/v0/b/gitbook-x-prod.appspot.com/o/spaces%2FXV6dIa2ZTHDKnFjYTLCU%2Fuploads%2FrwL7rnJ7Yy0oVY8viOpJ%2FScreenshot%202025-09-19%20at%201.42.21%E2%80%AFPM%20copy.png?alt=media&amp;token=d295e973-8a76-4eff-921f-7a48c80ff2b1" alt="" width="375"><figcaption></figcaption></figure>

If you notice that your log footage shows transformed to Rec709 inside Final Cut without ever doing any color correction, it means Final Cut is applying a LUT or color space override onto your footage based on its metadata.  We don’t want this as CineDream is designed to handle all your color space management and it is expecting to get the native image untouched. &#x20;

To disable any Final Cut conversion, select all your clips in the Library, go to the Video Inspector and disable Color Conform.

<figure><img src="https://1449894025-files.gitbook.io/~/files/v0/b/gitbook-x-prod.appspot.com/o/spaces%2FXV6dIa2ZTHDKnFjYTLCU%2Fuploads%2FxvseEztxjYo9rXkTW7gx%2FScreenshot%202025-09-19%20at%209.05.13%E2%80%AFAM.png?alt=media&amp;token=fc204fcd-161d-4be8-8ab4-c5139920decb" alt="" width="375"><figcaption></figcaption></figure>

Then go to the Info Inspector and make sure no LUT is applied under Camera LUT.

<figure><img src="https://1449894025-files.gitbook.io/~/files/v0/b/gitbook-x-prod.appspot.com/o/spaces%2FXV6dIa2ZTHDKnFjYTLCU%2Fuploads%2FnaVgEDnbT1CJYSQk8877%2FScreenshot%202025-09-19%20at%209.04.22%E2%80%AFAM.png?alt=media&amp;token=8dfe102e-5f81-4987-aab9-5179e27e045a" alt="" width="375"><figcaption></figcaption></figure>

With the color management settings matched between CineDream and Final Cut Pro you can expect a 1:1 match.

<figure><img src="https://1449894025-files.gitbook.io/~/files/v0/b/gitbook-x-prod.appspot.com/o/spaces%2FXV6dIa2ZTHDKnFjYTLCU%2Fuploads%2FK9NkWMDUMIbu4AR3Nt5u%2Ffinal%20cut%20match.png?alt=media&amp;token=4076f7e7-d0e2-4df5-a5cb-5fe2923e77a1" alt=""><figcaption></figcaption></figure>


# Color Management DaVinci Resolve

{% embed url="<https://colorgradingcentral.wistia.com/medias/fo07t49ntm?embedType=web_component&seo=true&videoWidth=960>" %}

In DaVinci Resolve there are 2 color management menus to pay attention to.

Preferences→General

<figure><img src="https://1449894025-files.gitbook.io/~/files/v0/b/gitbook-x-prod.appspot.com/o/spaces%2FXV6dIa2ZTHDKnFjYTLCU%2Fuploads%2F5AyTKukZbpJyukFTeuZY%2FScreenshot%202025-10-24%20at%2010.57.24%E2%80%AFAM.png?alt=media&amp;token=5e859dc2-b5c6-4cef-8b07-7765923dac20" alt="" width="375"><figcaption></figcaption></figure>

Here you can choose to enable/disable "Use Mac display color profiles for viewers" (on Mac) and "Use Windows display color management and HDR for viewers" (on Windows) which is equivalent to switching your monitor's ICC Profile on or off.

Enabling it means Resolve will do the necessary conversions to ensure the image displayed in Resolve’s viewer adapts to the characteristics and color space of your monitor.&#x20;

This option not always yields the expected results and the conversion might not be accurate. We encourage you to run some tests and see if the images displayed in Resolve looks closer or not to what you see on other devices like smartphones, tablets and TVs with this option enabled.  Based on that you can opt to keep it on or off.

For Mac users, below the "Use Mac display color profiles for viewers" option you'll find "Viewers match Quicktime player when using Rec.709 (Scene)". This option is aimed at making Resolve's viewer match Quicktime Player's viewer, as a way to address the famous gamma shift issue on Mac.  This setting will only affect Resolve's viewer when Rec.709 (Scene) is selected in the Color Management menu. If you want to make your images match between Resolve and Quicktime Player, enable this option and we will show you how to set Color Management and CineDream Preferences acordingly in the paragraphs below.

After settings Preferences we need to match this same settings inside CineDream.

In Preferences/Color, make sure ICC Profile is checked if you chose to keep Display Color Management enabled in Resolve, and unchecked if you chose to keep Display Color Management disabled.&#x20;

<figure><img src="https://1449894025-files.gitbook.io/~/files/v0/b/gitbook-x-prod.appspot.com/o/spaces%2FXV6dIa2ZTHDKnFjYTLCU%2Fuploads%2FCEPoFxEieR07KGkhdBWm%2FScreenshot%202025-09-19%20at%201.42.21%E2%80%AFPM%20copy%202.png?alt=media&amp;token=06f3623e-7bf4-42f5-9bbe-76b7f94e3804" alt="" width="375"><figcaption></figcaption></figure>

The second menu to look at is Project Settings/Color Management

<figure><img src="https://1449894025-files.gitbook.io/~/files/v0/b/gitbook-x-prod.appspot.com/o/spaces%2FXV6dIa2ZTHDKnFjYTLCU%2Fuploads%2FAtG9cajhT6K1Tqjdk0Cu%2FScreenshot%202025-09-19%20at%209.23.01%E2%80%AFAM.png?alt=media&amp;token=9208996a-ddde-4132-b31d-5024794bb804" alt="" width="375"><figcaption></figcaption></figure>

Here make sure Color Science is set to DaVinci YRGB, this means you’ll be using a non-color managed workflow.  This is important because all your color management will happen inside CineDream and we don’t want two different color managements, Resolve and CineDream, to collide.

Then for Timeline and Output color space choose Rec709, gamma 2.4 for broadcast or 2.2 for web, depending on your intended delivery. If you checked "Viewers match Quicktime player when using Rec.709 (Scene)" in the Preferences menu to ensure Resolve and Quicktime Player match, change the Timeline color space and Output color space to Rec709 (Scene).

Back to CineDream, Preferences/Color menu, set the gamma accordingly.  If you chose Rec709 (Scene), change Gamma to 1.9 (Apple), as that is the Gamma used in Quicktime Player.

<figure><img src="https://1449894025-files.gitbook.io/~/files/v0/b/gitbook-x-prod.appspot.com/o/spaces%2FXV6dIa2ZTHDKnFjYTLCU%2Fuploads%2FoAQtDDFwGSOidAmD05Km%2FScreenshot%202025-09-19%20at%209.34.39%E2%80%AFAM.png?alt=media&amp;token=877549f1-7f78-4fbc-a24f-44c113450a33" alt="" width="375"><figcaption></figcaption></figure>

With the color management settings matched between CineDream and Adobe Premiere Pro you can expect a 1:1 match.

<figure><img src="https://1449894025-files.gitbook.io/~/files/v0/b/gitbook-x-prod.appspot.com/o/spaces%2FXV6dIa2ZTHDKnFjYTLCU%2Fuploads%2FGQrNrN1epDQOIT5yj6GV%2Fresolve%20match.png?alt=media&amp;token=0254af3c-1a18-4ad9-9c2b-fe2ca346ec2e" alt=""><figcaption></figcaption></figure>


# Images turn black after applying CineDream to clips (Windows)

<figure><img src="https://1449894025-files.gitbook.io/~/files/v0/b/gitbook-x-prod.appspot.com/o/spaces%2FXV6dIa2ZTHDKnFjYTLCU%2Fuploads%2FFTsW688MonXU7bxdu9So%2Fblack%20image.png?alt=media&amp;token=157a676c-e718-45ba-af3a-5f7ff29d0299" alt=""><figcaption></figcaption></figure>

**Cause:** This is generally caused by a graphics card with an outdated driver.

**Solution:** Update to the latest version of the driver.&#x20;

For AMD GPUs use the Adrenalin Edition Application for updates.

<figure><img src="https://1449894025-files.gitbook.io/~/files/v0/b/gitbook-x-prod.appspot.com/o/spaces%2FXV6dIa2ZTHDKnFjYTLCU%2Fuploads%2FxyB1CYhLdiJKmKd90ILo%2FSequence%2001.00_03_18_09.Still002.png?alt=media&amp;token=26c88946-36ce-478c-a6ea-a01967ebba2b" alt=""><figcaption></figcaption></figure>

For NVIDIA GPUs use the NVIDIA App for updates.\
Note: For NVIDIA cards, if the issue persists, install the Studio Version of the drivers.

<figure><img src="https://1449894025-files.gitbook.io/~/files/v0/b/gitbook-x-prod.appspot.com/o/spaces%2FXV6dIa2ZTHDKnFjYTLCU%2Fuploads%2FsNzhcZO15pgNahNZ7OC1%2FSequence%2001.00_03_14_04.Still001.png?alt=media&amp;token=02182c37-fbbb-4c6a-8018-7337de0d5fd6" alt=""><figcaption></figcaption></figure>


# Error message: Failed to Fetch

<figure><img src="https://1449894025-files.gitbook.io/~/files/v0/b/gitbook-x-prod.appspot.com/o/spaces%2FXV6dIa2ZTHDKnFjYTLCU%2Fuploads%2F15xKzFGnt8ZV687a8M7Z%2Ffaild%20to%20fetch.png?alt=media&amp;token=a1eaa245-14a1-44d1-81cc-9dd8c611d951" alt=""><figcaption></figcaption></figure>

**Cause:** On most cases it is caused by a faulty installation.

**Solution:** Perform a clean install.

**On Mac**

1\. Download the latest CineDream build here: <https://fd.cinemagrade.com/installer/release/CD-21a950e0/mac>

2\. Mount the .dmg, run the “Uninstaller” first, then enter your system password. If it prompts you to move to trash or ‘keep’ click ‘keep’.

<figure><img src="https://1449894025-files.gitbook.io/~/files/v0/b/gitbook-x-prod.appspot.com/o/spaces%2FXV6dIa2ZTHDKnFjYTLCU%2Fuploads%2FGiE5inreUW0Jx7BQyU7v%2FSequence%2001.00_01_08_14.Still003.png?alt=media&amp;token=4c645b69-3971-4a6b-ac4b-f087b4b3eb3b" alt=""><figcaption></figcaption></figure>

3. If you are an Adobe Premiere user, make sure you are logged in to Adobe Creative Cloud.

<figure><img src="https://1449894025-files.gitbook.io/~/files/v0/b/gitbook-x-prod.appspot.com/o/spaces%2FXV6dIa2ZTHDKnFjYTLCU%2Fuploads%2F3rwRFvcMSPMV9ZCo5nQT%2FSequence%2001.00_00_55_11.Still004.png?alt=media&amp;token=7be9c8f1-38f7-4f3f-9c48-1663ebe4a8e0" alt=""><figcaption></figcaption></figure>

4. Then mount again the .dmg and run the “Installer”.

<figure><img src="https://1449894025-files.gitbook.io/~/files/v0/b/gitbook-x-prod.appspot.com/o/spaces%2FXV6dIa2ZTHDKnFjYTLCU%2Fuploads%2FWizjvyz98sLwf8QJpf1I%2FSequence%2001.00_01_15_01.Still005.png?alt=media&amp;token=9ba7f7bd-2982-4078-b2d0-155ff2a74de2" alt=""><figcaption></figcaption></figure>

5\. After installation is complete, restart your Mac for good measure.

**On Windows**

1\. Search for “Add or remove programs” in the Start menu to open the Settings app.

<figure><img src="https://1449894025-files.gitbook.io/~/files/v0/b/gitbook-x-prod.appspot.com/o/spaces%2FXV6dIa2ZTHDKnFjYTLCU%2Fuploads%2FAN7d3b1ctinEtEw9Hicx%2FSequence%2001.00_03_54_10.Still007.png?alt=media&amp;token=f105e8fa-4367-4aae-8e92-97ea01fc9ef6" alt=""><figcaption></figcaption></figure>

<figure><img src="https://1449894025-files.gitbook.io/~/files/v0/b/gitbook-x-prod.appspot.com/o/spaces%2FXV6dIa2ZTHDKnFjYTLCU%2Fuploads%2F1Tvwa1GGTn5erhPkPWxY%2FSequence%2001.00_05_14_04.Still008.png?alt=media&amp;token=6c8dfc05-bb39-4c14-80ce-aacedc060563" alt=""><figcaption></figcaption></figure>

2. Find the CineDream in the list of applications and select it, then click “Uninstall”.

<figure><img src="https://1449894025-files.gitbook.io/~/files/v0/b/gitbook-x-prod.appspot.com/o/spaces%2FXV6dIa2ZTHDKnFjYTLCU%2Fuploads%2Foh9lnx5mBYGiXNmLjj59%2FSequence%2001.00_05_24_20.Still006.png?alt=media&amp;token=9e853d87-cdb4-46c4-af0a-aa57a823e2c1" alt=""><figcaption></figcaption></figure>

3\. Download the latest CineDream build here:

<https://fd.cinemagrade.com/installer/release/CD-21a950e0/win>

4\. If you are an Adobe Premiere user, make sure you are logged in to Adobe Creative Cloud.

<figure><img src="https://1449894025-files.gitbook.io/~/files/v0/b/gitbook-x-prod.appspot.com/o/spaces%2FXV6dIa2ZTHDKnFjYTLCU%2Fuploads%2FvpX77rQuptUKDAi9DZpR%2FSequence%2001.00_03_44_19.Still009.png?alt=media&amp;token=39116f5c-b009-4f73-9927-b336e9c60ac3" alt=""><figcaption></figcaption></figure>

5. Then open the .msi file to start installation and follow the prompts.

<figure><img src="https://1449894025-files.gitbook.io/~/files/v0/b/gitbook-x-prod.appspot.com/o/spaces%2FXV6dIa2ZTHDKnFjYTLCU%2Fuploads%2FlhXjLvrL0D7cYVA3zyFV%2FSequence%2001.00_03_49_03.Still010.png?alt=media&amp;token=5e3ab9b7-62ac-4a8d-acfb-8e1a62ea3687" alt=""><figcaption></figcaption></figure>

6. After installation is complete, restart your PC for good measure.


# The Shot Matching page doesn’t show up (DaVinci Resolve)

{% embed url="<https://colorgradingcentral.wistia.com/medias/yi9x0ii22g?embedType=web_component&seo=true&videoWidth=960>" %}

**Cause:** CineDream doesn’t support the Shot Matching page in DaVinci Resolve because of limitations in OFX architecture in Resolve.  OFX doesn’t support the ability to send multiple clips at a time to CineDream.

**Solution:** DaVinci Resolve has shot matching and grouping built in.  You can use Resolve’s built-in tools for these steps.

To create a side by side view for matching select two or more clips and enable Split screen view, then select Selected Clips from the dropdown menu.

<figure><img src="https://1449894025-files.gitbook.io/~/files/v0/b/gitbook-x-prod.appspot.com/o/spaces%2FXV6dIa2ZTHDKnFjYTLCU%2Fuploads%2FGHFmCcm4kp5eMTmfirTv%2FScreenshot%202025-09-25%20at%2010.15.58%E2%80%AFAM.png?alt=media&amp;token=d3b1ad26-5eef-46e0-92c1-7a6063ed4e15" alt=""><figcaption></figcaption></figure>

To create a group select two or more clips, then right click over a thumbnail and select Add into a New Group from the contextual menu.

<figure><img src="https://1449894025-files.gitbook.io/~/files/v0/b/gitbook-x-prod.appspot.com/o/spaces%2FXV6dIa2ZTHDKnFjYTLCU%2Fuploads%2FBi2oyKQO5RhTKXEfqsws%2FScreenshot%202025-09-25%20at%2010.16.25%E2%80%AFAM.png?alt=media&amp;token=91a38159-52f6-47b9-a1ec-bbc63cb7752a" alt=""><figcaption></figcaption></figure>


# Grain looks different in CineDream’s viewer vs the host application viewer

<figure><img src="https://1449894025-files.gitbook.io/~/files/v0/b/gitbook-x-prod.appspot.com/o/spaces%2FXV6dIa2ZTHDKnFjYTLCU%2Fuploads%2FqOk8fDsnx1wtnTYzrkKL%2Fdiferencia%20grain.png?alt=media&amp;token=7748e778-df33-4b2f-a9f0-f4de6850f385" alt=""><figcaption></figcaption></figure>

**Cause:** The Grain feature demands a lot of processing power from your system, to keep it running light, without any bottle necks, we run a lower resolution version of grain inside CineDream’s viewer.  But after clicking Apply, the high resolution version of grain is applied in the host application.

**Solution:** When setting up Grain, keep CineDream’s viewer and the host application viewer side by side, so as soon as you click Apply, you can see the results.  Use this side by side set up to monitor and dial in the correct amount and size of grain.


# I don't get real time playback in the host application after applying CineDream

**Cause:** Color Correction and texture effects like halation, bloom and grain demand a lot of processing power. Some systems might struggle to play it back in realtime specially on timeline with high resolution footage (4k, 8K).&#x20;

**Solution:** Lower the resolution playback on the host application or render timeline.

**DaVinci Resolve**

Go to the Playback menu and lower the Timeline Playback Resolution

<figure><img src="https://1449894025-files.gitbook.io/~/files/v0/b/gitbook-x-prod.appspot.com/o/spaces%2FXV6dIa2ZTHDKnFjYTLCU%2Fuploads%2Fe1T9zgrf8PhvghVSTI4K%2FScreenshot%202025-09-25%20at%2010.26.26%E2%80%AFAM.png?alt=media&amp;token=2ecab68b-84a2-4035-bcdf-7e3a3f11cf67" alt=""><figcaption></figcaption></figure>

Go to the Playback menu and select Render Cache Smart

<figure><img src="https://1449894025-files.gitbook.io/~/files/v0/b/gitbook-x-prod.appspot.com/o/spaces%2FXV6dIa2ZTHDKnFjYTLCU%2Fuploads%2FTl3qU6KXyEpFJbKw6844%2FScreenshot%202025-09-25%20at%2010.31.20%E2%80%AFAM.png?alt=media&amp;token=eb6d043e-8961-4cfa-aa2e-08a426ee03ed" alt=""><figcaption></figcaption></figure>

**Adobe Premiere Pro**

Go to viewer and lower the playback resolution.

<figure><img src="https://1449894025-files.gitbook.io/~/files/v0/b/gitbook-x-prod.appspot.com/o/spaces%2FXV6dIa2ZTHDKnFjYTLCU%2Fuploads%2FOLMmQ1Jwp6YGbvUBJ2N1%2FScreenshot%202025-09-25%20at%2010.27.32%E2%80%AFAM.png?alt=media&amp;token=6db6ffaf-e46c-4597-8b66-7e9121f579a5" alt=""><figcaption></figcaption></figure>

Go to the Sequence menu and select Render In to Out.

<figure><img src="https://1449894025-files.gitbook.io/~/files/v0/b/gitbook-x-prod.appspot.com/o/spaces%2FXV6dIa2ZTHDKnFjYTLCU%2Fuploads%2FkkivyC3Hxph45nkR6mYg%2FScreenshot%202025-09-25%20at%2010.27.48%E2%80%AFAM.png?alt=media&amp;token=2a7a50cc-63e0-4cc8-beaf-2aec7c7dc649" alt=""><figcaption></figcaption></figure>

**Final Cut Pro**

Go to the viewer, open the View dropdown menu and select Better Performance.

<figure><img src="https://1449894025-files.gitbook.io/~/files/v0/b/gitbook-x-prod.appspot.com/o/spaces%2FXV6dIa2ZTHDKnFjYTLCU%2Fuploads%2F3tF8BbOFyHv3UXaeajRP%2FScreenshot%202025-09-25%20at%2011.23.44%E2%80%AFAM.png?alt=media&amp;token=242b95ce-655f-4b65-962c-88cca33af4b1" alt=""><figcaption></figcaption></figure>

Go to Final Cut (upper left corner), click on Settings. Then enable Background Render from the Playback Panel.

<figure><img src="https://1449894025-files.gitbook.io/~/files/v0/b/gitbook-x-prod.appspot.com/o/spaces%2FXV6dIa2ZTHDKnFjYTLCU%2Fuploads%2FTNiI5424kMiNZryXcYCK%2FScreenshot%202025-09-25%20at%2010.55.37%E2%80%AFAM.png?alt=media&amp;token=3411469c-d6cf-4b2a-b84c-e0d0f22f39da" alt=""><figcaption></figcaption></figure>


# CineDream crashes frequently

**Cause:** On most cases these errors are caused by a faulty installation or an issue with the imported LUT folder.

**Solution:** Go to Preferences then Color and remove the LUTs folders.  Then perform a clean install.

<figure><img src="https://1449894025-files.gitbook.io/~/files/v0/b/gitbook-x-prod.appspot.com/o/spaces%2FXV6dIa2ZTHDKnFjYTLCU%2Fuploads%2F3aEo7G58KcwMdfTIq2j3%2FScreenshot%202025-09-25%20at%2011.20.28%E2%80%AFAM.png?alt=media&amp;token=50f236ec-b81e-44d6-a1e8-73c7849f83ee" alt=""><figcaption></figcaption></figure>

To perform a clean install:

**On Mac**

1\. Download the latest CineDream build here: <https://fd.cinemagrade.com/installer/release/CD-21a950e0/mac>

2\. Mount the .dmg, run the “Uninstaller” first, then enter your system password. If it prompts you to move to trash or ‘keep’ click ‘keep’.

<figure><img src="https://1449894025-files.gitbook.io/~/files/v0/b/gitbook-x-prod.appspot.com/o/spaces%2FXV6dIa2ZTHDKnFjYTLCU%2Fuploads%2FGiE5inreUW0Jx7BQyU7v%2FSequence%2001.00_01_08_14.Still003.png?alt=media&amp;token=4c645b69-3971-4a6b-ac4b-f087b4b3eb3b" alt=""><figcaption></figcaption></figure>

3. If you are an Adobe Premiere user, make sure you are logged in to Adobe Creative Cloud.

<figure><img src="https://1449894025-files.gitbook.io/~/files/v0/b/gitbook-x-prod.appspot.com/o/spaces%2FXV6dIa2ZTHDKnFjYTLCU%2Fuploads%2F3rwRFvcMSPMV9ZCo5nQT%2FSequence%2001.00_00_55_11.Still004.png?alt=media&amp;token=7be9c8f1-38f7-4f3f-9c48-1663ebe4a8e0" alt=""><figcaption></figcaption></figure>

4. Then mount again the .dmg and run the “Installer”.

<figure><img src="https://1449894025-files.gitbook.io/~/files/v0/b/gitbook-x-prod.appspot.com/o/spaces%2FXV6dIa2ZTHDKnFjYTLCU%2Fuploads%2FWizjvyz98sLwf8QJpf1I%2FSequence%2001.00_01_15_01.Still005.png?alt=media&amp;token=9ba7f7bd-2982-4078-b2d0-155ff2a74de2" alt=""><figcaption></figcaption></figure>

5\. After installation is complete, restart your Mac for good measure.

**On Windows**

1\. Search for “Add or remove programs” in the Start menu to open the Settings app.

<figure><img src="https://1449894025-files.gitbook.io/~/files/v0/b/gitbook-x-prod.appspot.com/o/spaces%2FXV6dIa2ZTHDKnFjYTLCU%2Fuploads%2FAN7d3b1ctinEtEw9Hicx%2FSequence%2001.00_03_54_10.Still007.png?alt=media&amp;token=f105e8fa-4367-4aae-8e92-97ea01fc9ef6" alt=""><figcaption></figcaption></figure>

<figure><img src="https://1449894025-files.gitbook.io/~/files/v0/b/gitbook-x-prod.appspot.com/o/spaces%2FXV6dIa2ZTHDKnFjYTLCU%2Fuploads%2F1Tvwa1GGTn5erhPkPWxY%2FSequence%2001.00_05_14_04.Still008.png?alt=media&amp;token=6c8dfc05-bb39-4c14-80ce-aacedc060563" alt=""><figcaption></figcaption></figure>

2. Find the CineDream in the list of applications and select it, then click “Uninstall”.

<figure><img src="https://1449894025-files.gitbook.io/~/files/v0/b/gitbook-x-prod.appspot.com/o/spaces%2FXV6dIa2ZTHDKnFjYTLCU%2Fuploads%2Foh9lnx5mBYGiXNmLjj59%2FSequence%2001.00_05_24_20.Still006.png?alt=media&amp;token=9e853d87-cdb4-46c4-af0a-aa57a823e2c1" alt=""><figcaption></figcaption></figure>

3\. Download the latest CineDream build here:

<https://fd.cinemagrade.com/installer/release/CD-21a950e0/win>

4\. If you are an Adobe Premiere user, make sure you are logged in to Adobe Creative Cloud.

<figure><img src="https://1449894025-files.gitbook.io/~/files/v0/b/gitbook-x-prod.appspot.com/o/spaces%2FXV6dIa2ZTHDKnFjYTLCU%2Fuploads%2FvpX77rQuptUKDAi9DZpR%2FSequence%2001.00_03_44_19.Still009.png?alt=media&amp;token=39116f5c-b009-4f73-9927-b336e9c60ac3" alt=""><figcaption></figcaption></figure>

5. Then open the .msi file to start installation and follow the prompts.

<figure><img src="https://1449894025-files.gitbook.io/~/files/v0/b/gitbook-x-prod.appspot.com/o/spaces%2FXV6dIa2ZTHDKnFjYTLCU%2Fuploads%2FlhXjLvrL0D7cYVA3zyFV%2FSequence%2001.00_03_49_03.Still010.png?alt=media&amp;token=5e3ab9b7-62ac-4a8d-acfb-8e1a62ea3687" alt=""><figcaption></figcaption></figure>

6. After installation is complete, restart your PC for good measure.


# Anamorphic footage shows up squeezed/ Footage from a vertical timeline shows up horizontal

<figure><img src="https://1449894025-files.gitbook.io/~/files/v0/b/gitbook-x-prod.appspot.com/o/spaces%2FXV6dIa2ZTHDKnFjYTLCU%2Fuploads%2Fz4eRZAX7kQEiWyenG9hN%2FScreenshot%202025-09-25%20at%2011.38.18%E2%80%AFAM.png?alt=media&amp;token=f1198354-f4c0-4755-b561-60a43e3f5f40" alt=""><figcaption></figcaption></figure>

<figure><img src="https://1449894025-files.gitbook.io/~/files/v0/b/gitbook-x-prod.appspot.com/o/spaces%2FXV6dIa2ZTHDKnFjYTLCU%2Fuploads%2F7WMF2Qv84t1DCpK2AJe1%2FScreenshot%202025-09-25%20at%2011.42.49%E2%80%AFAM.png?alt=media&amp;token=5e407074-3724-4963-b84a-8f0f0c68511a" alt=""><figcaption></figcaption></figure>

**Cause:** CineDream fetches the original clip from the host application so it won’t show any desqueezing, resizing or rotation performed by it.&#x20;

**Solution:** This is a software limitation we hope to resolve in a future update, we don’t have a fix at this moment.  In the meantime nesting each clip and then applying CineDream to the nest/compound clip will make CineDream “read” the desqueezing and any sizing or rotation change happening inside the nest.

**DaVinci Resolve:** Right click over the clip and select New Compound Clip from the contextual menu.

<figure><img src="https://1449894025-files.gitbook.io/~/files/v0/b/gitbook-x-prod.appspot.com/o/spaces%2FXV6dIa2ZTHDKnFjYTLCU%2Fuploads%2FcQBcADMMDkyEUySK5MHx%2FScreenshot%202025-09-25%20at%2012.04.58%E2%80%AFPM.png?alt=media&amp;token=93086911-c545-42ee-a471-205f5aa14a79" alt=""><figcaption></figcaption></figure>

**Adobe Premiere Pro:** Right click over the clip and select Nest from the contextual menu.

<figure><img src="https://1449894025-files.gitbook.io/~/files/v0/b/gitbook-x-prod.appspot.com/o/spaces%2FXV6dIa2ZTHDKnFjYTLCU%2Fuploads%2FOV4aFJi56hnDeEdWpyXi%2FScreenshot%202025-09-25%20at%2012.03.47%E2%80%AFPM.png?alt=media&amp;token=58aa9169-c729-41b0-b90e-27c3a9ef27bf" alt=""><figcaption></figcaption></figure>

**Final Cut Pro:** Right click over the clip and select New Compound Clip from the contextual menu.

<figure><img src="https://1449894025-files.gitbook.io/~/files/v0/b/gitbook-x-prod.appspot.com/o/spaces%2FXV6dIa2ZTHDKnFjYTLCU%2Fuploads%2FkPzi6C6aVoDkdRfyv6p9%2FScreenshot%202025-09-25%20at%2012.02.14%E2%80%AFPM.png?alt=media&amp;token=2abf0e42-057e-4793-8a34-4cf0f5be0276" alt=""><figcaption></figcaption></figure>


# Error message: Failed to set parameters (Premiere)

<figure><img src="https://1449894025-files.gitbook.io/~/files/v0/b/gitbook-x-prod.appspot.com/o/spaces%2FXV6dIa2ZTHDKnFjYTLCU%2Fuploads%2FVuBQOqzXdFXMAj8F6E3q%2FScreenshot%202025-09-25%20at%201.28.53%E2%80%AFPM.png?alt=media&amp;token=5c7022a6-a3e7-4a91-af28-15236f3693cc" alt=""><figcaption></figcaption></figure>

**Cause:** Faulty communication between Adobe Premiere and CineDream

**Solution:**

1. Apply CineDream in Premiere to more than one clip

<figure><img src="https://1449894025-files.gitbook.io/~/files/v0/b/gitbook-x-prod.appspot.com/o/spaces%2FXV6dIa2ZTHDKnFjYTLCU%2Fuploads%2FAPqphgGqxqFWPDUaeyyG%2FScreenshot%202025-09-25%20at%201.44.46%E2%80%AFPM.png?alt=media&amp;token=b6abd860-9b64-4282-b6b1-b997b5a2e757" alt=""><figcaption></figcaption></figure>

2. Click ‘Open Controls’

<figure><img src="https://1449894025-files.gitbook.io/~/files/v0/b/gitbook-x-prod.appspot.com/o/spaces%2FXV6dIa2ZTHDKnFjYTLCU%2Fuploads%2Fj3i3p88LQrmIcYN59SIj%2FScreenshot%202025-09-25%20at%201.37.16%E2%80%AFPM.png?alt=media&amp;token=010e9431-007f-43fe-a932-cf3a1abd7aef" alt=""><figcaption></figcaption></figure>

3. Some clips might not appear in CineDream. Any changes that you make will result in that error message

<figure><img src="https://1449894025-files.gitbook.io/~/files/v0/b/gitbook-x-prod.appspot.com/o/spaces%2FXV6dIa2ZTHDKnFjYTLCU%2Fuploads%2FBWuCg00L3BwRmWweL3qT%2FScreenshot%202025-09-25%20at%201.38.51%E2%80%AFPM.png?alt=media&amp;token=0090210e-29e6-48f6-bffc-5d3ae0a4a4cc" alt=""><figcaption></figcaption></figure>

4\. Close CineDream

<figure><img src="https://1449894025-files.gitbook.io/~/files/v0/b/gitbook-x-prod.appspot.com/o/spaces%2FXV6dIa2ZTHDKnFjYTLCU%2Fuploads%2FnafCHcYMmM46sQU68FB7%2FScreenshot%202025-09-25%20at%201.39.40%E2%80%AFPM.png?alt=media&amp;token=c9c77b7d-e878-478b-aded-cd99a55e1642" alt=""><figcaption></figcaption></figure>

5. Save Project in Premiere (important!)

<figure><img src="https://1449894025-files.gitbook.io/~/files/v0/b/gitbook-x-prod.appspot.com/o/spaces%2FXV6dIa2ZTHDKnFjYTLCU%2Fuploads%2Fr7cijnOhF20E0I2l3Hgl%2FScreenshot%202025-09-25%20at%201.39.52%E2%80%AFPM.png?alt=media&amp;token=49270444-9bd3-4b9e-badc-1ec995c16b33" alt=""><figcaption></figcaption></figure>

6. Close Premiere

<figure><img src="https://1449894025-files.gitbook.io/~/files/v0/b/gitbook-x-prod.appspot.com/o/spaces%2FXV6dIa2ZTHDKnFjYTLCU%2Fuploads%2FYzWSOySRVeWJAw2kYMEs%2FScreenshot%202025-09-25%20at%201.40.07%E2%80%AFPM.png?alt=media&amp;token=24554897-9197-4f4b-ad4f-d0769fe57b62" alt=""><figcaption></figcaption></figure>

7. Reopen Premiere and open that very same timeline

<figure><img src="https://1449894025-files.gitbook.io/~/files/v0/b/gitbook-x-prod.appspot.com/o/spaces%2FXV6dIa2ZTHDKnFjYTLCU%2Fuploads%2FGyyVMMvIN8bbDxVyHWC8%2FScreenshot%202025-09-25%20at%201.48.51%E2%80%AFPM.png?alt=media&amp;token=fd6e9122-d3c0-4906-87f6-65a04cdb6554" alt=""><figcaption></figcaption></figure>

8\. Click Open Controls again.

<figure><img src="https://1449894025-files.gitbook.io/~/files/v0/b/gitbook-x-prod.appspot.com/o/spaces%2FXV6dIa2ZTHDKnFjYTLCU%2Fuploads%2Fj3i3p88LQrmIcYN59SIj%2FScreenshot%202025-09-25%20at%201.37.16%E2%80%AFPM.png?alt=media&amp;token=010e9431-007f-43fe-a932-cf3a1abd7aef" alt=""><figcaption></figcaption></figure>

From now on the timeline should be prepared and for that timeline you won’t see “Failed to set parameters”.

If this procedure doesn't solve the issue it is most likely that the CineDream Extension for Premiere is the cause. For updating the Extension please follow the steps shown in these sections:

{% content-ref url="/pages/vbhO8C8YjZYDCiNUxgSb" %}
[Fixing Extension Issues on Adobe Premiere Pro (Windows)](/troubleshooting/fixing-extension-issues-on-adobe-premiere-pro-windows)
{% endcontent-ref %}

{% content-ref url="/pages/Xe1KC27BbHyDVO4GZUVH" %}
[Fixing Extension Issues on Adobe Premiere Pro (Mac)](/troubleshooting/fixing-extension-issues-on-adobe-premiere-pro-mac)
{% endcontent-ref %}


# Error message: Failed to add Idt effect on Adobe Premiere (Mac)

In Adobe Premiere, if you apply CineDream to a clip and get an error message that says "Failed to add Idt effect" follow these steps to solve the issue.

<figure><img src="https://1449894025-files.gitbook.io/~/files/v0/b/gitbook-x-prod.appspot.com/o/spaces%2FXV6dIa2ZTHDKnFjYTLCU%2Fuploads%2F1HVNpEx3j4CYQnv4ENOu%2Fimage.png?alt=media&amp;token=9c49d2fc-467d-4580-8960-d71e64a350b4" alt=""><figcaption></figcaption></figure>

1. Redownload CineDream installer
2. Reinstall CineDream
3. Restart your computer

Afterwards open Premiere and try applying CineDream again, it should work as expected.


# I don’t see the Open Control Button when applying CineDream to a multicam clip (Final Cut Pro)

<figure><img src="https://1449894025-files.gitbook.io/~/files/v0/b/gitbook-x-prod.appspot.com/o/spaces%2FXV6dIa2ZTHDKnFjYTLCU%2Fuploads%2FiZJEWXqkhfQh7zE55MmD%2FScreenshot%202025-09-25%20at%201.51.33%E2%80%AFPM.png?alt=media&amp;token=29bc2ae1-aced-4ba3-a672-cc5b9e11bcb0" alt=""><figcaption></figcaption></figure>

**Cause:**  CineDream is meant to be applied to regular clips, it won’t work when applied to a multicam clip.

**Solution:** Open the multicam clip and apply CineDream to the clips contained in it, then click Open Controls and grade as usual.


# Fixing Extension Issues on Adobe Premiere Pro (Mac)

Error messages like "Failed to set parameters" and "Could not connect to extension" can be solved installing a new Extension to Adobe Premiere Pro.  Watch the video for a full breakdown of the steps to follow.

{% embed url="<https://colorgradingcentral.wistia.com/medias/22k7g3stqk>" %}

1.Download and install new CEP extension

-Download and install aescripts ZXP installer:\
<https://aescripts.com/learn/post/zxp-installer?srsltid=AfmBOopUGL0lod5fJLFEiLDfWB4RZVwuQyVnr-NXHlgx7NiBxtA1MJOt>\
\
-Download new CEP extension from:\
<https://fd.cinemagrade.com/CinemaGrade/cdn/test/builds/CineDreamExtension.zxp>\
\
-Uninstall old Premiere Pro CEP extension for CineDream\
-Install newly downloaded extension

2.Test if the errors still appear

-Make sure your Adobe Creative Cloud App is updated to the latest version (6.8.0+):\
-Opening the Creative Cloud app\
-From toolbar Creative Cloud menu choose \`About Creative Cloud\`\
-Version should be 6.8.0 or later\
-Open terminal and run the following command:\
\
`defaults write com.adobe.CSXS.12 LogLevel 6`\
\
-Open Premiere Pro\
-Add CineDream effect to a clip\
-Click Open controls\
-If an error in Premiere appears (Could not connect to extension), restart Premiere and try again\
-When CineDream opens, make an adjustment and hit Apply\
-Switch to Premiere, move playhead. Note, if \`Failed to set parameters\`\
error appears -If no errors appeared in Premiere, let us know and feel free to use the\
new extension -If you need to reinstall CineDream at some point, you will need to reinstall the new extension until a new CineDream version with that extension is out\
-If you still experienced any of those errors (\\"Could not connect to extension\\" or \\"Failed to set parameters\\"), please find the log files for the extension<br>

3.Send logs if needed

-Open Finder, press cmd+shift+g\
-Type:\
\
`~/Library/Logs/CSXS`\
\
and press enter\
\
-In the folder that opens, locate the following files:\
\
CEP12-PPRO.log\
\
Any file that matches the pattern CEPHtmlEngine12-PPRO-X.X.X-io.cinedream.PProCEP.log and was modified recently\
Any that match pattern CEPHtmlEngine12-PPRO-X.X.X-io.cinedream.PProCEP-renderer.log and was modified recently\
\
For example:\
\
CEPHtmlEngine12-PPRO-25.5.0-io.cinedream.PProCEP.log\
CEPHtmlEngine12-PPRO-25.5.0-io.cinedream.PProCEP-renderer.log\
\
-Copy these files into a separate folder and compress that new folder by right-clicking and selecting \`compress\`\
-Open CineDream and attach the zip file to a support request\
-Then run the following command in terminal:\
\
`defaults write com.adobe.CSXS.12 LogLevel 1`<br>


# Fixing Extension Issues on Adobe Premiere Pro (Windows)

Error messages like "Failed to set parameters" and "Could not connect to extension" can be solved installing a new Extension to Adobe Premiere Pro.  Watch the video for a full breakdown of the steps to follow.

{% embed url="<https://colorgradingcentral.wistia.com/medias/27o5yojym5>" %}

1. Download and install new CEP extension\
   \
   \- Download and install aescripts ZXP installer:\
   <https://aescripts.com/learn/post/zxp-installer?srsltid=AfmBOopUGL0lod5fJLFEiLDfWB4RZVwuQyVnr-NXHlgx7NiBxtA1MJOt>\
   \
   \- Download new CEP extension from:\
   <https://fd.cinemagrade.com/CinemaGrade/cdn/test/builds/CineDreamExtensionWin.zxp>\
   \
   \- Open ZXP installer\
   \- Uninstall old Premiere Pro CEP extension for CineDream\
   \- If no CineDream extension shows up in ZXP installer Premiere Pro page:<br>
   * Go to C:\Program Files (x86)\Common Files\Adobe\CEP\extensions and delete any CineDream extension folder that you find there<br>
   * Do the same inside C:\Program Files\Common Files\Adobe\CEP\extensions and C:\Users\<USERNAME>\AppData\Roaming\Adobe\CEP\extensions\
     \- Install newly downloaded extension in ZXP installer\ <br>
2. Test if the errors still appear\
   \- Make sure your Adobe Creative Cloud App is updated to the latest version (6.8.0+):<br>

   * Opening the Creative Cloud app<br>
   * From toolbar Creative Cloud menu choose `About Creative Cloud`<br>
   * Version should be 6.8.0 or later (see attached screenshot)\
     \- Open command prompt and run the following command:\ <br>

   `reg add "HKCU\Software\Adobe\CSXS.12" /v LogLevel /t REG_DWORD /d 6 /f`\
   \
   \- Open Premiere Pro holding a shift key,\
   \- From the dialog select "Reset Plugin cache"\
   \- Add CineDream effect to a clip,\
   \- Click Open controls, note if an error in Premiere appears "Could not connect to extension". If so, restart Premiere and try again.\
   \- When CineDream opens, make an adjustment and hit Apply\
   \- Switch to Premiere, move playhead. Note, if `Failed to set parameters` error appears.\
   \- Close CineDream and Premiere\ <br>
3. Send logs if needed\
   \- If no errors appeared in Premiere, let us know and feel free to use the new extension. If you are forced to reinstall CineDream, you will need to reinstall the new extension until a new CineDream version with that extension is out.\
   \- If you still experienced any of those errors ("Could not connect to extension" or "Failed to set parameters"), please find the log files for the extension.\
   \- Open Explorer and navigate to C:\Users\<USERNAME>\AppData\Local\Temp\
   \- In the folder that opens, locate the following files:<br>
   * CEP12-PPRO.log<br>
   * Any file that matches the pattern CEPHtmlEngine12-PPRO-X.X.X-io.cinedream.PProCEP.log and was modified recently<br>
   * Any that match pattern CEPHtmlEngine12-PPRO-X.X.X-io.cinedream.PProCEP-renderer.log and was modified recently<br>
   * For example:\
     CEPHtmlEngine12-PPRO-25.5.0-io.cinedream.PProCEP.log\
     CEPHtmlEngine12-PPRO-25.5.0-io.cinedream.PProCEP-renderer.log\
     \- Copy these files into a separate folder and compress that new folder by right-clicking and selecting `compress to... > zip file`\
     \- Open CineDream and attach the zip file to a support request\
     \
     Wrap up - Run the following command in the command prompt:\
     \
     `reg add "HKCU\Software\Adobe\CSXS.12" /v LogLevel /t REG_DWORD /d 1 /f`\
     \
     (that final command is important to save disk space and avoid excessive Premiere logging in the future)


# FCP 12: CineDream missing from Effects Panel

If the CineDream Effect is missing from the Effects Panel, go to the Search Bar at the bottom of the panel, open the dropdown menu, and make sure both "4K" and "HDR" are unchecked.

<figure><img src="https://1449894025-files.gitbook.io/~/files/v0/b/gitbook-x-prod.appspot.com/o/spaces%2FXV6dIa2ZTHDKnFjYTLCU%2Fuploads%2FDRrujMcDMq26vvCMpOym%2FScreenshot%202026-02-12%20at%208.51.15%E2%80%AFAM.png?alt=media&amp;token=46584e40-3a39-4cf4-8451-86aaee2726a3" alt=""><figcaption></figcaption></figure>

After that, CineDream and all your plugins will show up as usual.


# How to cancel subscription

To cancel your subscription access the License Manager following the steps described in the License Manager & Downloads section or go to <https://lm.cinedream.io> and follow the instructions.

Once inside the License Manager go to the "Your Licenses section" and click on "Manage Subscription".

<figure><img src="https://1449894025-files.gitbook.io/~/files/v0/b/gitbook-x-prod.appspot.com/o/spaces%2FXV6dIa2ZTHDKnFjYTLCU%2Fuploads%2FiDKUGT2v25GaiUURmgvo%2Fpurchase.00_02_13_12.Still008%20copy.png?alt=media&amp;token=b682a644-e2ca-452d-8f3a-111fb548c433" alt=""><figcaption></figcaption></figure>

You will be taken to a SendOwl page asking you to claim an account.

<figure><img src="https://1449894025-files.gitbook.io/~/files/v0/b/gitbook-x-prod.appspot.com/o/spaces%2FXV6dIa2ZTHDKnFjYTLCU%2Fuploads%2FqC8mCfa4MImQww2AEFXa%2Fpurchase.00_02_20_23.Still021.png?alt=media&amp;token=6ef1e616-00bf-4ebe-8bb3-747e23cd4c5f" alt=""><figcaption></figcaption></figure>

You’ll get a SendOwl email to set up the account.

<figure><img src="https://1449894025-files.gitbook.io/~/files/v0/b/gitbook-x-prod.appspot.com/o/spaces%2FXV6dIa2ZTHDKnFjYTLCU%2Fuploads%2FeNeq5G5fD1HHEo4S19Pz%2Fpurchase.00_02_37_07.Still011.png?alt=media&amp;token=b720a869-3e18-4244-8b8c-631a58b2d9e8" alt=""><figcaption></figcaption></figure>

<figure><img src="https://1449894025-files.gitbook.io/~/files/v0/b/gitbook-x-prod.appspot.com/o/spaces%2FXV6dIa2ZTHDKnFjYTLCU%2Fuploads%2Fnee8VWFbCdHdGzw7tyuS%2Fpurchase.00_02_42_19.Still012.png?alt=media&amp;token=c712d234-9e7a-4e8c-8668-d3c02168eab7" alt=""><figcaption></figcaption></figure>

After setting it up, go back to the License Manager and click the Manage Subscription button.

<figure><img src="https://1449894025-files.gitbook.io/~/files/v0/b/gitbook-x-prod.appspot.com/o/spaces%2FXV6dIa2ZTHDKnFjYTLCU%2Fuploads%2FW7lm6MgF9wfgoSzGd8SG%2Fpurchase.00_05_11_00.Still022.png?alt=media&amp;token=3c3ae5e5-bf89-4c6c-bbbf-58b6544a0ce4" alt=""><figcaption></figcaption></figure>

From the Edit subscription panel you can renew or cancel your subscription. In case you choose to cancel, it will remain active until the end of the current payment period.


# Release Notes

Here you'll find Release Notes for all Mac and Windows updates for CineDream.

{% content-ref url="/pages/i7KSjntOeQpbNOuRqW5J" %}
[Release Notes Mac](/release-notes/release-notes-mac)
{% endcontent-ref %}

{% content-ref url="/pages/sIcaChOJhyGJRKPrIva2" %}
[Release Notes Windows](/release-notes/release-notes-windows)
{% endcontent-ref %}


# Release Notes Mac

### 2026-9-1

#### Version 1.1.13 Build 554

```
## Performance and stability

### New features

- CineDream can be installed in a multi-user environment on MacOS

### Fixes

- Drag and drop of an image or project file into an empty window is working correctly
- Open image inside CineDream context menu option is working correctly
- Send to Photoshop works correctly on the Mac
- After Effects plugins can properly sample when the footage is different resolution than the composition
- Resolve hue and film density OSC sliders initialize at proper values and respect slide bounds
- CineDream no longer falls inside the endless loop when an unreachable frame is being fetched

### Improvements

- Significantly improved GPU performance in Editor and in plugins
- More flexible and stringent GPU memory management in NLEs
```

### 2026-8-18

#### Version 1.1.12 Build 544

<pre><code><strong>## Adobe plugins and stability
</strong>
### New features

- Base Correction and Final Grading plugins for Adobe Premiere Pro and Adobe After Effects
- New presentation of vector and density tools in Final Cut Pro plugins

### Fixes and improvements

- Significant reduction of GPU memory use in plugins and in CineDream
- Optimization of rendering speed and memory management
- HMS Saturation sliders work properly over 100 on the Mac and in GPU renders
- Added Pass Through mode to FCP and Adobe plugins
- Full Resolution mode can be enabled
- Vertical scrolling in CineDream for effect panels works without issues
- Small fixes for better stability
</code></pre>

### 2026-7-28

#### Version 1.1.11 Build 537

```
## Stability update

### New features
- New input profiles for JVC, GoPro and DJI cameras

### Important fixes and improvements
- Sending customer support feedback should no longer report SSL errors
- Grain rendering on Metal should be significantly faster
- GPU memory should be better managed inside NLEs
- Rendering or running out of GPU memory should no longer cause NLE to hang
- FCP should no longer show red overlay on Intel/AMD GPUs
```

### 2026-6-17

#### Version 1.1.10 Build 525

```
## New FCP plugins and bug fixes

### New features

- New FCP plugins: Base Correction and Final Grading

### Important fixes and improvements

- Ranges preview no longer shows cyan colors when values are below 0
- [Editor] Grading on scopes is working correctly
- [Editor] Fixed HMS and 5-way range previews and sampling
- [Resolve] Vectors and Density tools - color components are now properly assigned
```

### 2026-5-29

#### Version 1.1.9 Build 505

```
## Stability and feature updates

New features:

- Area auto-white balance tool
- New tutorials for Resolve users

Important fixes and improvements:

- Video tutorials should play back without issues
```

### 2026-4-23

#### Version 1.1.8 Build 502

```
## Stability and feature updates

New features:

- Additional layouts of detached scopes
- Additional overlays in Editor

Important fixes and improvements:

- Resolve plugins properly record and render keyframes
```

### 2026-4-20

#### Version 1.1.7 Build 496

```
## New DaVinci Resolve plugins

New features:

- Beta version of DaVinci Resolve Base Correction and Final Grading plugins

Important fixes and improvements:

- Helper Service is no longer a permanently running service on the Mac
- Connection with the service is more stable and self-healing
- Fixes to occasional crashes connected to session closing or switching
- Photoshop absence is properly detected by CineDream Editor
```

### 2026-3-19

#### Version 1.1.6 Build 470

```
## Stability and bug fixes

New features:

- Film strip can be pinned
- Full resolution is enabled for NLE sessions
- Added full resolution button in the Grain section
- Ability to export internal grading LUTs
- Tutorials for exporting internal grading LUTs

Important fixes and improvements:

- Offset wheel behavior as a global tool
- Better stability of internal LUT storage
- Better stability during session opening, closing, and switching
- Proper mixing of Cube LUTs with a Shaper component
```

### 2026-3-5

#### Version 1.1.5 Build 459

```
## Stability and bug fixes

Notable fixes:

- Adobe Media Encoder no longer interferes with CineDream communication with Adobe Premiere Pro
- CineDream Premiere Pro extension no longer interferes with Cinema Grade extension
- Exporting an image from CineDream no longer causes NLE to crash

Improvements:

- It's possible to recover auto-saved NLE session even if the NLE is not running
- Improved image relinking
- Improvements to image exporting
- Improved licensing handling
- Improved rendering performance inside CineDream when dragging sliders and wheels
- Close session dialog has closing project name in the title
- Added recent projects list to the new session dialog

If you're updating from 1.1.3, also:
## Stability and bug fixes

Important fixes:

- Improved rendering speed and stability
- Fixed regression on missing grading LUTs after reinstall
- Fixed a crash on the Mac in Lut Gallery when interacting with search boxes
- Fixed occasional crashes related to connectivity and cache usage
```

If you're updating from 1.1.3, also:

```
## Stability and bug fixes

Important fixes:

- Improved rendering speed and stability
- Fixed regression on missing grading LUTs after reinstall
- Fixed a crash on the Mac in Lut Gallery when interacting with search boxes
- Fixed occasional crashes related to connectivity and cache usage
```

### 2026-2-3

#### Version 1.1.3 Build 430

```
## Stability and bug fixes

New features:

- Video tutorials for matching CineDream color viewer with your NLE and overall workflows
- Added input color profile for Zcam ZLog2

Notable fixes:

- Improved LUT retrieval on the Mac (should no longer be subject to security policies or software)
- Adobe Media Encoder no longer interferes with CineDream communication with Adobe Premiere Pro
- CineDream Premiere Pro extension no longer interferes with Cinema Grade extension
- Exporting an image from CineDream no longer causes NLE to crash
- Photoshop layers inside groups are properly sent to CineDream
- Refreshing frame in Resolve will nolonger lose active image
- Exporting large images no longer show stitching when bloom is enabled

Improvements:

- Improved CineDream UI rendering performance
- Improved plugin communication
- Improved image relinking
- Improvements to image exporting
- Improved licensing handling
- It's possible to recover auto-saved NLE session even if the NLE is not running
- Close session dialog has closing project name in the title
- Added recent projects list to the new session dialog
```

### 2025-10-27

#### Version 1.1.0 Build 370

<pre><code><a data-footnote-ref href="#user-content-fn-1">#</a># Major update - breaks backwards compatibility with 1.0

**This update will make it impossible to roll-back to 1.0.x without removing preferences and for projects saved using 1.1.x**

**You might experience slight shifts in colors for older projects if you used:**

- **Internal grading LUTs**
- **Bloom on Windows**

**Old installer versions are always available through License Manager.**

New features:

- Demo mode for unlicensed installs
- Additional 34 internal grading LUTs
- Additional Input Color Profile LUTs
- Additional navigation shortcuts
- Shortcuts for CineDream Emulations
- Ability to reset preferences

Fixes:

- Bloom algorithm on Windows is the same as on the Mac
- Resolve shared nodes and group-level nodes are now properly stored
- Updated Rec709 Input Color Profile to account for tinted highlights
- Updated Premiere CEP extension should address Failed to set parameters issue
- Updated Inter-Process Communication should address Failed to Fetch issues and improve performance
- Pinned panels status is preserved throughout sessions and after restart
- Several low-key UI improvements
</code></pre>

### 2025-9-30

#### Version 1.0.2 Build 353

```
## Important NLE fixes

- Premiere projects are no longer subject to Failed to set parameters issue
- CineDream works inside FCP X multicam and compound clips (with caveats)
- FCP X projects no longer show invalid plugin instances
- Proper context menu shows for custom presets
- Group filtering in shot matching page is working
- Changing session gamma does not require CineDream restart to take effect
- Better connectivity with Helper service and NLE hosts
```

### 2025-9-23 <a href="#id-2025-09-23" id="id-2025-09-23"></a>

#### Version 1.0.1 Build 347  <a href="#id-2025-09-23" id="id-2025-09-23"></a>

```
## Major stability improvements

**System reboot strongly suggested after install!**

## Fixes

- Images are properly retrieved from Resolve
- Crashes on closing or opening CineDream when Helper service was not running
- Crashes on app close when lut gallery was open
- Closing and opening a session no longer shows previous session thumbnails
- Scrolling experience is more consistent
- LUTs parse and import properly
- FujiFilm Flat profile renders correctly
- License Manager URLs lead to license manager website
```

[^1]:


# Release Notes Windows

### 2026-9-1

#### Version 1.1.13 Build 256

```
## Performance and stability

### Fixes

- Drag and drop of an image or project file into an empty window is working correctly
- Open image inside CineDream context menu option is working correctly
- After Effects plugins can properly sample when the footage is different resolution than the composition
- Resolve hue and film density OSC sliders initialize at proper values and respect slide bounds
- CineDream no longer falls inside the endless loop when an unreachable frame is being fetched

### Improvements

- Significantly improved GPU performance in Editor and in plugins
- More flexible and stringent GPU memory management in NLEs
```

### 2026-8-18

#### Version 1.1.12 Build 252

```
## Adobe plugins and stability

### New features

- Base Correction and Final Grading plugins for Adobe Premiere Pro and Adobe After Effects

### Fixes and improvements

- Significant reduction of GPU memory use in plugins and in CineDream
- Optimization of rendering speed and memory management
- HMS Saturation sliders work properly over 100 on the Mac and in GPU renders
- Added Pass Through mode to FCP and Adobe plugins
- Full Resolution mode can be enabled
- Vertical scrolling in CineDream for effect panels works without issues
- Small fixes for better stability
```

### 2026-7-28

#### Version 1.1.11 Build 244

```
## Stability update

### New features
- New input profiles for JVC, GoPro and DJI cameras

### Important fixes and improvements
- GPU memory should be better managed inside NLEs
- Rendering or running out of GPU memory should no longer cause NLE to hang
```

### 2026-6-17

#### Version 1.1.10 Build 237

```
## Bug fixing update

### Important fixes and improvements

- [Editor] Grading on scopes is working correctly
- [Editor] Fixed HMS and 5-way range previews and sampling
- [Resolve] Vectors and Density tools - color components are now properly assigned
```

### 2026-5-29

#### Version 1.1.9 Build 234

```
## Stability and feature updates

New features:

- Area auto-white balance tool
- New tutorials for Resolve users

Important fixes and improvements:

- Video tutorials should play back without issues
```

### 2026-4-23

#### Version 1.1.8 Build 229

```
## Stability and feature updates

New features:

- Additional layouts of detached scopes
- Additional overlays in Editor

Important fixes and improvements:

- Resolve plugins properly record and render keyframes
- Reduced plugin size on Windows
```

### 2026-4-20

#### Version 1.1.7 Build 224

```
## New DaVinci Resolve plugins

New features:

- Beta version of DaVinci Resolve Base Correction and Final Grading plugins

Important fixes and improvements:

- Helper Service is no longer a permanently running service on the Mac
- Connection with the service is more stable and self-healing
- Fixes to occasional crashes connected to session closing or switching
- Photoshop absence is properly detected by CineDream Editor
```

### 2026-3-19

#### Version 1.1.6 Build 205

```
## Stability and bug fixes

New features:

- Film strip can be pinned
- Full resolution is enabled for NLE sessions
- Added full resolution button in the Grain section
- Ability to export internal grading LUTs
- Tutorials for exporting internal grading LUTs
- Improved performance for LUT and texture exchange on Windows

Important fixes and improvements:

- Offset wheel behavior as a global tool
- Better stability of internal LUT storage
- Better stability during session opening, closing, and switching
- Proper mixing of Cube LUTs with a Shaper component
- Windows file path handling for non-Western alphabets that prevented LUT fetching
- Faster rendering of LUT gallery thumbnails on Windows
```

### 2026-3-5

#### Version 1.1.5 Build 199

```
New features:

- Additional sampling point before HSL tool
- Sampling buffer preview for the current tool (hold Z key when a tool is selected)
- Updated DJI D-Log M Input Color Profile
- Added GoPro GP-Log Input Color Profile

Important fixes:

- Improved stability and performance of OpenCL rendering
- Improved stability and performance of session opening and switching
- Improved stability and performance of image fetching from NLEs
- Improved stability and performance of project refresh from NLEs
- Fixed a bug in LUT fetching
- Overall UI performance and stability improvements
```

If you're updating from 1.1.3 also:

```
## Stability and bug fixes

Important fixes:

- Improved rendering speed and stability - on some machines we noted significant performance boost
- Premiere Pro extension will properly install when only Premiere Pro 2026 is installed
- Fixed occasional crashes related to connectivity and cache usage
- Fixed a crash on startup related to enumerating DirectX adapters
```

### 2026-2-3

#### Version 1.1.3 Build 178

```
## Stability and bug fixes

New features:

- Video tutorials for matching CineDream color viewer with your NLE and overall workflows
- Added input color profile for Zcam ZLog2

Notable fixes:

- Improved LUT retrieval on the Mac (should no longer be subject to security policies or software)
- Adobe Media Encoder no longer interferes with CineDream communication with Adobe Premiere Pro
- CineDream Premiere Pro extension no longer interferes with Cinema Grade extension
- Exporting an image from CineDream no longer causes NLE to crash
- Photoshop layers inside groups are properly sent to CineDream
- Refreshing frame in Resolve will nolonger lose active image
- Exporting large images no longer show stitching when bloom is enabled

Improvements:

- Improved CineDream UI rendering performance
- Improved plugin communication
- Improved image relinking
- Improvements to image exporting
- Improved licensing handling
- It's possible to recover auto-saved NLE session even if the NLE is not running
- Close session dialog has closing project name in the title
- Added recent projects list to the new session dialog
```

### 2025-10-27

#### Version 1.1.0 Build 142

```
## Major update - breaks backwards compatibility with 1.0

**This update will make it impossible to roll-back to 1.0.x without removing preferences and for projects saved using 1.1.x**

**You might experience slight shifts in colors for older projects if you used:**

- **Internal grading LUTs**
- **Bloom on Windows**

**Old installer versions are always available through License Manager.**

New features:

- Demo mode for unlicensed installs
- Additional 34 internal grading LUTs
- Additional Input Color Profile LUTs
- Additional navigation shortcuts
- Shortcuts for CineDream Emulations
- Ability to reset preferences

Fixes:

- Bloom algorithm on Windows is the same as on the Mac
- Resolve shared nodes and group-level nodes are now properly stored
- Updated Rec709 Input Color Profile to account for tinted highlights
- Updated Premiere CEP extension should address Failed to set parameters issue
- Updated Inter-Process Communication should address Failed to Fetch issues and improve performance
- Pinned panels status is preserved throughout sessions and after restart
- Several low-key UI improvements
```

### 2025-9-30

#### Version 1.0.2 Build 121

```
## Important NLE fixes

- Premiere projects are no longer subject to Failed to set parameters issue
- Fuji Film F-Log 2 input color profile works on Windows
- Proper context menu shows for custom presets
- Group filtering in shot matching page is working
- Changing session gamma does not require CineDream restart to take effect
- Better connectivity with Helper service and NLE hosts
```

### 2025-9-23

#### Version 1.0.1 Build 115

```
## Major stability improvements

**System reboot strongly suggested after install!**

## Fixes

- Images are properly retrieved from Resolve
- Crashes on closing or opening CineDream when Helper service was not running
- Crashes on app close when lut gallery was open
- Closing and opening a session no longer shows previous session thumbnails
- Scrolling experience is more consistent
- LUTs parse and import properly
- FujiFilm Flat profile renders correctly
- License Manager URLs lead to license manager website
```